Scalar Media Reference Options
1 2015-05-15T18:11:26-07:00 Curtis Fletcher 3225f3b99ebb95ebd811595627293f68f680673e 3296 1 plain 2015-05-15T18:11:26-07:00 Curtis Fletcher 3225f3b99ebb95ebd811595627293f68f680673eThis page is referenced by:
-
1
2015-08-07T21:08:56-07:00
New Focus on Media
19
Scalar 2.0: What's New
plain
2015-08-10T23:13:50-07:00
Scalar 2 gives authors more options when adding media to pages in their projects. The "media views" (i.e. "Text emphasis," "Media emphasis," etc...) featured in the old interface have been replaced with more granular options for authors to choose from when displaying media. What's more, these options, unlike in the old interface, can also be applied to inline media.
Authors now have the following choices when adding individual media objects to a page:
They can choose the size of the object to be displayed. Choices include “Small” (206px wide), “Medium” (412px wide), “Large” (620px wide), “Full” (maximum width of the page, great for adding visual impact), and “Native” (the original size of the media, up to the maximum width of the page).
They can choose how they want the media object aligned on the page. Choices include "Left" (aligned left), "Center" (aligned center), and "Right" (aligned right).
Finally, authors can dictate what they'd like to appear in the caption just below the media object. Choices include "Description" (only the description for the media object will be displayed), "Title" (only the title of the media object will be displayed), "Title and description" (the title and description for the media object will be displayed), and "None" (neither title nor description will be displayed).
Details and Citations View
Scalar 2 was engineered to better foreground information about media objects and their use. Rolling over media now reveals a series of tabs, among them "Details" and "Citations." Clicking on "Details" reveals all metadata associated with the object, and from there, access to its metadata in raw formats like RDF-XML and RDF-JSON, or in an HTML table. Clicking on "Citations" opens an expanded view of the media. This "Citations" view acts as kind of contextual hub for individual media objects. All annotations of the media are available, along with excerpted paragraphs that cite the media throughout the book. If the "Details" tab gives readers a more granular sense of the metadata associated with a given media object (often imported directly from a curatorial context) the "Citations" view gives readers the fullest sense of how that media object is then put to use by the author or authors of a Scalar project.
-
1
2014-10-01T16:38:33-07:00
QuickStart: Adding media to a page
19
How to add media links to a Scalar page.
plain
2015-05-29T14:50:53-07:00
These steps will add a media link to a page; the placement and size of the resulting media player depends in part on the page's default view. To insert media at a specific position on the page, see Adding inline media to a page. Note that before adding media to a page you will need to have already imported the media into Scalar.
- Sign in to your Scalar account.
- Click
 in your Scalar header bar to create a new page, or navigate to an existing page and click
  to edit that page.
 - Select the text you want to link to the media.
- Click
 and select the media you want to link.
 - Using the media reference options select the following display preferences:
- Size. Choices include “Small” (206px wide), “Medium” (412px wide), “Large” (620px wide), “Full” (maximum wide of the page), and “Native” (the original size of the media up to the maximum width of the page).
- Alignment. Choices include "Left" (aligned left), "Center" (aligned center), and "Right" (aligned right).
- Caption. Choices include "Description" (the description for the media object will be displayed), "Title" (the title of the media object will be displayed), "Title and description" (the title and description for the media object will be displayed), and "None" (neither title nor description will be displayed).
- Next to "Default layout," select the layout you want for this page (only Basic, Image Header and Google Maps views support linked media).
- Click "Save."
For more details, see Adding Media and Links.
-
1
2016-06-04T13:38:37-07:00
Adding Media and Annotations [DRAFT]
14
plain
2016-06-04T17:39:42-07:00
This section describes functionality in Scalar's page editor, which is accessed by clicking the
icon (if creating new content) or the icon (if editing existing content) in your Scalar header bar. Adding media to your page is done through links in the page editor.
Adding Media Links
--by selecting a relevant bit of text and then linking it to the media you want to reference. When Scalar shows the page, it finds all of these links and turns them into media players. Because the media is referenced indirectly through links instead of directly through the kind of embed code you would use to add a YouTube video to a blog, Scalar is free to change the layout of the text and media on the fly, making your content much more flexible.
You can add media links to your content by selecting the text you want to link and then using the first blue media button seen at the top of the text editor in its Visual mode. This will insert a link to a media file that's already been imported into Scalar. This kind of link allows maximum flexibility in the layout of your text and media--Scalar can rearrange them as needed depending on the current view.Adding Inline Media
If, however, you want to embed your media in the page at a specific location in the more traditional style, you can use the second blue media button . This will iInsert an inline reference to a Scalar media file that will be embedded in the page at the selected location.
Formatting Media
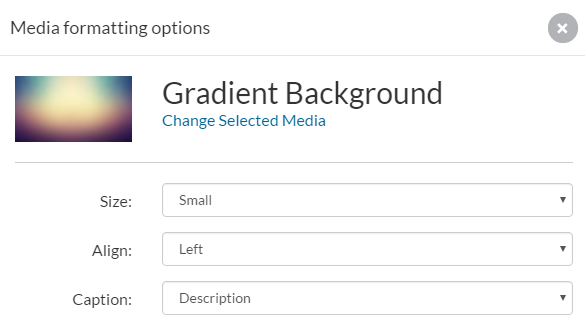
Once you've selected the media you'd like to insert, whether as a media link or as inline media, you'll be promted to choose your formatting options. Using the media reference options select the following display preferences:- Size. Choices include “Small” (206px wide), “Medium” (412px wide), “Large” (620px wide), “Full” (maximum wide of the page), and “Native” (the original size of the media up to the maximum width of the page).
- Alignment. Choices include "Left" (aligned left), "Center" (aligned center), and "Right" (aligned right).
- Caption. Choices include "Description" (the description for the media object will be displayed), "Title" (the title of the media object will be displayed), "Title and description" (the title and description for the media object will be displayed), and "None" (neither title nor description will be displayed).
Adding Annotated Media
If the media you've selected has been annotated, the media reference options described above will be expanded to include options for displaying those annotations. First, select which annotations you'd like to display; second select which of those annotations you'd like to be featured.Reformatting Media
-
1
2014-10-01T16:38:33-07:00
QuickStart: Adding inline media to a page
10
How to embed media directly into a Scalar page.
plain
2015-05-29T14:55:18-07:00
Following these steps will embed a media player in a page at a specific point. To insert a media link instead (less precise, but more flexible in that the default view for the page helps determine the placement and size of the resulting media player), see Adding media to a page. Note that before adding media to a page you will need to have already imported the media into Scalar.
- Sign in to your Scalar account.
- Click in your Scalar header bar to create a new page, or navigate to an existing page and click to edit that page.
- Place the insertion point at the point in the page where you want to embed the media.
- Click and select the media you want to embed.
- Using the media reference options select the following display preferences:
- Size. Choices include “Small” (206px wide), “Medium” (412px wide), “Large” (620px wide), “Full” (maximum wide of the page), and “Native” (the original size of the media up to the maximum width of the page).
- Alignment. Choices include "Left" (aligned left), "Center" (aligned center), and "Right" (aligned right).
- Caption. Choices include "Description" (the description for the media object will be displayed), "Title" (the title of the media object will be displayed), "Title and description" (the title and description for the media object will be displayed), and "None" (neither title nor description will be displayed).
- Click "Save."
For more details, see Adding Media and Links.
-
1
2014-10-01T16:38:33-07:00
QuickStart: Adding inline annotated media to a page
8
plain
2015-05-29T14:56:24-07:00
These steps will embed a media player cued to an annotation in a page at a specific point. To insert a annotation link instead (less precise, but more flexible in that the default view for the page helps determine the placement and size of the resulting media player), see Adding annotated media to a page. Note that before adding an annotation to a page you will need to have already created the annotation in Scalar.
- Sign in to your Scalar account.
- Click in your Scalar header bar to create a new page, or navigate to an existing page and click to edit that page.
- Place the insertion point at the point in the page where you want to embed the annotated media.
- Click
 and select the annotation you want to embed.
 - Using the media reference options select the following display preferences:
- Size. Choices include “Small” (206px wide), “Medium” (412px wide), “Large” (620px wide), “Full” (maximum wide of the page), and “Native” (the original size of the media up to the maximum width of the page).
- Alignment. Choices include "Left" (aligned left), "Center" (aligned center), and "Right" (aligned right).
- Caption. Choices include "Description" (the description for the media object will be displayed), "Title" (the title of the media object will be displayed), "Title and description" (the title and description for the media object will be displayed), and "None" (neither title nor description will be displayed).
- Click "Save."
For more details, see Adding Media and Links.
-
1
2014-10-01T16:38:33-07:00
QuickStart: Adding annotated media to a page
8
How to add an annotated media file to a Scalar page.
plain
2015-05-29T14:53:23-07:00
These steps will add an annotation link to a page which will cue up its related content; the placement and size of the resulting media player depends in part on the page's default view. To insert annotated media at a specific position on the page, see Adding inline annotated media to a page. Note that before adding an annotation to a page you will need to have already created the annotation in Scalar.
- Sign in to your Scalar account.
- Click in your Scalar header bar to create a new page, or navigate to an existing page and click to edit that page.
- Select the text you want to link to the annotation.
- Click
 and select the annotation you want to link.
 - Using the media reference options select the following display preferences:
- Size. Choices include “Small” (206px wide), “Medium” (412px wide), “Large” (620px wide), “Full” (maximum wide of the page), and “Native” (the original size of the media up to the maximum width of the page).
- Alignment. Choices include "Left" (aligned left), "Center" (aligned center), and "Right" (aligned right).
- Caption. Choices include "Description" (the description for the media object will be displayed), "Title" (the title of the media object will be displayed), "Title and description" (the title and description for the media object will be displayed), and "None" (neither title nor description will be displayed).
- Next to "Default layout," select the layout you want for this page (only Basic, Image Header and Google Maps views support linked media).
- Click "Save."
For more details, see Adding Media and Links.