Annotating a Unity Scene
1 2022-04-29T09:49:02-07:00 Erik Loyer f862727c4b34febd6a0341bffd27f168a35aa637 3296 8 How to annotate a Unity scene in Scalar. plain 2023-02-09T08:49:42-08:00 Erik Loyer f862727c4b34febd6a0341bffd27f168a35aa637Page
| resource | rdf:resource | https://scalar.usc.edu/works/guide2/annotating-a-unity-scene |
| type | rdf:type | http://scalar.usc.edu/2012/01/scalar-ns#Composite |
| is live | scalar:isLive | 1 |
| was attributed to | prov:wasAttributedTo | https://scalar.usc.edu/works/guide2/users/379 |
| created | dcterms:created | 2022-04-29T09:49:02-07:00 |
Version 8
| resource | rdf:resource | https://scalar.usc.edu/works/guide2/annotating-a-unity-scene.8 |
| versionnumber | ov:versionnumber | 8 |
| title | dcterms:title | Annotating a Unity Scene |
| description | dcterms:description | How to annotate a Unity scene in Scalar. |
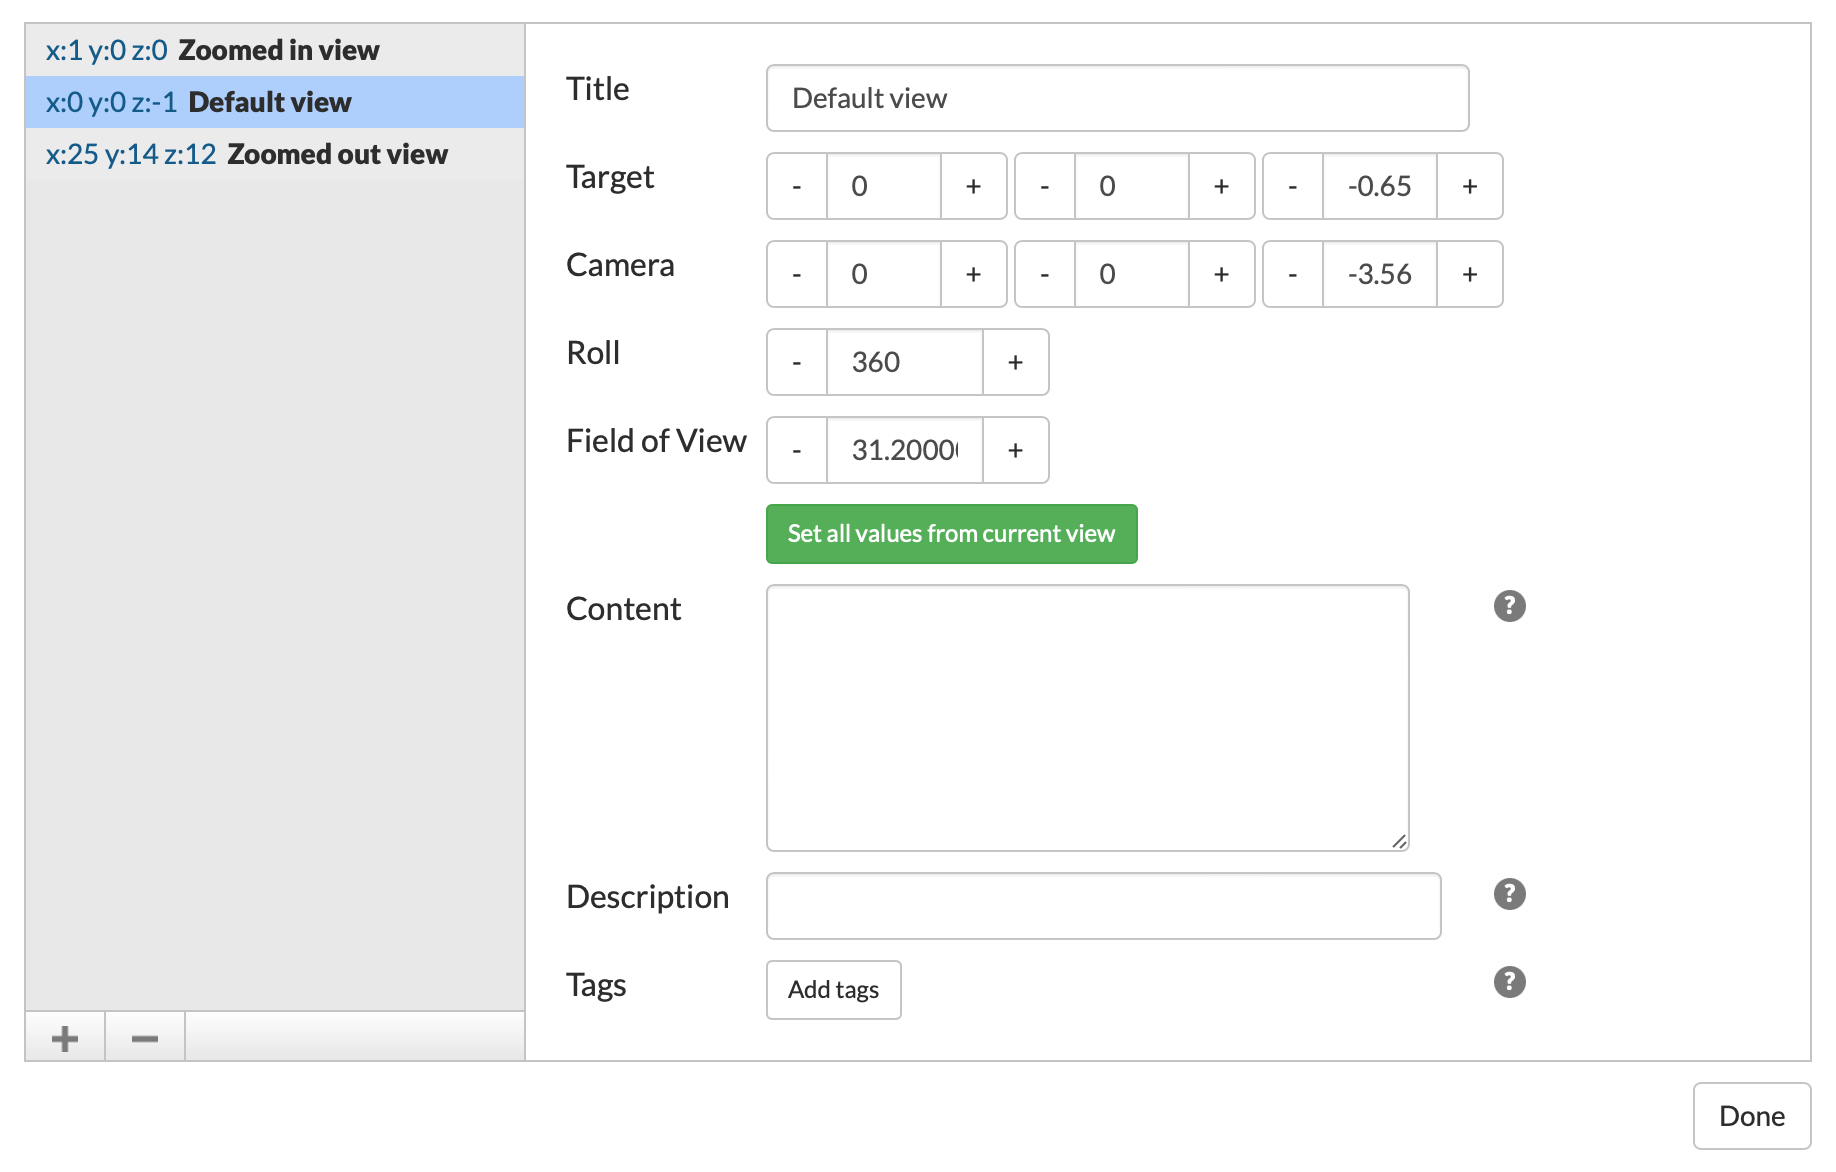
| content | sioc:content | In order for a Unity scene to be annotatable in Scalar, it must include the Scalar/Unity Bridge. Learn more about using Unity content in Scalar. To create 3D annotations on a Unity scene in Scalar, navigate to the scene in your project and click the click the annotation icon (paperclip) in the header bar. This will launch the annotation editor. Once in the editor:
Additionally, you can click any annotation in the annotation list on the left to select it. Selected annotations can be edited using the provided form, or deleted by clicking the minus button. When you're done editing annotations for the file, click "Done" to return to the page for the media file. |
| default view | scalar:defaultView | plain |
| was attributed to | prov:wasAttributedTo | https://scalar.usc.edu/works/guide2/users/379 |
| created | dcterms:created | 2023-02-09T08:49:42-08:00 |
| type | rdf:type | http://scalar.usc.edu/2012/01/scalar-ns#Version |
Version 7
| resource | rdf:resource | https://scalar.usc.edu/works/guide2/annotating-a-unity-scene.7 |
| versionnumber | ov:versionnumber | 7 |
| title | dcterms:title | Annotating a Unity Scene |
| description | dcterms:description | How to annotate a Unity scene in Scalar. |
| content | sioc:content | In order for a Unity scene to be annotatable in Scalar, it must include the Scalar/Unity Bridge. Learn more about using Unity content in Scalar. To create 3D annotations on a Unity scene in Scalar, navigate to the scene in your project and click the click the annotation icon (paperclip) in the header bar. This will launch the annotation editor. Once in the editor:
Additionally, you can click any annotation in the annotation list on the left to select it. Selected annotations can be edited using the provided form, or deleted by clicking the minus button. When you're done editing annotations for the file, click "Done" to return to the page for the media file. |
| default view | scalar:defaultView | plain |
| was attributed to | prov:wasAttributedTo | https://scalar.usc.edu/works/guide2/users/379 |
| created | dcterms:created | 2023-02-09T08:48:39-08:00 |
| type | rdf:type | http://scalar.usc.edu/2012/01/scalar-ns#Version |
Version 6
| resource | rdf:resource | https://scalar.usc.edu/works/guide2/annotating-a-unity-scene.6 |
| versionnumber | ov:versionnumber | 6 |
| title | dcterms:title | Annotating a Unity Scene |
| content | sioc:content | In order for a Unity scene to be annotatable in Scalar, it must include the Scalar/Unity Bridge. Learn more about using Unity content in Scalar. To create 3D annotations on a Unity scene in Scalar, navigate to the scene in your project and click the click the annotation icon (paperclip) in the header bar. This will launch the annotation editor. Once in the editor:
Additionally, you can click any annotation in the annotation list on the left to select it. Selected annotations can be edited using the provided form, or deleted by clicking the minus button. When you're done editing annotations for the file, click "Done" to return to the page for the media file. |
| default view | scalar:defaultView | plain |
| was attributed to | prov:wasAttributedTo | https://scalar.usc.edu/works/guide2/users/379 |
| created | dcterms:created | 2022-04-29T09:58:06-07:00 |
| type | rdf:type | http://scalar.usc.edu/2012/01/scalar-ns#Version |
Version 5
| resource | rdf:resource | https://scalar.usc.edu/works/guide2/annotating-a-unity-scene.5 |
| versionnumber | ov:versionnumber | 5 |
| title | dcterms:title | Annotating a Unity Scene |
| content | sioc:content | In order for a Unity Scene to be annotatable in Scalar, it must include the Scalar/Unity Bridge. Learn more about using Unity content in Scalar. To create 3D annotations on a Unity scene in Scalar, navigate to the scene in your project and click the click the annotation icon (paperclip) in the header bar. This will launch the annotation editor. Once in the editor:
Additionally, you can click any annotation in the annotation list on the left to select it. Selected annotations can be edited using the provided form, or deleted by clicking the minus button. When you're done editing annotations for the file, click "Done" to return to the page for the media file. |
| default view | scalar:defaultView | plain |
| was attributed to | prov:wasAttributedTo | https://scalar.usc.edu/works/guide2/users/379 |
| created | dcterms:created | 2022-04-29T09:56:15-07:00 |
| type | rdf:type | http://scalar.usc.edu/2012/01/scalar-ns#Version |
Version 4
| resource | rdf:resource | https://scalar.usc.edu/works/guide2/annotating-a-unity-scene.4 |
| versionnumber | ov:versionnumber | 4 |
| title | dcterms:title | Annotating a Unity Scene |
| content | sioc:content | In order for a Unity Scene to be annotatable in Scalar, it must include the Scalar/Unity Bridge. Learn more about using Unity content in Scalar. To create 3D annotations on a Unity scene in Scalar, navigate to the scene in your project and click the click the annotation icon (paperclip) in the header bar. This will launch the annotation editor. Once in the editor:
Additionally, you can click any annotation in the annotation list on the left to select it. Selected annotations can be edited using the provided form, or deleted by clicking the minus button. When you're done editing annotations for the file, click "Done" to return to the page for the media file. |
| default view | scalar:defaultView | plain |
| was attributed to | prov:wasAttributedTo | https://scalar.usc.edu/works/guide2/users/379 |
| created | dcterms:created | 2022-04-29T09:55:29-07:00 |
| type | rdf:type | http://scalar.usc.edu/2012/01/scalar-ns#Version |
Version 3
| resource | rdf:resource | https://scalar.usc.edu/works/guide2/annotating-a-unity-scene.3 |
| versionnumber | ov:versionnumber | 3 |
| title | dcterms:title | Annotating a Unity Scene |
| content | sioc:content | In order for a Unity Scene to be annotatable in Scalar, it must include the Scalar/Unity Bridge. Learn more about using Unity content in Scalar. To create 3D annotations on a Unity scene in Scalar, navigate to the scene in your project and click the click the annotation icon (paperclip) in the header bar. This will launch the annotation editor. Once in the editor:
Additionally, you can click any annotation in the annotation list on the left to select it. Selected annotations can be edited using the provided form, or deleted by clicking the minus button. When you're done editing annotations for the file, click "Done" to return to the page for the media file. |
| default view | scalar:defaultView | plain |
| was attributed to | prov:wasAttributedTo | https://scalar.usc.edu/works/guide2/users/379 |
| created | dcterms:created | 2022-04-29T09:54:47-07:00 |
| type | rdf:type | http://scalar.usc.edu/2012/01/scalar-ns#Version |
Version 2
| resource | rdf:resource | https://scalar.usc.edu/works/guide2/annotating-a-unity-scene.2 |
| versionnumber | ov:versionnumber | 2 |
| title | dcterms:title | Annotating a Unity Scene |
| content | sioc:content | In order for a Unity Scene to be annotatable in Scalar, it must include the Scalar/Unity Bridge. Learn more about using Unity content in Scalar. To create 3D annotations on a Unity scene in Scalar, navigate to the scene in your project and click the click the annotation icon (paperclip) in the header bar. This will launch the annotation editor. Once in the editor:
Additionally, you can click any annotation in the annotation list on the left to select it. Selected annotations can be edited using the provided form, or deleted by clicking the minus button. When you're done editing annotations for the file, click "Done" to return to the page for the media file. |
| default view | scalar:defaultView | plain |
| was attributed to | prov:wasAttributedTo | https://scalar.usc.edu/works/guide2/users/379 |
| created | dcterms:created | 2022-04-29T09:49:30-07:00 |
| type | rdf:type | http://scalar.usc.edu/2012/01/scalar-ns#Version |
Version 1
| resource | rdf:resource | https://scalar.usc.edu/works/guide2/annotating-a-unity-scene.1 |
| versionnumber | ov:versionnumber | 1 |
| title | dcterms:title | Annotating a Unity Scene |
| content | sioc:content | In order for a Unity Scene to be annotatable in Scalar, it must include the Scalar/Unity Bridge. Learn more about using Unity content in Scalar. To create 3D annotations on a Unity scene in Scalar, navigate to the scene in your project and click the click the annotation icon (paperclip) in the header bar. This will launch the annotation editor. Once in the editor:
Additionally, you can click any annotation in the annotation list on the left to select it. Selected annotations can be edited using the provided form, or deleted by clicking the minus button. When you're done editing annotations for the file, click "Done" to return to the page for the media file. |
| default view | scalar:defaultView | plain |
| was attributed to | prov:wasAttributedTo | https://scalar.usc.edu/works/guide2/users/379 |
| created | dcterms:created | 2022-04-29T09:49:02-07:00 |
| type | rdf:type | http://scalar.usc.edu/2012/01/scalar-ns#Version |