New Uses for PowerPoint: Creating Original Illustrations for Classroom and Web-Based Teaching
By Mitch Ricketts, Northeastern State University, Oklahoma
It is sometimes difficult to find open-source media that clearly illustrate the concepts we teach. This is especially true in my own field of occupational safety and health, where course concepts include hazardous events that are seldom captured on film. One way to overcome this challenge is to draw original illustrations in PowerPoint, as shown in Figures 1 through 6. The illustrations can then be used for lectures or as media files in instructor-made videos.
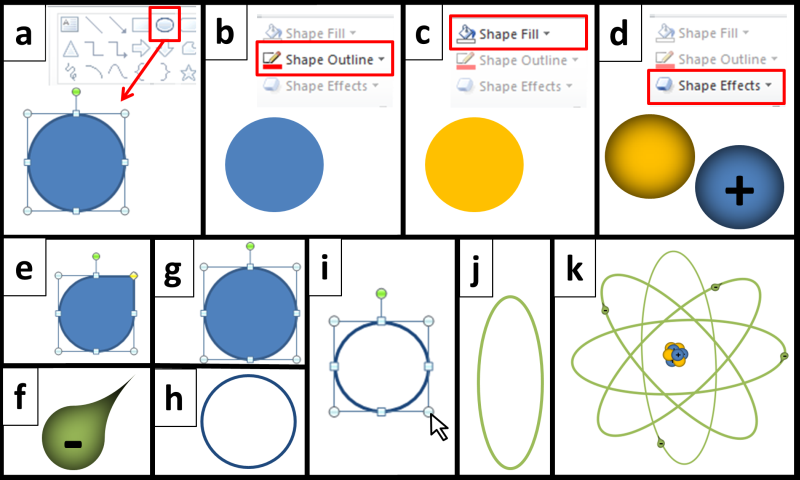
Figure 1: Illustrating an Atom
Simple drawing: An atom. aTo make a neutron, generate an oval using the PowerPoint Shapes menu. bRemove the outline by clicking the Shape Outline menu and selecting No Outline. cClick Shape Fill, and select a color of your choice. dTo create a proton, make a copy of the neutron, select a fill color, and type a “+”. To simulate three-dimensionality, highlight the neutron and proton, click Shape Effects, and select Shadow (Inside Center). eTo make an electron, generate a teardrop (in Shapes menu). fRemove the outline (Shape Outline menu), select an appropriate fill color, add a shadow, and type a “-”. gTo make an electron’s orbital path, start with another oval. hIn Shape Fill, select No Fill to remove the inside color, while keeping the outline. iElongate the oval by clicking and dragging the corner. jAfter elongating, select an outline color. kCopy, paste, and arrange the shapes to create an atom.
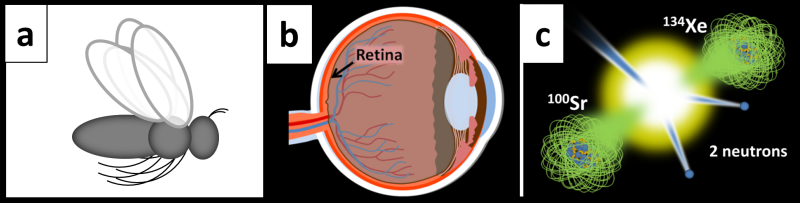
Figure 2: Creative Application of Stand-alone PowerPoint Shapes
Standard PowerPoint shapes can be used to make other illustrations, ranging from simple to complex. aStylized insect. bCross section of eyeball. cNuclear reaction (showing products of bombarding 235U with a high-speed neutron). Experiment with shapes to see what you can create. a,b,c Images are from Mitch Ricketts © 2012, Eye Anatomy, https://youtu.be/cr9bgLVOy-g and Mitch Ricketts © 2012, Nuclear Reactions (unpublished).
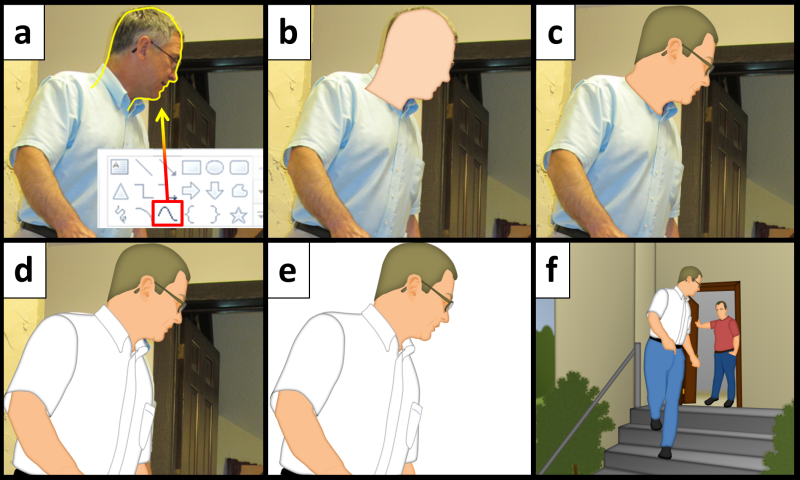
Figure 3: Tracing over Pictures
Even non-artists can draw complex shapes (such as people) by tracing over pictures. aStart with a photo and trace outlines using the Curve tool in the Shapes menu. bFill the shape with color, remove the outline, and add a shadow. cAdd more details; then use the Arrange menu to Group all shapes in the head into a single composite object. dAdd more body parts. Arrange each major body part into its own group so you can move them independently for animation. eDelete the background picture, position the body parts as desired, and arrange all body parts as a final group. fCopy and paste the image into an illustration, and re-size as needed. Image is from Mitch Ricketts © 2012, Falls on Stairs, https://youtu.be/v-KJEkm__Cc
Figure 4: Showing a Sequence of Events
Create animations. Here, body parts were grouped so each component can be re-positioned independently (except the person’s left arm/hand, which was re-drawn for the bottom image). The cow was progressively enlarged to simulate approach. Trees are Cloud shapes with Gradients (from Shape Fill menu) and Soft Edges (in Shape Effects). Explosion shapes (with soft edges) depict impact. The swinging gate was re-drawn for perspective at right. Images are from Mitch Ricketts© 2012, Traumatic Injury Hazards, https://youtu.be/5dhNfVYXsMQ
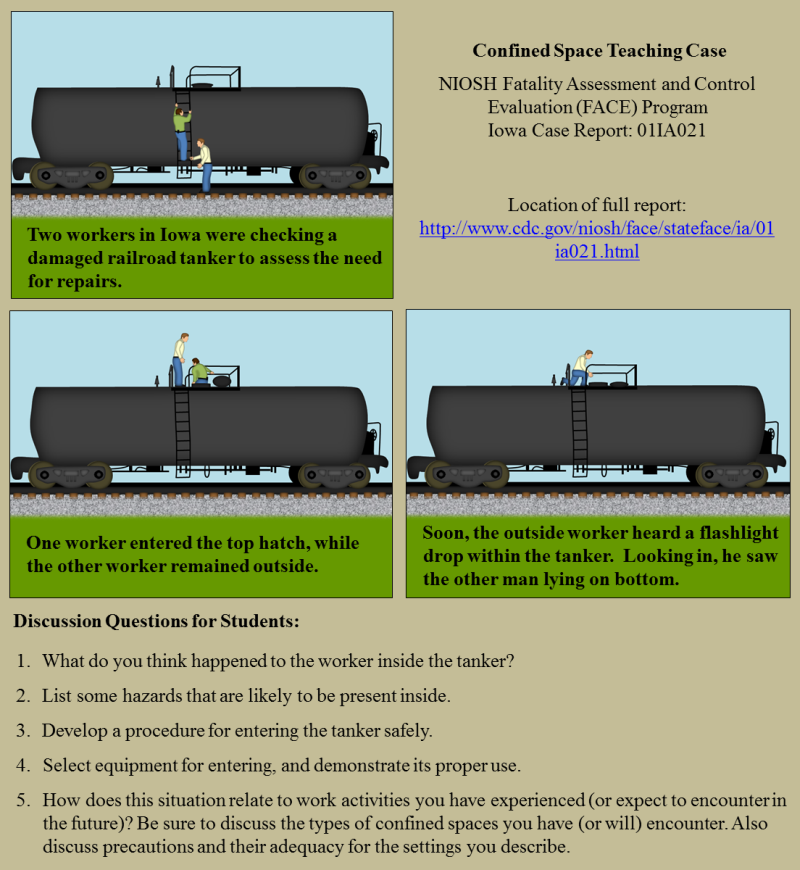
Figure 5: Using Illustrations for a Case Study
Create a case study for a class discussions or assignment. Here, students learn the initial facts of the case and apply their knowledge through group discussion. To build suspense, knowledge about the outcome of the case is delayed (see Figure 6). Images are from Mitch Ricketts © 2010, Hazard Categories: Industrial Hygiene (unpublished)
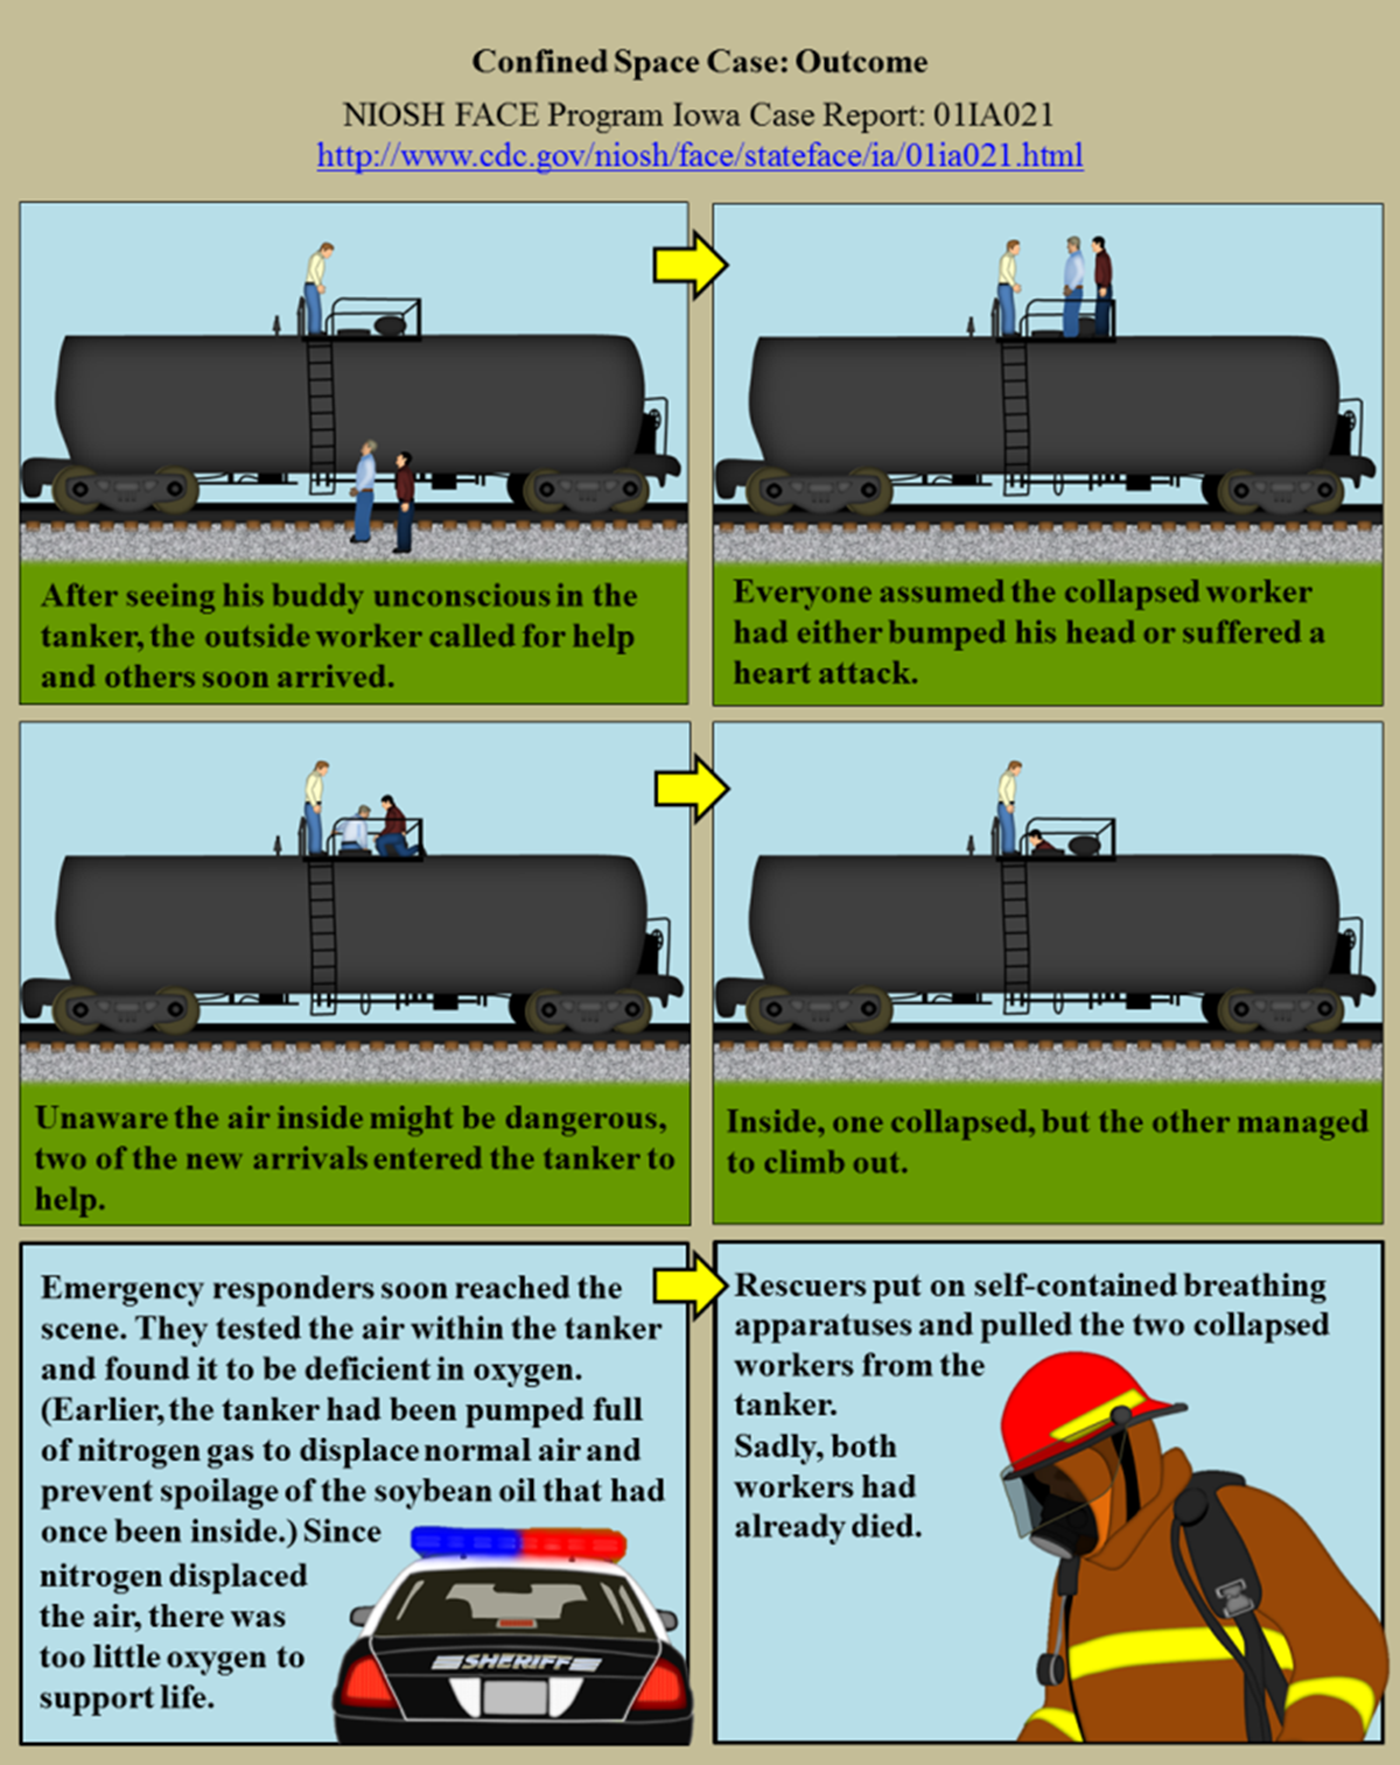
Figure 6: Debriefing the Case with Outcomes
Outcome of the case from Figure 5. Students learn about the outcome after completing the discussion or assignment. Images are from Mitch Ricketts © 2010, Hazard Categories: Industrial Hygiene (unpublished)
Conclusion. The Shapes menu in PowerPoint is a useful tool for creating instructional images. These images can be used in lectures, instructor-made videos, instructional handouts, case-study assignments, and other learning materials. For additional ideas on how you can create and use images in your own classroom, see the bibliography, below.
Mayer, R. E. (2009). Multimedia Learning (2nd ed.). New York: Cambridge University Press.
The following video demonstrates how to create illustrations using PowerPoint.
Ricketts, M. (2013). Illustrating educational concepts: How to create compelling instructional images in PowerPoint. YouTube. https://www.youtube.com/watch?v=DDKtwjYhW6E&feature=youtu.be
The following publications discuss the use of illustrated cases (a.k.a., anecdotes, narratives, or stories illustrated with images) as teaching and learning resources.
Ricketts, M. (2014). Making health information personal: How anecdotes bring concepts to life. In Hai-Jew, S. (Ed.), Packaging digital information for enhanced learning and analysis: Data visualization, spatialization, and multidimensionality (pp. 1-36). Hershey, PA: IGI Global. http://krex.k-state.edu/dspace/bitstream/handle/2097/16397/RickettsIGI2014.pdf?sequence=1
Ricketts, M. (2015). Using stories to teach safety: Practical, research-based tips. Professional Safety, 60(5), 51-57. http://www.asse.org/assets/1/7/F2Ric_0515Z.pdf
It is sometimes difficult to find open-source media that clearly illustrate the concepts we teach. This is especially true in my own field of occupational safety and health, where course concepts include hazardous events that are seldom captured on film. One way to overcome this challenge is to draw original illustrations in PowerPoint, as shown in Figures 1 through 6. The illustrations can then be used for lectures or as media files in instructor-made videos.
Figure 1: Illustrating an Atom
Simple drawing: An atom. aTo make a neutron, generate an oval using the PowerPoint Shapes menu. bRemove the outline by clicking the Shape Outline menu and selecting No Outline. cClick Shape Fill, and select a color of your choice. dTo create a proton, make a copy of the neutron, select a fill color, and type a “+”. To simulate three-dimensionality, highlight the neutron and proton, click Shape Effects, and select Shadow (Inside Center). eTo make an electron, generate a teardrop (in Shapes menu). fRemove the outline (Shape Outline menu), select an appropriate fill color, add a shadow, and type a “-”. gTo make an electron’s orbital path, start with another oval. hIn Shape Fill, select No Fill to remove the inside color, while keeping the outline. iElongate the oval by clicking and dragging the corner. jAfter elongating, select an outline color. kCopy, paste, and arrange the shapes to create an atom.
Figure 2: Creative Application of Stand-alone PowerPoint Shapes
Standard PowerPoint shapes can be used to make other illustrations, ranging from simple to complex. aStylized insect. bCross section of eyeball. cNuclear reaction (showing products of bombarding 235U with a high-speed neutron). Experiment with shapes to see what you can create. a,b,c Images are from Mitch Ricketts © 2012, Eye Anatomy, https://youtu.be/cr9bgLVOy-g and Mitch Ricketts © 2012, Nuclear Reactions (unpublished).
Figure 3: Tracing over Pictures
Even non-artists can draw complex shapes (such as people) by tracing over pictures. aStart with a photo and trace outlines using the Curve tool in the Shapes menu. bFill the shape with color, remove the outline, and add a shadow. cAdd more details; then use the Arrange menu to Group all shapes in the head into a single composite object. dAdd more body parts. Arrange each major body part into its own group so you can move them independently for animation. eDelete the background picture, position the body parts as desired, and arrange all body parts as a final group. fCopy and paste the image into an illustration, and re-size as needed. Image is from Mitch Ricketts © 2012, Falls on Stairs, https://youtu.be/v-KJEkm__Cc
Figure 4: Showing a Sequence of Events
Create animations. Here, body parts were grouped so each component can be re-positioned independently (except the person’s left arm/hand, which was re-drawn for the bottom image). The cow was progressively enlarged to simulate approach. Trees are Cloud shapes with Gradients (from Shape Fill menu) and Soft Edges (in Shape Effects). Explosion shapes (with soft edges) depict impact. The swinging gate was re-drawn for perspective at right. Images are from Mitch Ricketts© 2012, Traumatic Injury Hazards, https://youtu.be/5dhNfVYXsMQ
Figure 5: Using Illustrations for a Case Study
Create a case study for a class discussions or assignment. Here, students learn the initial facts of the case and apply their knowledge through group discussion. To build suspense, knowledge about the outcome of the case is delayed (see Figure 6). Images are from Mitch Ricketts © 2010, Hazard Categories: Industrial Hygiene (unpublished)
Figure 6: Debriefing the Case with Outcomes
Outcome of the case from Figure 5. Students learn about the outcome after completing the discussion or assignment. Images are from Mitch Ricketts © 2010, Hazard Categories: Industrial Hygiene (unpublished)
Conclusion. The Shapes menu in PowerPoint is a useful tool for creating instructional images. These images can be used in lectures, instructor-made videos, instructional handouts, case-study assignments, and other learning materials. For additional ideas on how you can create and use images in your own classroom, see the bibliography, below.
Bibliography
The following publication discusses the benefits of using a combination of words and images (rather than words or images alone) in communication.Mayer, R. E. (2009). Multimedia Learning (2nd ed.). New York: Cambridge University Press.
Creating Illustrations with PowerPoint:
The following video demonstrates how to create illustrations using PowerPoint.
Ricketts, M. (2013). Illustrating educational concepts: How to create compelling instructional images in PowerPoint. YouTube. https://www.youtube.com/watch?v=DDKtwjYhW6E&feature=youtu.be
Illustrated Cases:
The following publications discuss the use of illustrated cases (a.k.a., anecdotes, narratives, or stories illustrated with images) as teaching and learning resources.
Ricketts, M. (2014). Making health information personal: How anecdotes bring concepts to life. In Hai-Jew, S. (Ed.), Packaging digital information for enhanced learning and analysis: Data visualization, spatialization, and multidimensionality (pp. 1-36). Hershey, PA: IGI Global. http://krex.k-state.edu/dspace/bitstream/handle/2097/16397/RickettsIGI2014.pdf?sequence=1
Ricketts, M. (2015). Using stories to teach safety: Practical, research-based tips. Professional Safety, 60(5), 51-57. http://www.asse.org/assets/1/7/F2Ric_0515Z.pdf
Video Demos for Incorporating Illustrations Created in PowerPoint:
The videos below illustrate methods for incorporating illustrations in instructor-made videos.
Ricketts, M. (2012). Falls from heights. YouTube. https://www.youtube.com/watch?v=37n3rddJhvU
Ricketts, M. (2012). Workplace injury control. YouTube. https://www.youtube.com/watch?v=n6xON985j-E
Ricketts, M. (2014). Skid-steer loader safety. YouTube. https://www.youtube.com/watch?v=STQ5khnfkUQ
Mitch Ricketts, Ph.D., CSP, is an assistant professor of safety management at Northeastern State University in Broken Arrow, Oklahoma. Ricketts has worked in occupational safety and health since 1992, with experience in diverse settings that include agriculture, manufacturing, chemical/biological laboratories, and public school safety. Prior to moving to Oklahoma, Ricketts worked as the Health, Safety and Environmental Quality Coordinator at K-State Research and Extension. Occasionally, he teaches an online course for Kansas State University.
The videos below illustrate methods for incorporating illustrations in instructor-made videos.
Ricketts, M. (2012). Falls from heights. YouTube. https://www.youtube.com/watch?v=37n3rddJhvU
Ricketts, M. (2012). Workplace injury control. YouTube. https://www.youtube.com/watch?v=n6xON985j-E
Ricketts, M. (2014). Skid-steer loader safety. YouTube. https://www.youtube.com/watch?v=STQ5khnfkUQ
About the Author
Mitch Ricketts, Ph.D., CSP, is an assistant professor of safety management at Northeastern State University in Broken Arrow, Oklahoma. Ricketts has worked in occupational safety and health since 1992, with experience in diverse settings that include agriculture, manufacturing, chemical/biological laboratories, and public school safety. Prior to moving to Oklahoma, Ricketts worked as the Health, Safety and Environmental Quality Coordinator at K-State Research and Extension. Occasionally, he teaches an online course for Kansas State University.
| Previous page on path | Cover, page 6 of 28 | Next page on path |
Discussion of "New Uses for PowerPoint: Creating Original Illustrations for Classroom and Web-Based Teaching"
Add your voice to this discussion.
Checking your signed in status ...