Creating Pages
A Structural Approach
In order to best demonstrate how Scalar operates, we're going to approach building your Scalar book one structure at a time, rather than in the linear order your pages will eventually go. That means that we're going to start by building all three of your pages at once.But, First...
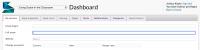
We have to make your Scalar books. In order to do this, navigate to the person in the top right hand corner of your browser window. This is the Account button; open it in a NEW TAB. It will take you to what Scalar calls your Dashboard, which looks like this:Look to the bottom of your page, until you find this dialog box:
Call your book whatever you like; your title can be descriptive (as in The PCL) or it can be interpretative (THE COOLEST LIBRARY IN TOWN), you can always change it later, if you'd like. Next, click the square that asks you to prove you're not a robot (don't worry if you are, we won't tell) and then click Create. Your book will appear on your account dashboard; click on its name to move into your book.
Creating Pages
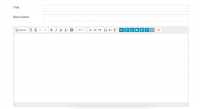
Now that we've created our books, we can begin to create our pages. You should be open on a page that reads:The pencil icon, also known as the Edit button, is in menu on the top right hand corner, a few options over from the account button you selected a few minutes ago. Click into it and you'll see this:
This is the top half of the Edit page; there are some options at the bottom we will be dealing with later. For now, just give your page a title (as when you titled your book, it could be descriptive or interpretative, but it should be distinctive enough that you remember what it is and it helps give your ultimate reader a way to orient themselves to your argument). Scroll down to the bottom page and click "Save and View." You'll see the updated version of your page.
Next, we're going to create your other two pages. You CANNOT do this with the Edit button, which will take you back into the page you just made. Instead, you need to click the New Page button, which looks like a plus, in the top right hand menu. This button will take you back to the page editor; make a second page, save it, and then repeat this process so you have a third page. Be sure to name each page something different.
Now that you have all of your pages, we can begin adding content into them.
This page has paths:
- Learning to Use Scalar Allyssa Guzman