HTML Code for Scalar
Text and code can be altered interchangeably in the Scalar interface. Text that shows up in the regular text editor will show up in the source code, and changes made to the source code will show up in the regular interface. Below are several examples, complete with code, that can be employed in Scalar. Simply open the source editor in the Scalar Interface, paste the code into your scalar in the desired spot, and make the necessary modifications to make the code do what you want it to do. Functions that can be performed with HTML that are also doable in the main edit interface are not covered.
Using HTML to Insert Images
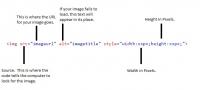
Using HTML to insert images inserts a static image onto your Scalar page. Images inserted using this method can be turned into links, but will not have their own pages in Scalar, meaning they cannot be tagged or grouped like native Scalar media can. Simply copy and paste this code into your Scalar source editor:<img src="imageurl" alt="imagetitle" style="width:xxpx;height:xxpx;">
Below is an explanation and example of how each element works and example code for an image.
Inserting an image this way will insert an image of your desired size into the center of your page, and inline with the rest of the content. To change the positioning of your image in the X and Y planes, revise your code like this:
<img src="imageurl" alt="imagetitle" style="width:xxpx;height:xxpx;" align="center, left, or right">
Your image will be positioned in line with the rest of your content, and will be be positioned in the center, the left, or the right depending on the code you choose. Also, the height and width specifications can be omitted to insert the image in its native size.
Below is an image inserted using the code above, sized to 350x250 pixels, aligned left:
Clickable Image Links
While images inserted into Scalar using HTML code cannot be used like other Scalar media, they can be made into links, which are as of yet impossible to do using the Scalar edit interface alone. Using the image code from earlier, an HTML link will use the image as its anchor:
<a href="yoururlhere">
<img src="imageurl" alt="imagetitle" style="width:xxpx;height:xxpx;" align="center, left, or right">
</a>
What this code does is turns the image into a link. For example, below is the exact same image as used above, with the exact same dimensions, except the image has now been linked to Google. Here is the code:
<a href="https://www.google.com/">
<img alt="imagetitle" style="width:350px;height:250px;" align="left" src="https://thumb1.shutterstock.com/display_pic_with_logo/512149/532963129/stock-photo-abstract-architecture-background-empty-rough-concrete-interior-with-diagonal-columns-d-532963129.jpg" >
</a>
![]()
Interactive Image Maps
This is by far the most complicated HTML tutorial here, but it does the most to improve a Scalar. For an example of what it can do, see here. The first step in creating an interactive map is to insert an image into your page, but you will have to tell the image to use an image map that will lay out the pixel coordinates for your image. In the case of the Primero Scalar, the image code looks like this:
<img src="primaphp.jpg" width="1500" height="1093" alt="Primero" usemap="#primeromap">
The code here is rather simple. Obviously, your code will change depending on your image. Remember the # symbol must precede your image map name, so if you wanted to name a map test, the code would look like this: usemap="#test".
Creating an image map is a bit more complicated. You will need a source that can map your pixels. An excellent website for this, which provides a free service, is http://imagemap-generator.dariodomi.de/. Upload or link your image, and the generator will show your image in its native size, and you must follow the onscreen instructions to create your coordinates. As an added bonus, the generator will create your code for you.
As an example, the image below allows you to click the Shutterstock logo to go to their website.
This is the code:
<img src="https://thumb1.shutterstock.com/display_pic_with_logo/512149/532963129/stock-photo-abstract-architecture-background-empty-rough-concrete-interior-with-diagonal-columns-d-532963129.jpg" alt="" usemap="#test" />
<map name="test" id="test">
<area alt="" title="shutterstock logo" href="https://www.shutterstock.com/" shape="rect" coords="103,153,365,199" /></map>
This page has paths:
- Advanced Scalar Techniques Blake Hatton