RTI Capture
1 media/RTI_setup_thumb.jpeg 2022-10-23T12:41:31-07:00 Elizabeth Palomino 97f5cc41f822c98012020ee3f1612be0c7950d52 40636 2 Behind the scenes RTI capture with Elizabeth Palomino plain 2022-10-24T09:30:34-07:00 38.958777777778,-95.247513888889 Elizabeth Palomino, Kivilcim Yavuz 20220418 125445-0500 Elizabeth Palomino 97f5cc41f822c98012020ee3f1612be0c7950d52This page is referenced by:
-
1
2022-10-20T14:09:13-07:00
About the Project
20
plain
1252059
2022-11-09T19:38:49-08:00
Project Author
Elizabeth Palomino earned her B.A. in Studio Art with a minor in Public History from Northwest Missouri State University in 2016 and she is working toward her M.A. in Museum Studies at the University of Kansas. From September 2019 - June 2022, she was the Digital Imaging Assistant at KU libraries, where she photographed special collections. Throughout her career, Elizabeth has built exhibitions and helped with art installations. Exhibit design is vital to her role as a museum professional because it is a form of outreach and information exchange.
Digitization
In 2019, I was hired as a Digital Imaging Assistant for the University of Kansas Libraries. I worked at Watson Library part of the time and the rest was spent photographing special collections at the Kenneth Spencer Research Library (SRL). I often photographed collections with the Digitization Coordinator, Sarah Chapman. It was helpful to have a second pair of hands when handling bulky or fragile materials. After image capture, the photographs were lightly processed with cropping and white balance applied. Tasks were split so that one person could focus on capture while the other person managed and edited files on the computer. The act of photographing a collection in a library, museum, or archive is referred to as digitization. The process of digitizing includes adding descriptors such as date, location, and object number. These details accompany an image and are known as metadata.
Medieval Manuscripts
The importance and scope of the manuscript collection at KU
The proposal to digitize the medieval manuscript collection was initially presented to the Digital Initiatives department in February 2020. By March, the project was halted due to the Covid-19 pandemic. By the beginning of the Spring 2022 semester, the digitization project was re-introduced.
Reflectance Transformation Imaging
In 2022 Sarah introduced me to an advanced form of digitization known as Reflectance Transformation Imaging (RTI). RTI is a form of computational photography because it uses computer generated calculations to create a file from an image data set. RTI consists of a series of photos (around 40-60) shot from a stationary camera. In each image, light is cast from a measured angle with a flash gun and reflected on to a black sphere. After the photos are rendered, the file can be opened in RTIViewer and dynamically relit from the captured points.. The idea for an RTI project grew from other proposals that I shared with Sarah at the start of my Museum Studies internship. I was particularly interested in building a digital exhibit. Sarah suggested a RTI project with an exhibit aspect. The ideal candidate for the project was the medieval manuscript collection. Toward the end of March, Sarah and I held a meeting with Angela Andres, Elspeth Healey, and Kivilcim Yavuz from SRL to talk about the benefits of a RTI data set. Sarah and I decided that photographing fragments would reduce the amount of data and prevent the challenges of working with a bound manuscript. Kivilcim chose a box of candidates and from there, we chose five individual fragments with writing on the front and back (recto, verso) of the leaf. As a bonus, we photographed the front and back cover of MS C189, a manuscript bound with recycled fragments.
Image Capture
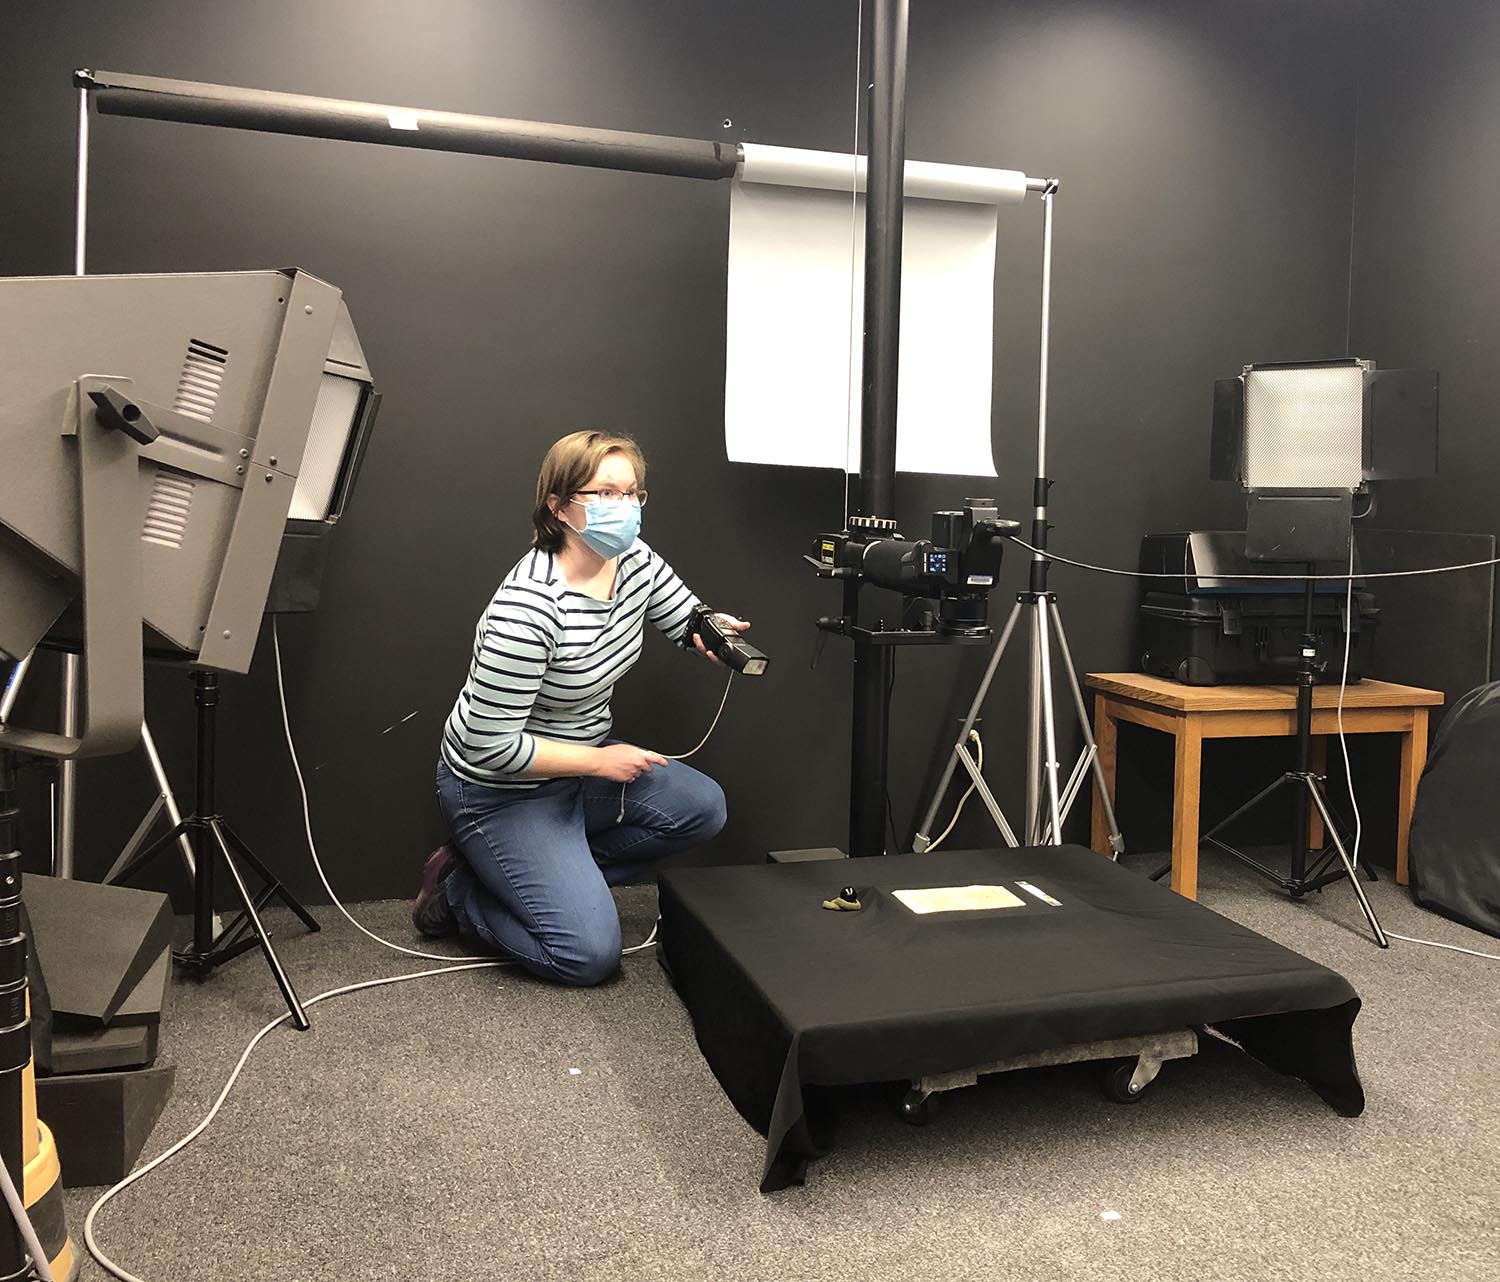
The capture process took three days and around fifteen hours. Combined, there are 711 photographs, with each image set containing an average of 60 photos. Each manuscript contains the original .dng (digital negative) files and .jpg exports (needed for RTIBuilder) bringing the total number of photos to 1,422 and 53 GB of space. A difficult part of the capture process was deciding the best angle and position to hold the flashgun. I held the flash gun at four angles including an angled overhead shot and a raking shot where the flash was low, almost parallel to the manuscript. I moved around the copy stand in a circular motion and placed myself and the flash gun at 12 positions relative to the manuscript. The position of the camera in relation to the copy stand required me to photograph while squatting on the ground. I remained still and held my position with the flashgun until the shutter was triggered.
RTI Render
Despite the time commitment, image capture was the simplest part of the process. Downloading the RTIBuilder from Cultural Heritage Imaging (CHI) required a lot of trial and error. To begin with, the security settings on my 2015 MacBook Pro mistook the download for a malicious file, so I selected “allow apps from CHI.” When this didn’t work, I temporarily disabled my firewall. It seemed that the application was downloaded, but when I clicked on the rtibuilder.exe file it didn’t run. I searched the CHIforums for an answer and I realized that RTIBuilder will not run on anything later than 2018 High Sierra OS. My second option was to try the software on a 2014 HP Envy. Again, I selected “allow apps from CHI” and I temporarily shut off the firewall. No luck. I realized that I needed to install Java to run the program. Finally, after many attempts, RTIBuilder opened. Downloading RTIViewer was relatively easy, all I had to do was check “allow” and briefly disable my firewall.
Before importing the photos into RTIBuilder, I opened the .dng files in Adobe Bridge and rotated image sets and batch applied white balance using the eyedropper tool on the color check. Once all the adjustments were complete, I saved the files as .dng and .jpg. There was minimal processing to the image files and no color adjustments other than white balance. After processing, I created nested files in my C drive with specified file names. This step is crucial because the software cannot locate the files if they are not named to the builder’s specifications. The files must be named jpeg-exports and original-captures. I followed the instructions and waited for the render. Instead, I received an error message. After some forum searching I found that I had to download the PTMfitter plugin (polynomial texture map), which is needed to generate .ptm files. The builder is also capable of generating a .hsh file. However, both the ptm and hsh plugins were not embedded in the download and I was only able to find the PTMfitter through a file that was shared in the forum thread. I tried again and received another error message. Sarah referenced a different guide and her old RTI files to confirm that the files would not render because they were incorrectly saved as .jpeg’s following CHI’s instructions. The files were reformatted as .jpg and Sarah ran them through her 2012 Lenovo computer. The render worked this time. I still didn’t have a workable RTIBuilder so Sarah suggested that I try the RTIbuilder[Console].exe instead of the RTIbuilder.exe application, both were included in the software download and she had used the [Console] version with success. I tried it and after some waiting the file rendered successfully. After all this work, it was exciting to see the end result.
Cost Benefit
In closing, I have to reflect if this process is worth the time commitment. Cultural Heritage Imaging needs funding for critical software updates. A post by CHI founder Carla Schoerer from this year, confirms that they have secured funding for updates to the RTIBuilder. There also needs to be edits to CHI’s guide to correct mistakes and include missing information, such as image scaling for .jpgs in the builder. As a whole, there is a limited understanding of RTI files and their benefits to object research. If RTIBuilder and RTIViewer were easier to download and use, it would generate interest among researchers. There are very few people who are trained in this process. Image capture is tedious but with practice it is not difficult. Instead, it is the constraints of the RTIBuilder that create frustration. It is a shame because this is a useful tool that allows researchers to explore manuscripts under multiple lighting conditions. The image capturing tools (flash gun, receiver, string, reflective sphere, camera, tripod) are relatively inexpensive and it is a non-invasive imaging technique.
-
1
2022-11-15T10:28:37-08:00
Process
18
plain
2022-11-30T10:56:17-08:00
Step One: Image Capture
The necessary tools to capture highlight RTIs include a digital camera and tripod; a flash gun, flash transmitter, and a tether for the shutter release; as well as a black reflective sphere (we used a black Christmas ornament) and string for measuring the distance between the flashgun and the object. Fortunately, there are a variety of quality cameras and it is not necessary to spend thousands of dollars for a capable device. For this project I was privileged to use a Phase One XF IQ4, medium format camera with 100MP and a 55mm Schneider lens. The imaging lab at KU also has a Canon 5D Mark II which I used frequently for digitization. The three camera settings that are important for image exposure are shutter speed, aperture, and ISO. A faster shutter speed allows in less light, reducing the risk of over-exposure. An aperture is the opening in the lens that causes light to pass through the camera. Aperture size is measured in f-stops, with lower numbers indicating wider openings. ISO is a measure of the light sensitivity of the camera’s sensor. Image grain increases with a higher ISO. For regular digitization, I turn off the overhead lights and switch on the studio lights to illuminate the object. However, for RTI, I left the overhead lights on during image capture. The exposure will need to be adjusted depending on the amount of light in the space. I used a shutter speed of 1/80, an aperture at f/16, and 100 ISO.[7]
The capture process took three days and around fifteen hours. Combined, there are 711 photographs, with each image set containing an average of 60 photos. Each manuscript includes the original .dng (digital negative) files and .jpg exports (needed for RTIBuilder) bringing the total number of photos to 1,422 and 53 GB of space. A difficult part of the capture process was deciding the best angle and position to hold the flashgun. I held the flash gun at four angles including an angled overhead shot and a raking shot where the flash was low, almost parallel to the manuscript. I moved around the copy stand in a circular motion and placed myself and the flash gun at 12 positions relative to the manuscript. The position of the camera in relation to the copy stand required me to photograph while squatting on the ground. I remained still and held my position with the flashgun until the shutter was triggered.
Step Two: Image Processing
Before importing the photos into RTIBuilder, I opened the .dng files in Adobe Bridge,[8] rotating images when needed and applying white balance to image batches by selecting the white on the color check with the eyedropper tool. There was minimal processing to the image files and no color adjustments other than white balance. Batch processing allows the editing process to go quickly despite managing many photos. Image sets were named with their call number, recto or verso designation, and running image number (ex: MS_9-2-16_recto_001.dng) After the images were named, I created nested sub folders in my C drive and two main folders named jpeg-exports and original-captures. This step is crucial because the software cannot locate the files if the folders are not named to the builder’s specifications.
Step Three: Downloading RTIBuilder and RTIViewer
Despite the time commitment, image capture was the simplest part of the process. Downloading the RTIBuilder required a lot of trial and error. To begin with, the security settings on my 2015 MacBook Pro mistook the download for a malicious file, so I selected “allow apps from CHI.” When this didn’t work, I temporarily disabled my firewall. It seemed that the application had downloaded, but when I clicked on the rtibuilder.exe file it didn’t run. I searched the CHIforums for an answer and I realized that RTIBuilder will not run on anything later than the 2018 High Sierra operating system. My second option was to try the software on a 2014 HP Envy. Again, I selected “allow apps from CHI” and I temporarily shut off the firewall. No luck. I realized that I needed to install Java to run the program. RTIBuilder finally opened. Downloading RTIViewer was relatively easy, all I had to do was check “allow” and briefly disable my firewall.
Step Four: RTI Render
I followed the list of instructions on the CHI site and waited for the render. Instead, I received an error message. After some forum searching I found that I needed the PTMfitter plugin (polynomial texture map) to generate .ptm files. The builder is also capable of generating a .hsh file. However, both the ptm and hsh plugins were not embedded in the download and I was only able to find the PTMfitter through a file that was shared in the forum thread. I tried again and received another error message. Sarah referenced a different guide and her old RTI files to confirm that the files would not render because they were incorrectly saved as .jpeg following CHI’s instructions. The files were reformatted as .jpg and Sarah ran them through her 2012 Lenovo computer. The render worked this time. I still didn’t have a workable RTIBuilder so Sarah suggested that I try the RTIbuilder[Console].exe instead of the RTIbuilder.exe application, both were included in the software download and she had used the [Console] version with success. I tried it and the file was rendered successfully. After all this work, it was exciting to see the end product. Downloading RTIBuilder, troubleshooting, and rendering each image set was very time intensive. I do not have a time estimate except to say that Sarah and I worked off and on with troubleshooting and RTI renders for a period of two weeks. This two week period included a combination of paid and unpaid labor.
Step Five: Research and Writing
Before I designed this exhibit, I needed to establish the focus, purpose and intended outcome of my writing. Despite the primary role of RTI in the development of this project, I was not sure if I wanted to include the technical details in the Scalar site. The process of digitizing cultural heritage is not widely written about because the tools are rapidly changing. There are even less resources about RTI. However, it is impossible to avoid discussing RTI in a project that relies so heavily on this method. As such, I hope that this project will be an introductory resource for RTI photography.
Additionally, I wanted to provide a complete object record for the six manuscript fragments. I cross-referenced entries from the KU library catalog with the Digital Scriptorium records. The catalog entries were helpful for gathering data but they did not describe manuscript production or provide biographical details about the author of a text. For this information, I turned to Kivilcim’s manuscript blog on KSRL and I researched individual authors and their body of work. It was especially difficult to write about the different aspects of MS C189 because the binding is a significant area of interest. Although I only photographed the cover of MS C189, I also wanted to write about the textblock. Writing about the text was a challenge because this manuscript is a collection of authors discussing philosophy. I studied the basic biography of each author and I gave a short overview of their work in the context of their writing.
To study medieval manuscripts it is necessary to be familiar with the terminology. As a result, having a glossary is vital. I organized the glossary alphabetically and by subject matter. For ease of use, I also linked definitions within the text. As a whole, I formatted my text for readability by using the Flesch-Kincaid scale, which rates the complexity of the writing based on grade level. Whenever possible, I simplified the language, shortened sentences and divided the content into smaller parts. I spent August through November 2022 writing and refining the sections for this site.
Step Six: Developing a Scalar Exhibit
During the digitization of the manuscript fragments, I was enrolled in the final semester of my museum studies program. I took a course that Spring with Dr. Maya Stiller called Digital Humanities for Art Historians which introduced me to different tools and methodologies, including Omeka, a free web publishing platform. As a result of this class, I began to think about the collections I had digitized and how I could provide visibility to the resources at KSRL. Every semester KSRL has a physical exhibit that is displayed in the library and a virtual version of the exhibit. The virtual exhibits are created with Omeka and hosted on the KSRL webpage. The semester before I enrolled in the digital humanities course I digitized materials from the Mary Huntoon collection that were used in an exhibit with KSRL.
I began searching for virtual exhibitions and particularly exhibits about medieval manuscripts. I found an exhibit hosted by the University of Southern California (USC) library system called USC Illuminated Medieval Manuscripts.[9] The exhibit was developed using Scalar, an open-source web publishing platform designed by the Alliance for Networking Visual Culture (ANVC) at USC, with support from the National Endowment for the Humanities and Andrew W. Mellon Foundation. Curtis Fletcher is the Director of the Ahmanson Lab at USC’s Leavey Library and Co-Director of Scalar alongside the Executive Director, Tara McPherson. USC began their illuminated manuscript exhibit just before the pandemic and it is currently a work in progress. I was excited to see another connection to USC. They not only built this platform, but they also have an RTI imaging lab and a history of collaboration with CHI. In fact, they plan to use RTI, as well as, hyperspectral, multispectral, and 3D imaging for this project.[10]
On February 9, 2022 Kaylen Dwyer, the Digital Media Specialist from the Institute of Digital Research (IDRH) at KU was invited to Dr. Maya Stiller’s class to teach a section on Omeka. Just a little over a week later, on February 18, 2022 I attended a Scalar workshop hosted by Kaylen. I needed advice on choosing the platform that was right for my project, so I met with Kaylen at the beginning of March. We discussed the benefits and shortcomings of different platforms including Omeka Scalar and Wax. One of the considerations was the longevity of the site. For Omeka, there is an option to create static files, which could be uploaded to KU’s Electronic Thesis and Dissertation (ETD) repository. Unfortunately, KU IT no longer supports institutional hosting for students. Wax could be hosted by KU and the user has the ability to customize the site with HTML. Despite the positive points, I was intimidated by the aspect of coding. I wanted to use a formatted program that was relatively easy to learn. With Scalar, there is not an option to create static files, but I could still preserve the text and export it as a PDF. I was glad that I didn’t have to code and I preferred the book-like format of Scalar. As a result, my Scalar site is hosted by USC.
Designing the Scalar exhibit was relatively easy because I already had the information about the manuscripts written and compiled into sections. Linking pages was tedious, especially when building the glossary. Every media element that is linked within Scalar must have its own page and each item must be uploaded individually. Because Scalar is hosted by USC, there is a limit of 2 MB per file. This was a simple fix, I just reduced the size and scale of my RTI jpegs. I used YouTube as an archive for my RTI videos and I uploaded them to Scalar without reducing the file size. Including research, writing, and data input, it took me from June to November 2022 to compile an exhibit.
[7] In Digitizing Medieval Manuscripts by Bill Endres, he generally uses a shutter speed of 1/125 or 1/200, an ISO at 100 or 200, and a f-stop between 7 and 11 for his RTI projects (Endres 36, 37). When undertaking an RTI project, it is necessary to experiment with the shutter speed, ISO, and f-stop to find the appropriate exposure.[8] Adobe Bridge is file management software that allows you to batch organize and edit a variety of file types including RAW, digital negatives, and jpg formats.[9] Mihram, Danielle and Melissa Miller, eds. USC Illuminated Manuscripts. 2020. https://scalar.usc.edu/works/usc-illuminated-medieval-manuscripts/index . Accessed [November 16, 2022].[10] In Section 5 of the Project’s Strategic Approach the exhibit team writes that they aim to “Choose advanced imaging techniques including 3-D, RTI (Reflectance Transformation Imaging), hyper-spectral and multispectral imaging.” (https://scalar.usc.edu/works/usc-illuminated-medieval-manuscripts/about-the-project)