Cardflow: Digital Index Cards on the iPad
By Mary Hammel, Kansas State University
Are you one of those people who learned to use index cards when you were in school to organize speeches, create storyboards, study for tests, or brainstorm and plan projects? Did you enjoy the possibilities that physical index cards offered, like being able to draw on the cards, tack on photos, purchase in different colors and sizes, lined and unlined, and the flexibility of sorting and ordering?
Maybe you don’t use physical stacks of cards anymore because of the various digital tools and apps available today, such as wireframing, mind-mapping, and Kanban boards. But you can still have the retro feel of index cards with Cardflow, a virtual index card iPad app by the developer Qrayon.
Figure 1. Qrayon logo
Cardflow has a free standard edition and a pro version called Cardflow+. The free version does have quite a few limitations, which are spelled out in an included “Try Cardflow+” card stack. At $14.99, the additional features of Cardflow+ include:
- cloud sync
- ability to draw directly on a board
- card linking within a stack
- ability to insert photos and web pages
- full text search
- advanced ink capabilities (adjustable pen width and opacity, draw in front of or behind objects)
- drawn shape recognition (makes lines, circles, rectangles perfect)
- 32-color customizable palette
- color-select and recolor ink
- extra color-coded organization categories
- export to PDF, text, CSV and OPML (an XML format for outlines)
Figure 2. Cardflow App Icon
A desktop version of Cardflow is also available for the Mac. It has a 7-day free trial, but in order to use it after that you will need to purchase a subscription plan of $1.99 per month.
If you download the standard Cardflow app to check it out first and you like what you see, you can easily transfer any boards that you have created to Cardflow+ or the Mac desktop version.
Board View and Settings
The initial view when opening the app is Board view. The toolbar interface is simple: across the top from the left is the + (add) button for creating new boards, a cloud button for accessing iCloud Drive (through the Files app), and an icon sizer button to toggle the size of the board squares. On the right is the board category (a text button auto-set to All Boards) and the settings button (a gear), which has links to the app settings and online user guide as well as developer information.
Figure 3. Cardflow Board view
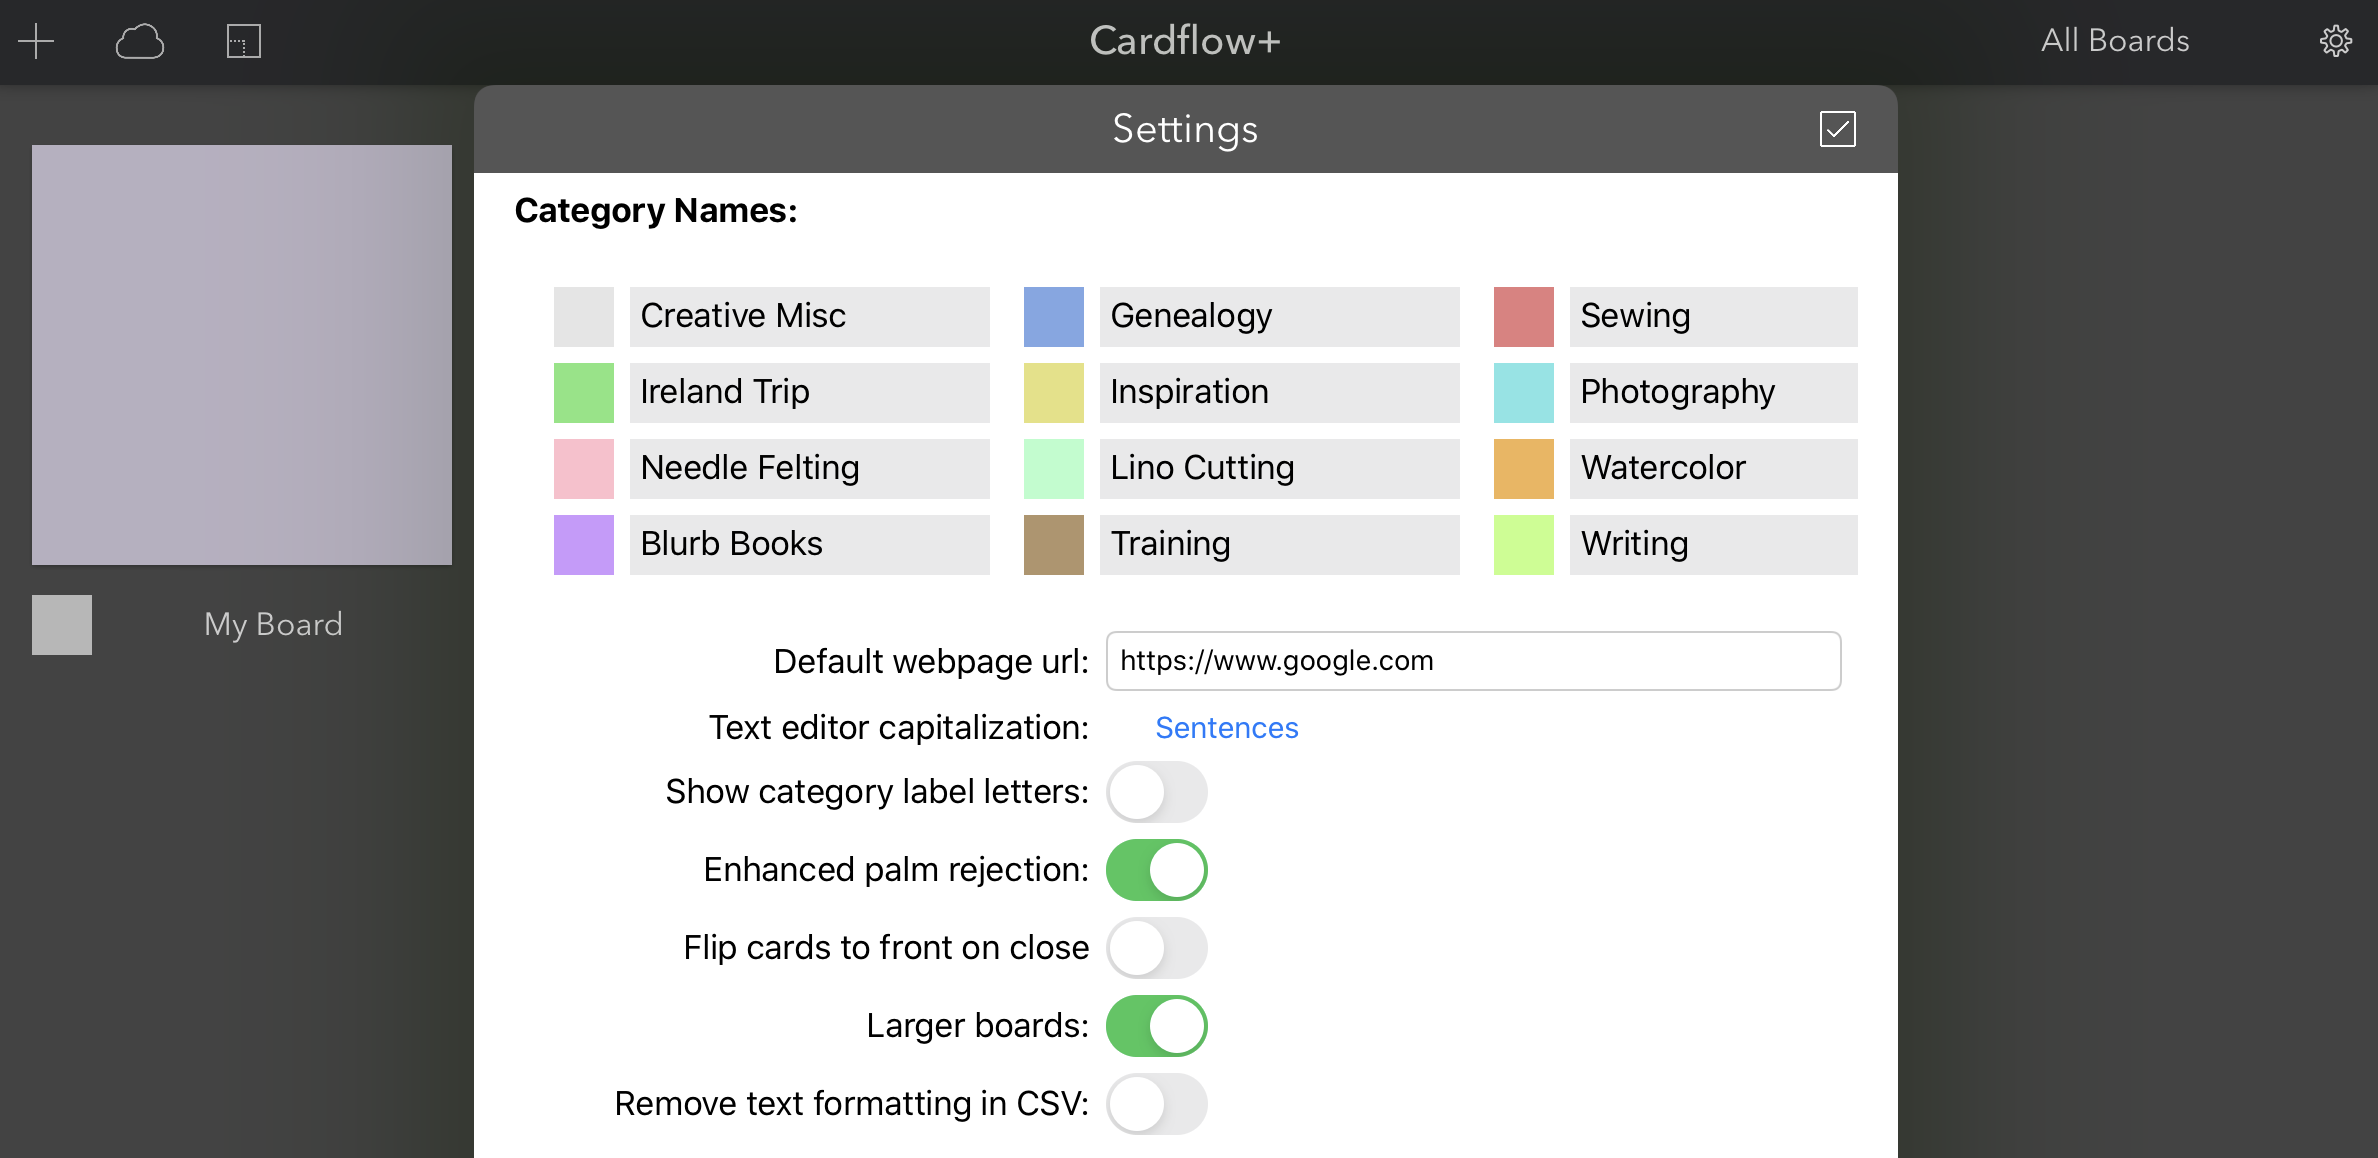
Any boards that you create will appear in the board view as a square with the title and category color. If you would like to create your own categories for your boards, tap the settings button, then select App Settings. At the top of the Settings window are colorized categories that you can rename – four available for the standard Cardflow, and twelve available for Cardflow+. Additional useful settings that you can tweak here are the text editor capitalization (tap to scroll through Words, Sentences, or None) and enhanced palm rejection for drawing.
Figure 4. Cardflow+ Settings
Creating Boards and Adding Cards
To get started, just click the + (add) button at the top left of the screen and a “My Board” square will be created. If you tap on the board name or long press on the board square, a contextual menu will appear with options for deleting, renaming, duplicating, copying to cloud, categorizing or exporting.
Figure 5. "My Board" Contextual Menu
If you tap on the square created, your blank board will open. You might notice that the top menu bar has now changed. A tool palette has appeared on the left side, and the right side includes a search button and the settings button, which now has new contextual options for changing the board and link colors and exporting. Cardflow boards automatically have a gray background. To change the color, tap the settings button and select Change Board Color. Since the drawing tools are available, you can also draw on the board background.
Figure 6. Board View Palette
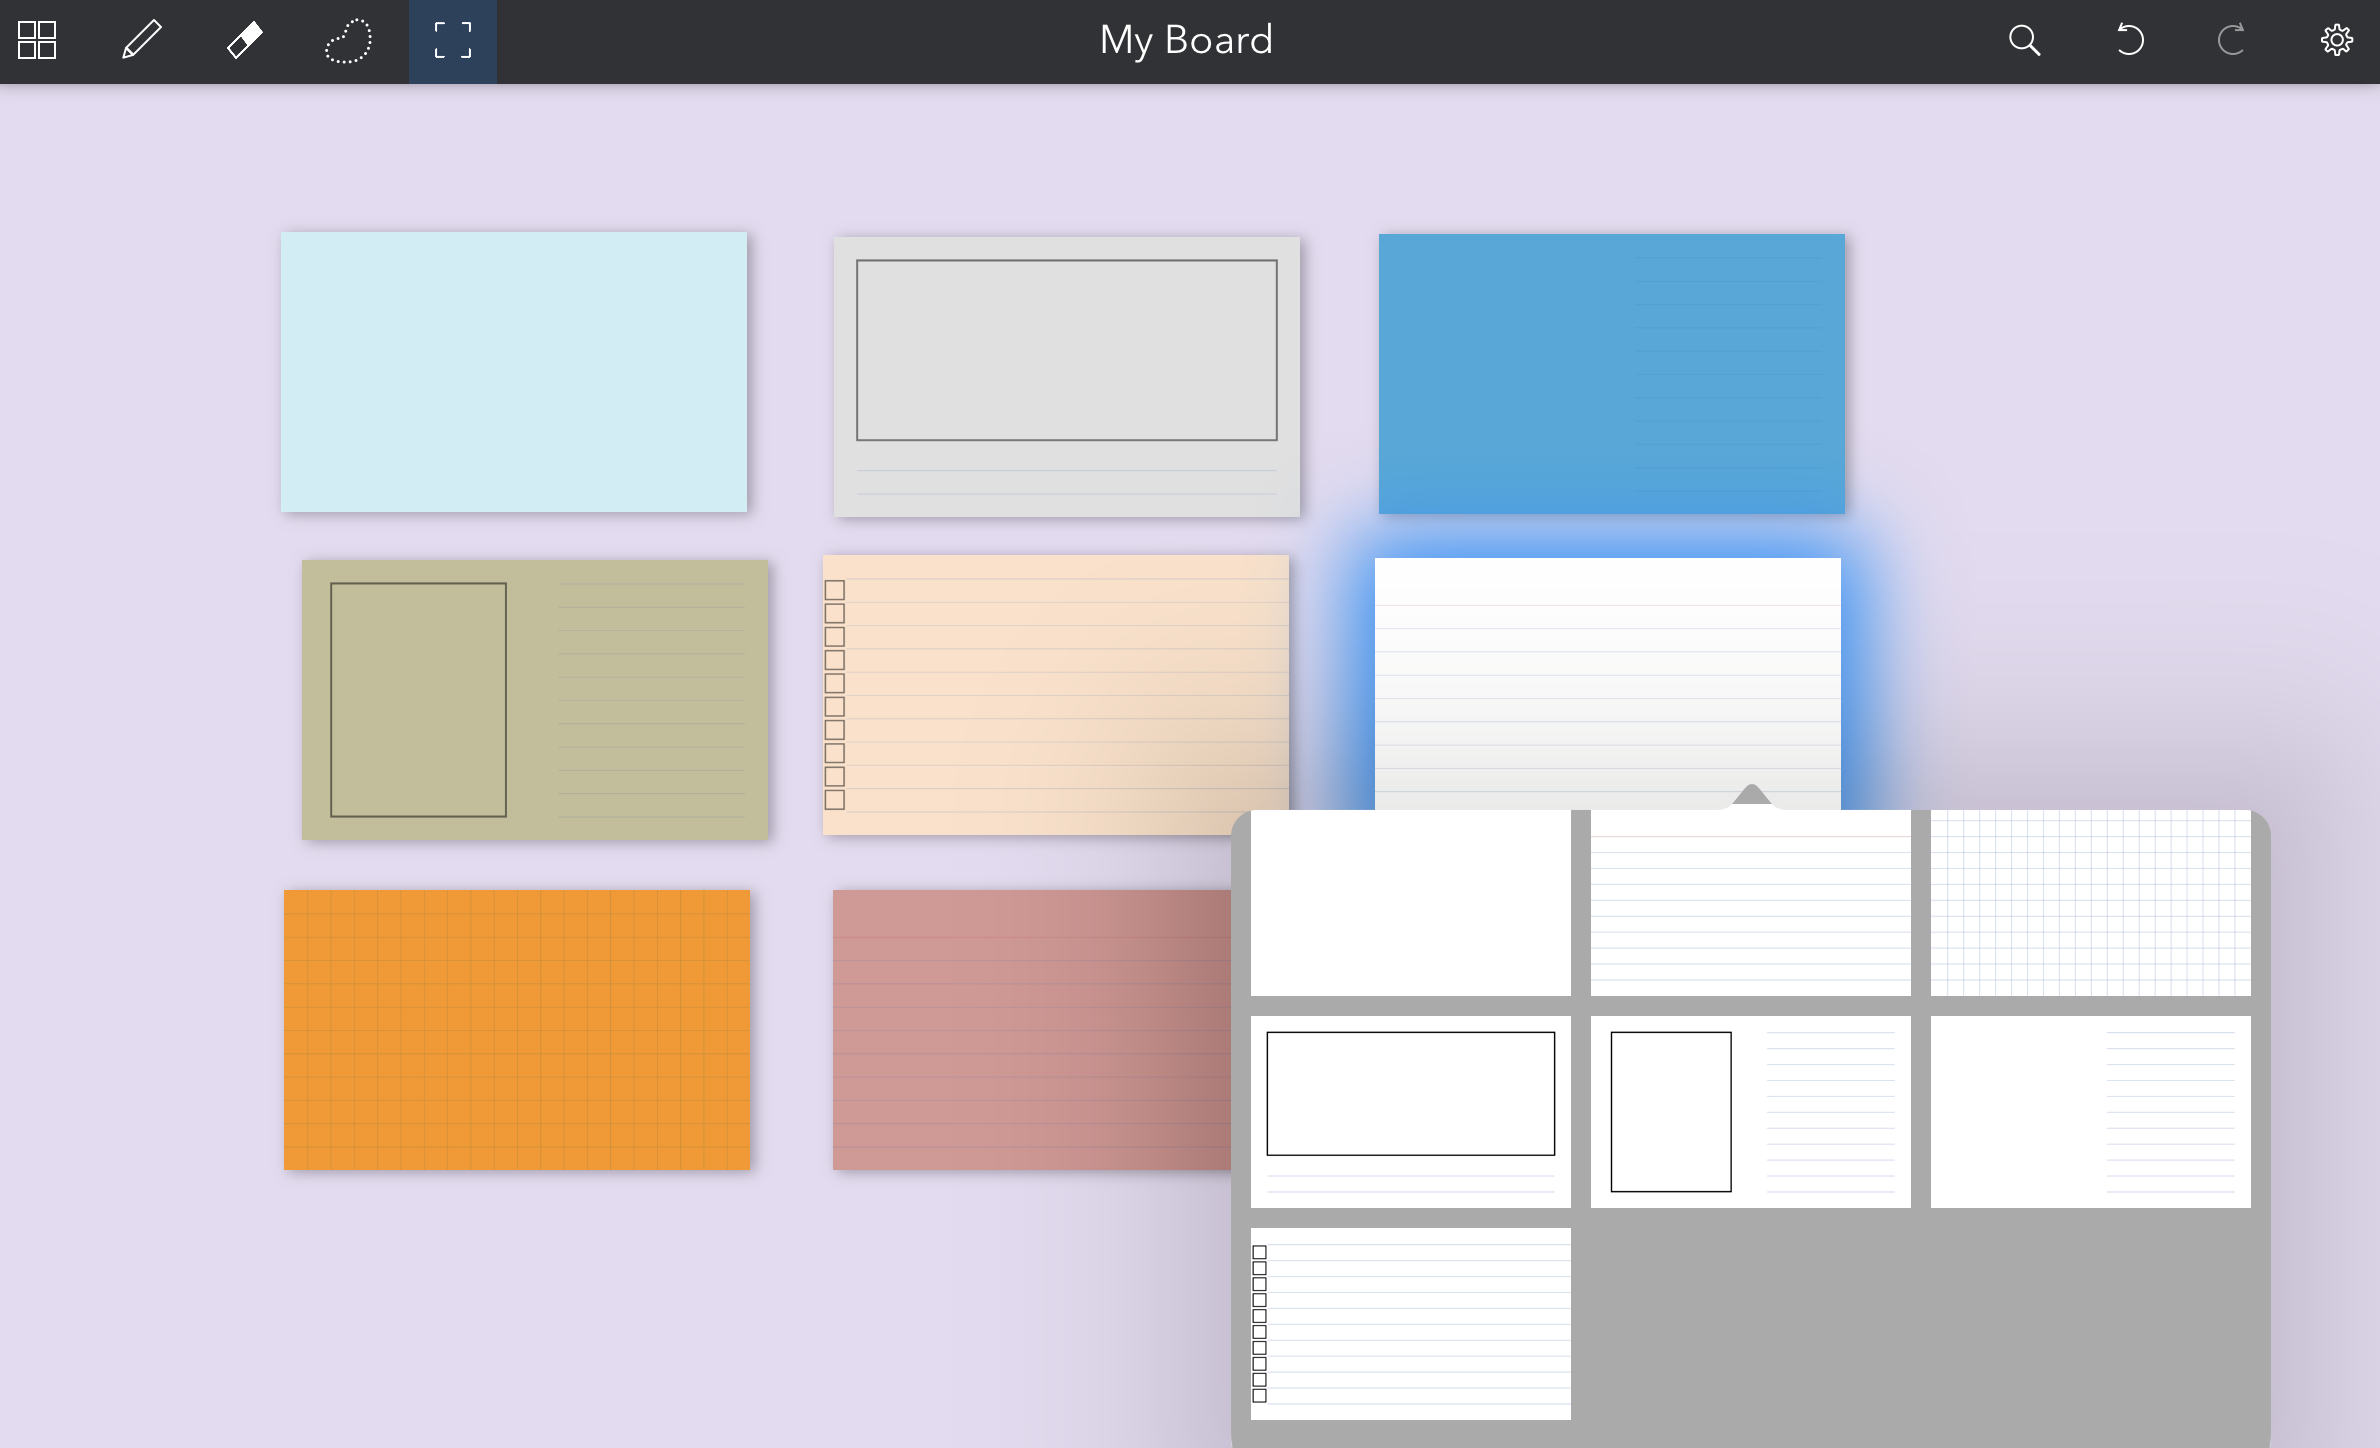
You can start adding cards by touching and holding your finger (or and Apple pencil) on the screen or double tapping. If you use the double tap approach, the card you add will immediately zoom to screen size (Card view). At this point, you can start adding any content that you wish to your cards, but I would suggest first considering some of the contextual options accessible with the settings button – templates and card colors. The Template option presents seven card layouts: blank, traditional lined, grid, three storyboard options, and a checklist option. Each card can have a different color, which can be changed by tapping Card Color.
Figure 7. Cardflow Template Options
When you are in Card view, the card is displayed large on your screen. Faint gray buttons appear at the bottom left. The first one, a square within a square, is a zoom feature. If you have zoomed in to do detail work on your card, this will get you back to full card view. The second button turns on the wrist guard, handy for resting your palm on when sketching. The third button will flip your card over so you can access the other side. Cards can also be flipped by tapping them with two fingers. When flipped, a blue triangle will appear at the bottom right corner of a card to indicate that it is the back side. You can select a different template for the back of cards, but the color will stay the same as the front of the card – just like real index cards!
Figure 8. Cardflow+ Zoom, Wristguard and Flip Options and the Back of a Flipped Card
To go back to the Board view, tap the top left square button at any time. If you don't like the gray board background, you can change it by tapping the settings gear button and selecting Change Board Color.
After a while, you will discover that here are numerous ways to do basic manipulation of your cards while in either Board view or Card view – the contextual menu that pops up when you tap and hold a card displays options for cutting and pasting, copying, editing, deleting, changing color or template, copying the styling, removing links, or flipping your cards.
Magic Arrange
After you have created a few cards, you might notice that they are haphazardly arranged by where you tapped. You can tap and drag cards around the screen. If you want more precision, there is a feature called Magic Arrange that can be accessed by selecting two or more cards. You can select cards two ways – by dragging your finger through the cards you want to arrange (selected cards will have a blue glow around them), or by tapping and holding anywhere on the board to access the Select All command. When multiple cards are selected, a group of card arrangement buttons appear in the bottom left of the screen. Options are: vertical stack, diagonal stack, vertical column, horizontal column, grid, random shuffle, or an alphabetical sort by first letter of text on the card.
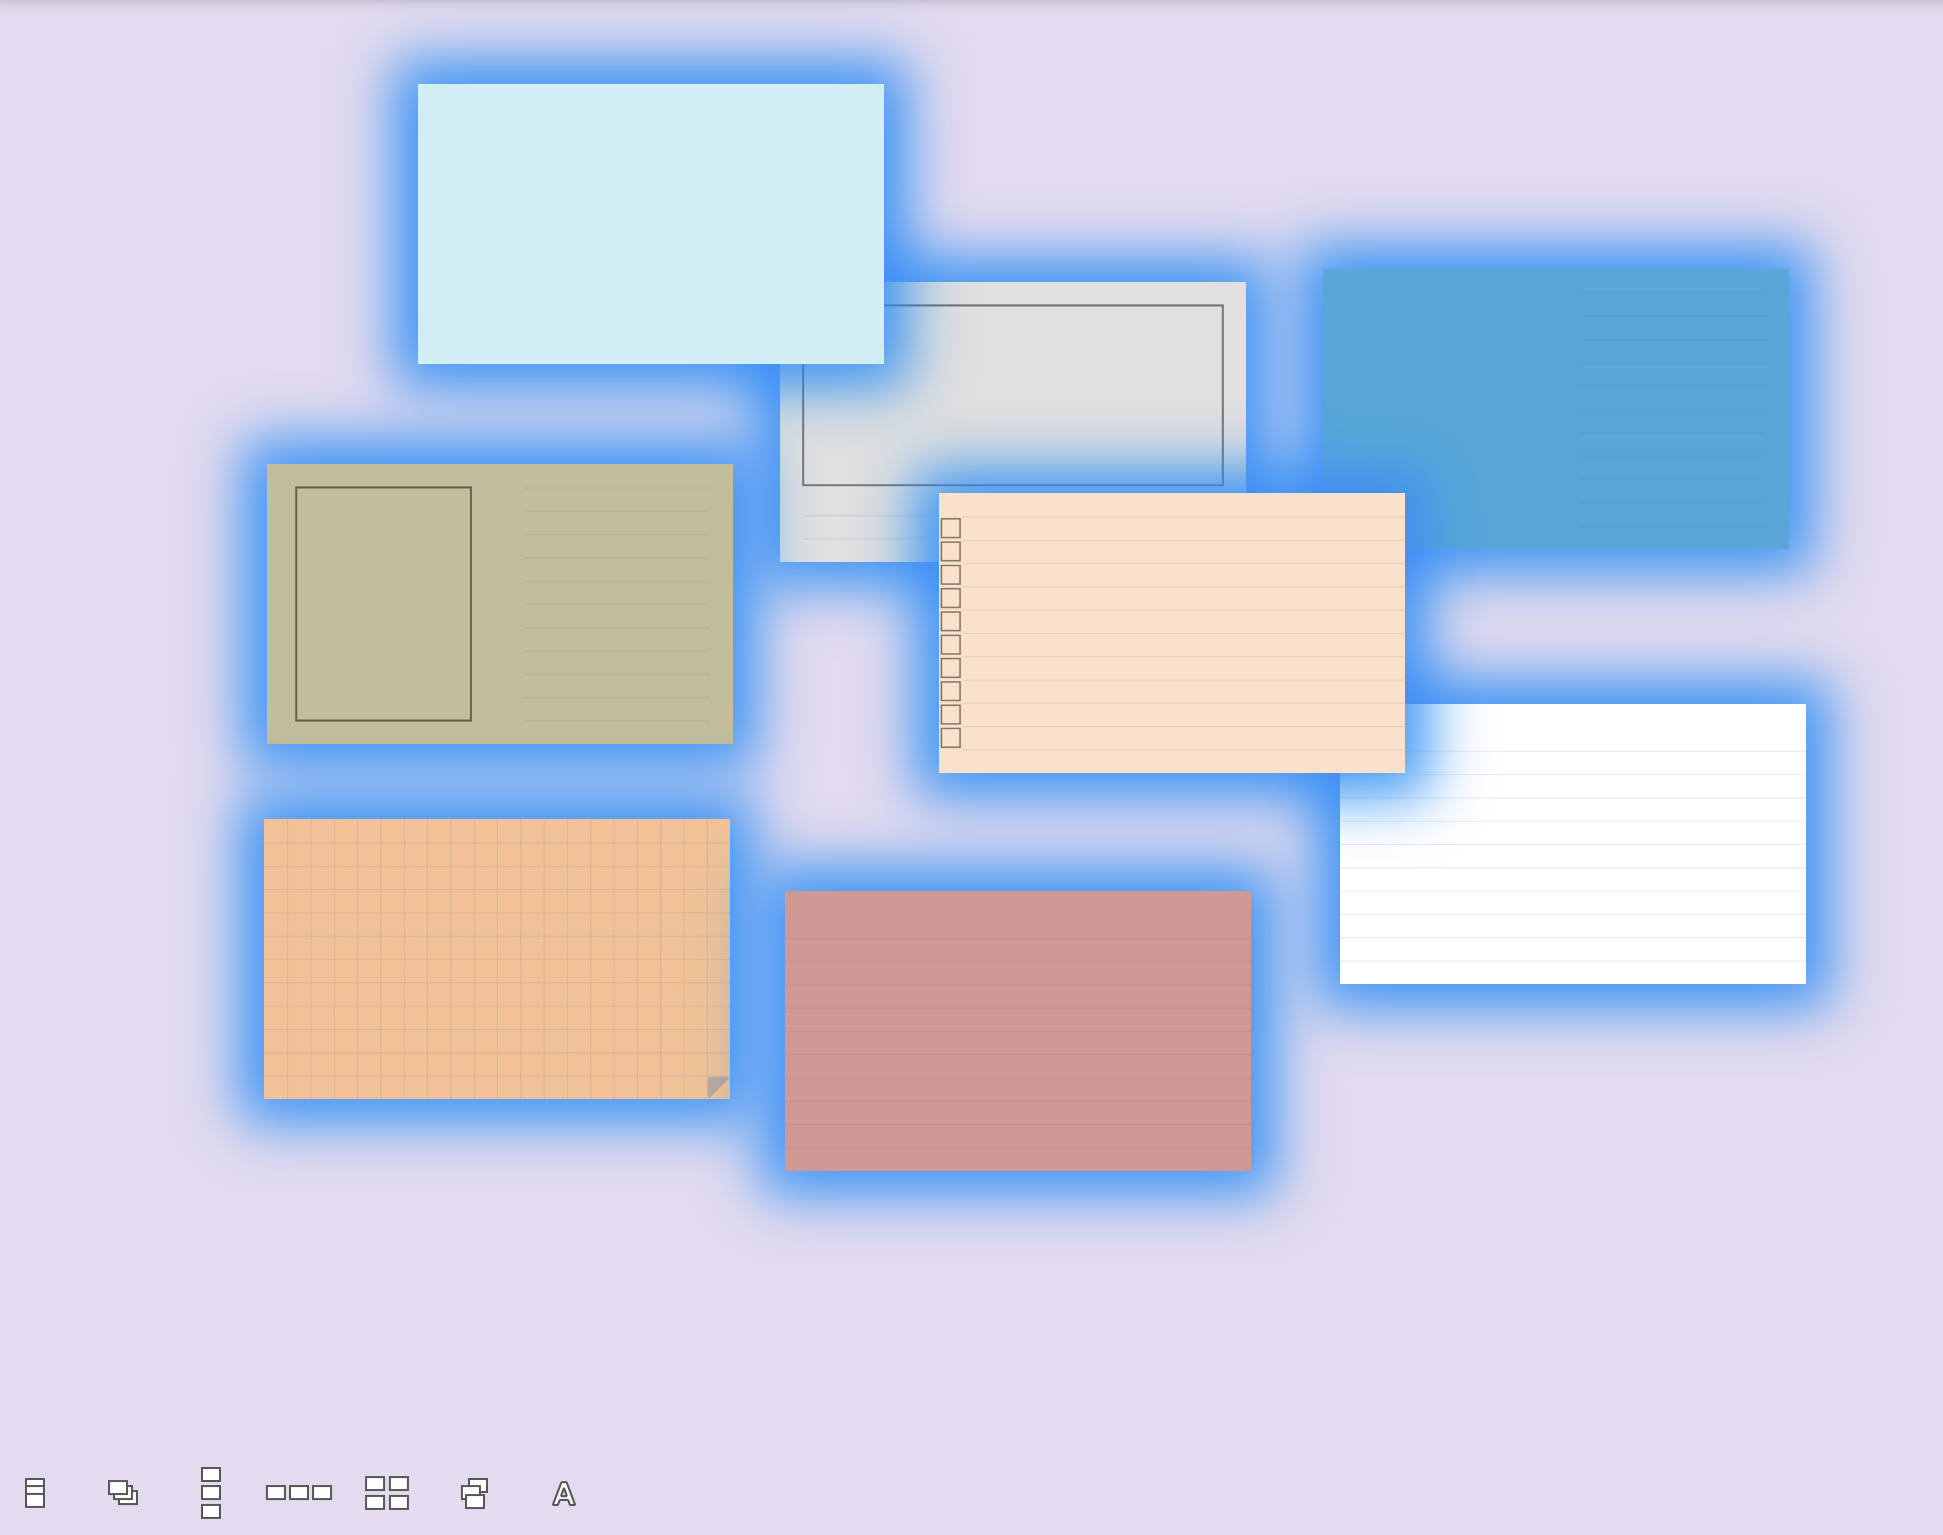
Figure 9. Cardflow Magic Arrange Options
Linking Cards
In addition to arranging your cards, you might want to link them in a particular order. This can be done in either the Board view or in the Card view mode. In Board view, just tap and hold a card until it is selected (the blue glow), then drag your finger off the card onto another already-created card, or drag to an empty section of the board to create a new card and link. You can also create links in Card view by tapping the settings button and selecting Add Link. All of the cards will be displayed for you to choose from.
Links are represented by transparent squares on the cards. By default these are blue, but link color can be changed in the board settings. Links can be resized or repositioned on the cards by selecting Position Links from the settings, then clicking and dragging. Links can also be removed via the Position Links option, or by tapping and holding a card then selecting Remove Links from the contextual menu.
If a card is linked to another card, in Card view you will see arrow(s) to the left and/or right indicating a sequence of linked cards. In Board view, you will see transparent link lines.
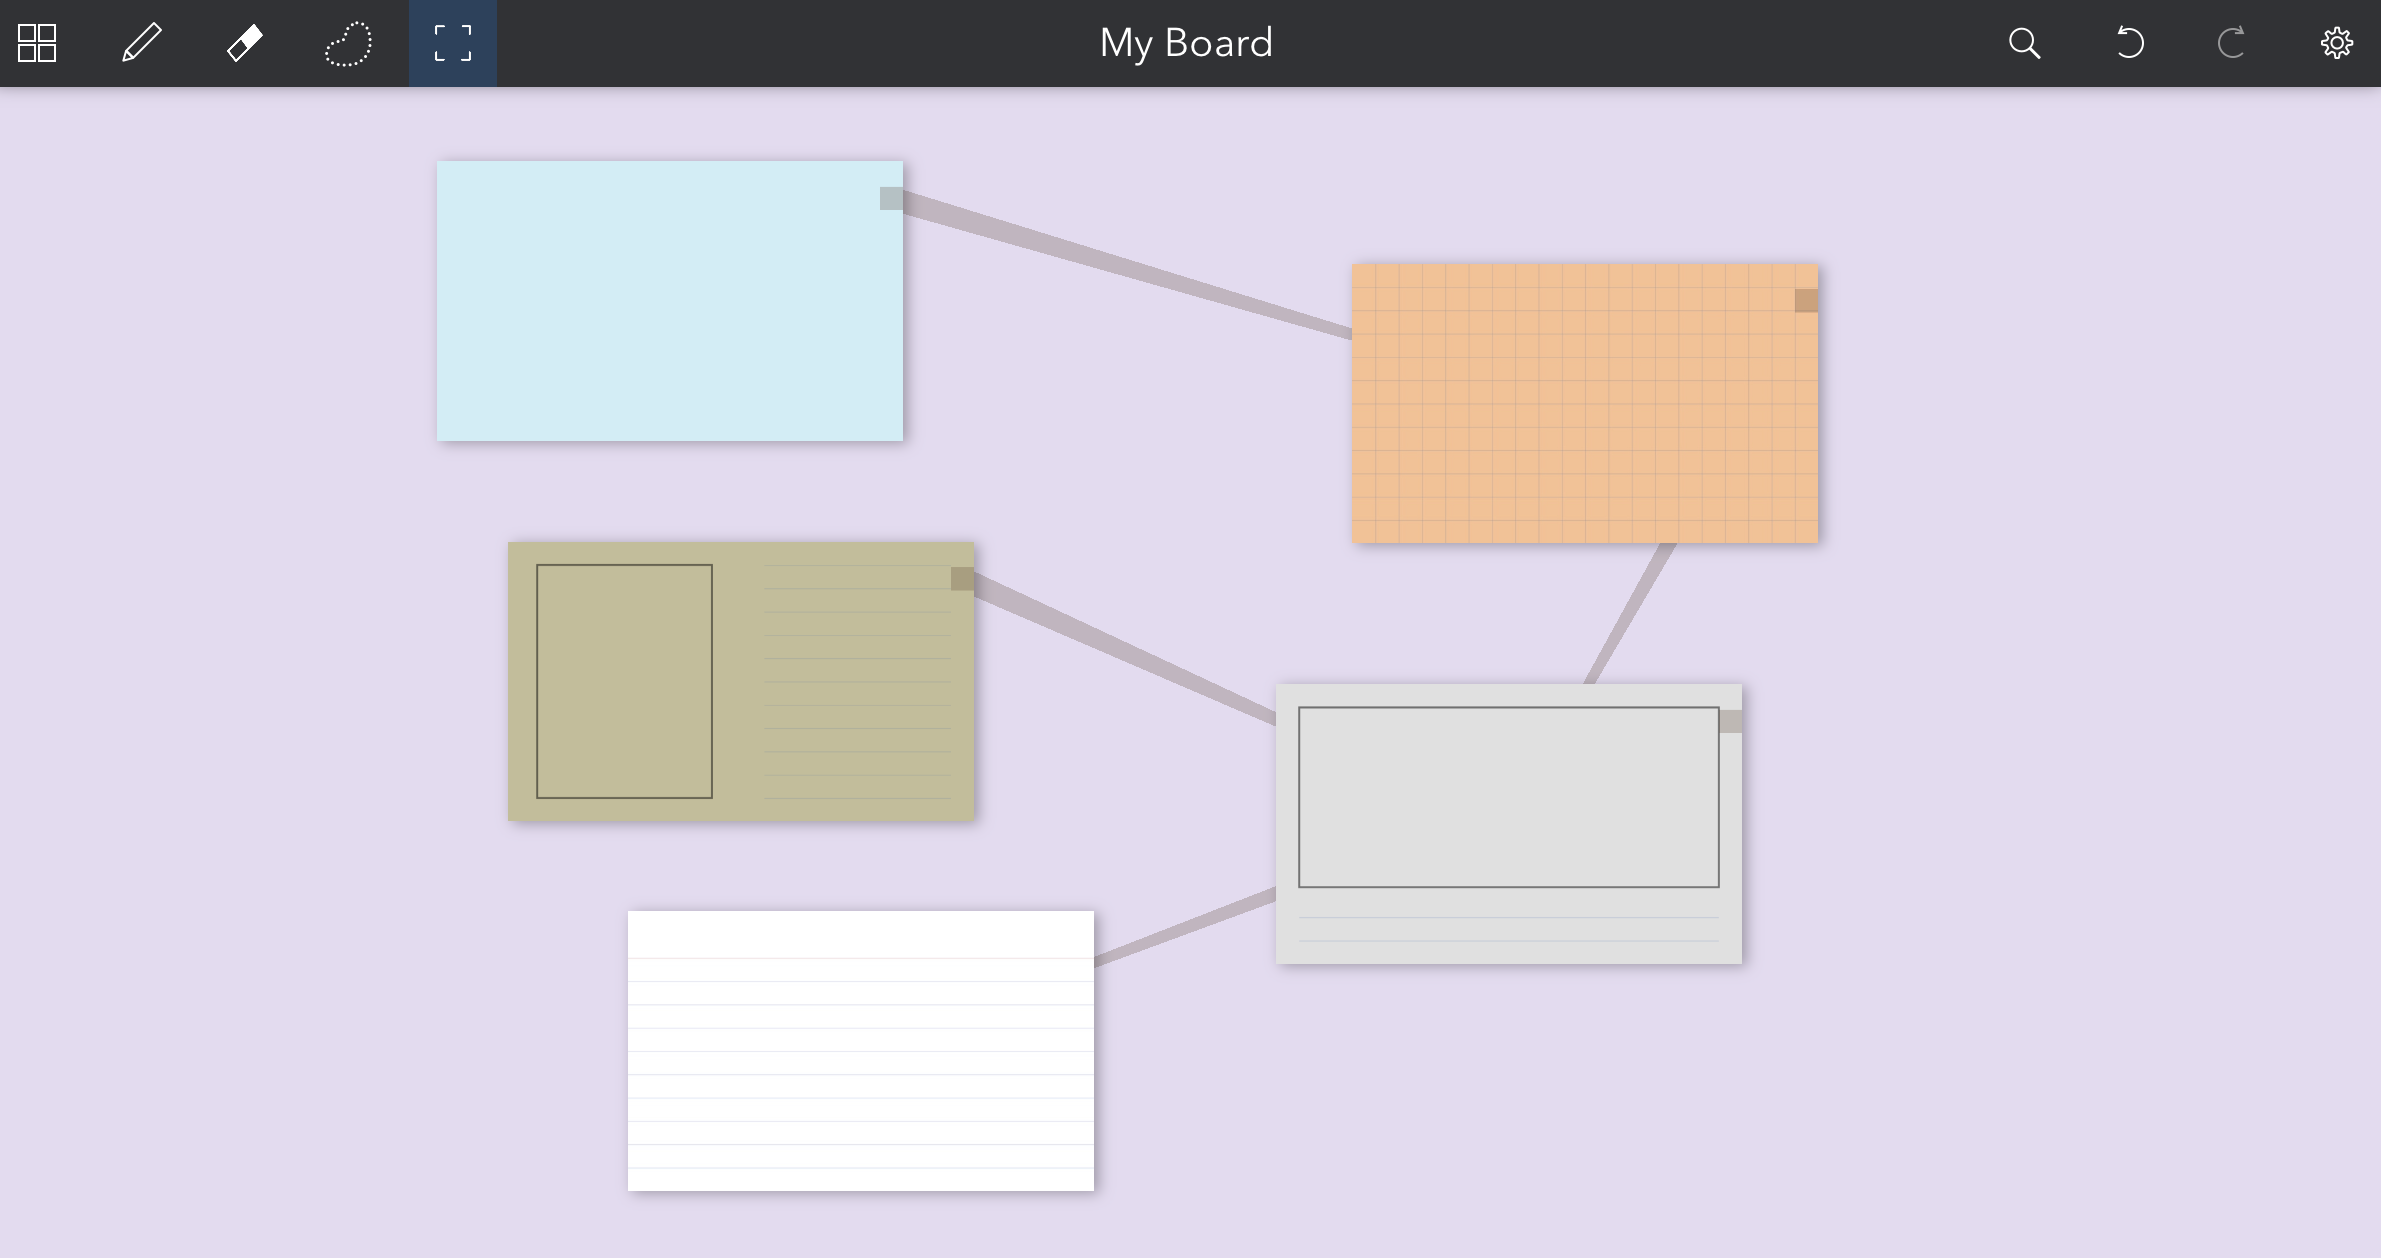
Figure 10. Cardflow Linking
Editing Your Card Contents – The Tool Palette
To add content to your cards, just tap on a card and it will open on the screen in Card view. The top left menu items include the square button to toggle back to Board view, the pencil button to access draw mode, an eraser button, and a lasso button for selecting items that you have written or drawn. The lasso does not select text boxes that have typed text, only drawn items.
The top right menu has an insert button for inserting photos and web pages, a text button for inserting text, undo and redo buttons, and the contextual settings button that lets you choose a card template and card color, as well as additional useful options including exporting card as image and adding a link to another card in your stack.
Figure 11. Card Tool Palette
Writing and Drawing
Cardflow uses an ink engine that creates vector artwork, making your writing and sketches nice and crisp. If you use an Apple Pencil, writing and sketching is a breeze. When you tap the pencil button to start sketching, another menu layer will appear below the top one. From left to right, the tools are: Draw in Front, Draw Behind, Shape, Pen Size and Color Opacity slider. To use the Shape tool, you just draw lines or shapes and the built-in shape recognition will perfect them for you. The Pen Size slider is tricky at first, but you can select the size by tapping the number on the left side of the slider, then adjust the opacity by tapping the % (1-100) on the right side of the slider. Next to the slider is the customizable color palette – you can tap and hold one of the colors to adjust it.
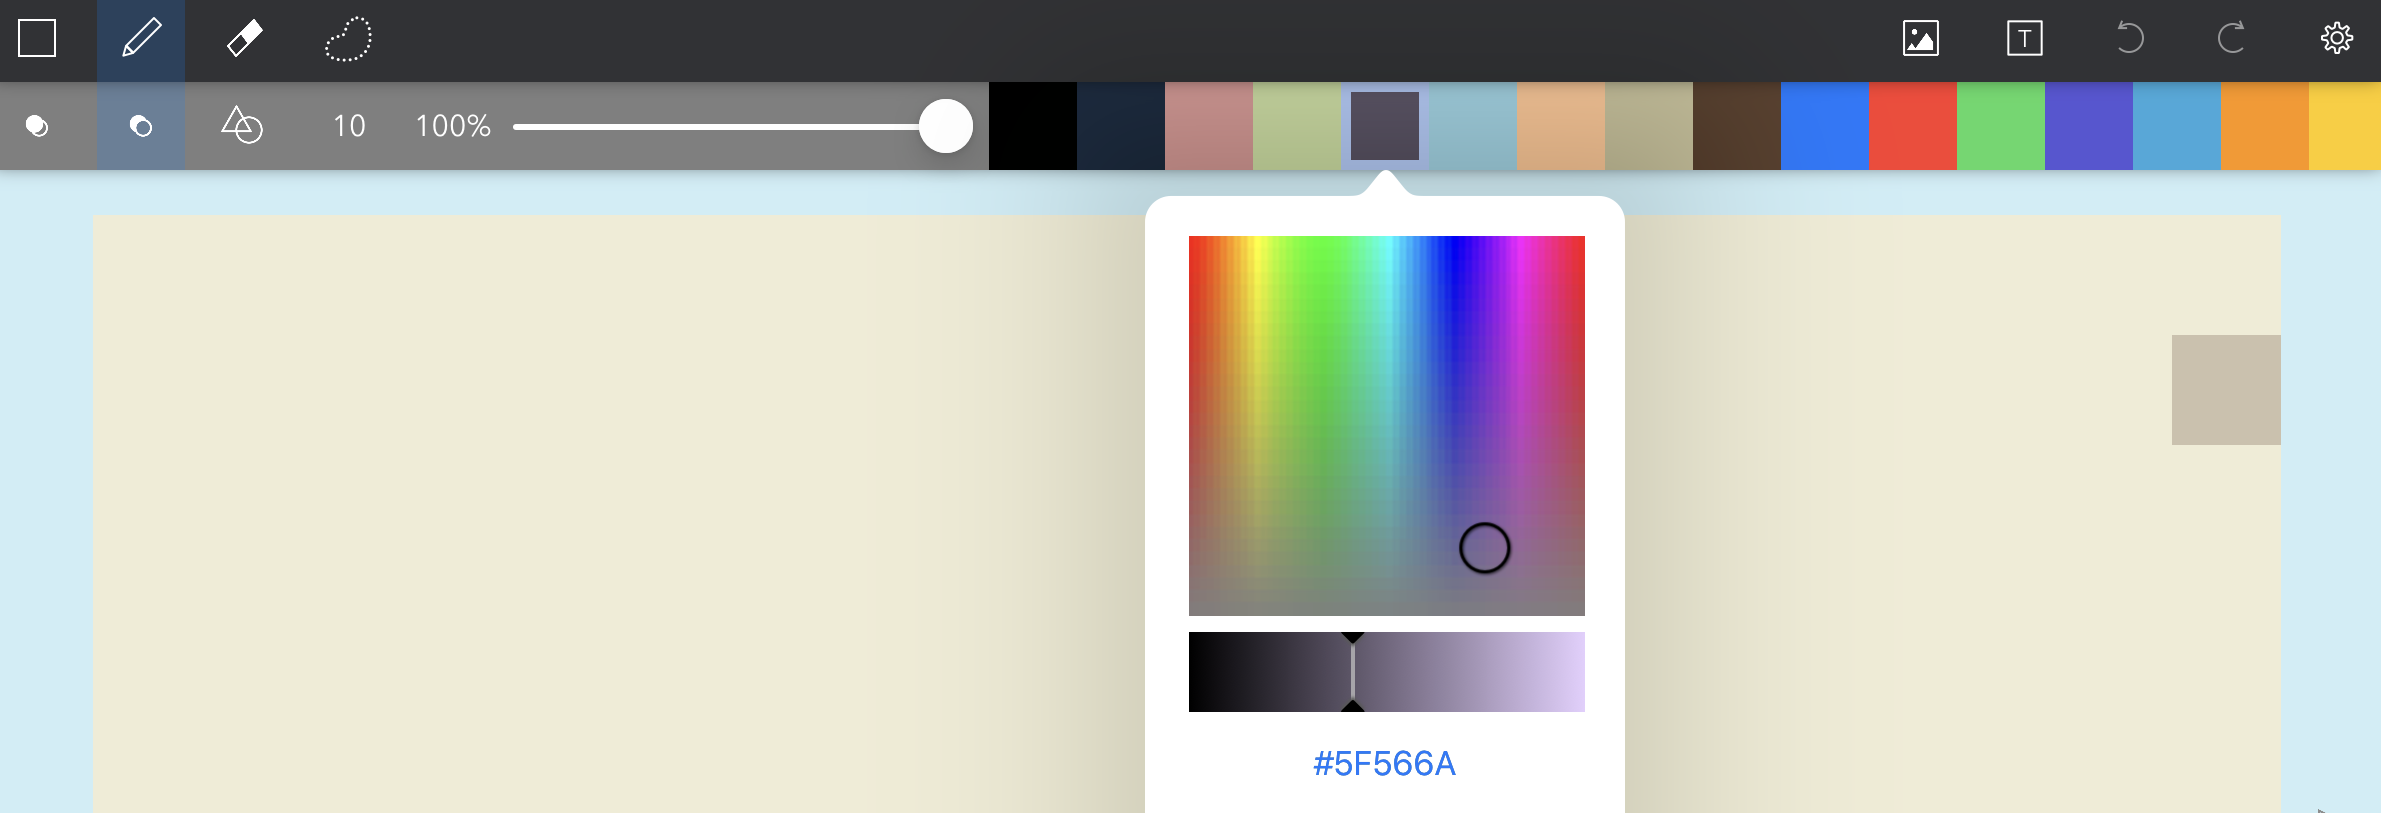
Figure 12. Drawing Tools
If you need to move your writing or art after creating it, tap the lasso button to select it. It will appear as an animated dotted blue line. You can then drag the round blue grip at the top of the selection to rotate the image or drag the resize arrow at the bottom right of it to resize it. You can also do this by pinching and zooming or dragging inside the blue selection with two fingers.
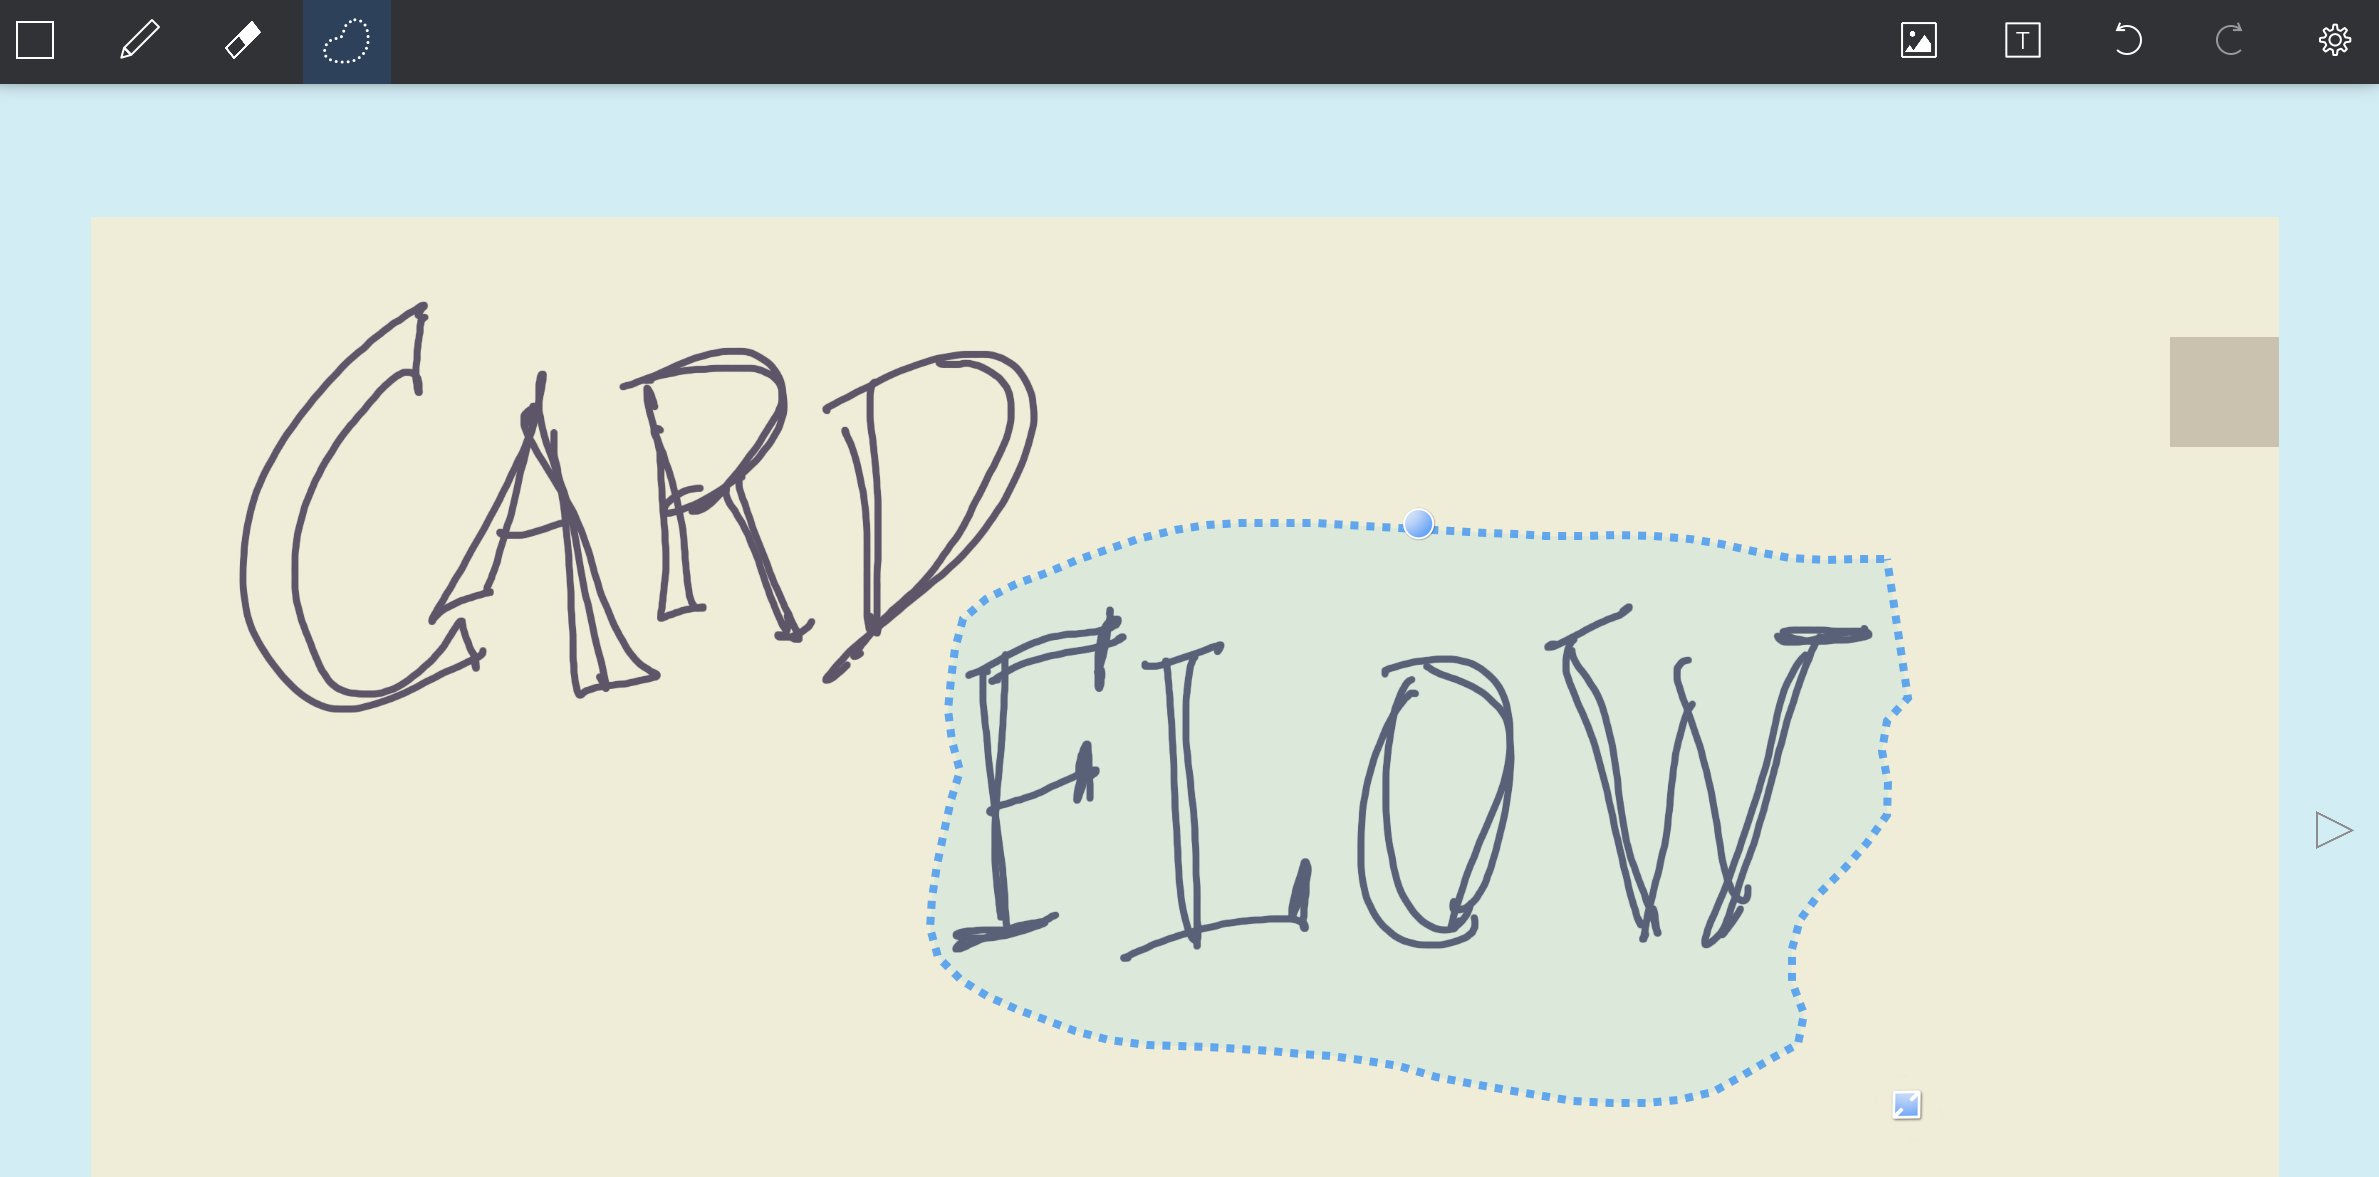
Figure 13. Lasso Tool
Inserting Photos and Web Pages
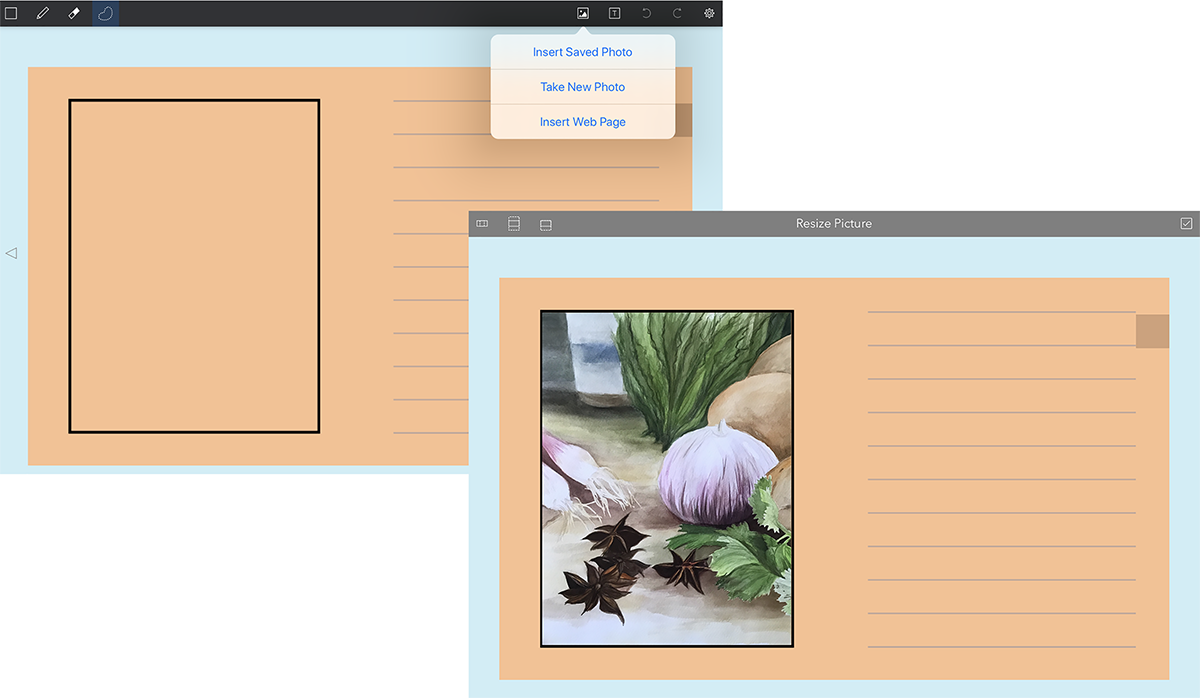
Pictures can be inserted from your Photos app or taken with your iPad camera by tapping the insert button and selecting Insert Saved Photo or Take New Photo. Each side of a card can contain one picture. If you are using a storyboard template, it will automatically resize the picture to fit the screen frame. Pictures can be changed, resized, copied or removed after you have placed them by tapping the insert button again. Options for fitting the frame or filling the frame appear at the top left when you select Resize Picture.
Figure 14. Inserting and Resizing a Photo
Web pages can be inserted onto cards by tapping the insert button and selecting Insert Web Page. In the built-in web browser, you can type a URL into the address bar or use the search feature. Any web URL, including locations to specific files, videos, photos or documents, can be linked, including files you might have in a cloud storage service. Just copy and paste links into the address bar. When your website/URL comes up, tap the Done button at top right and your website or file will appear on your card as an image, along with a blue globe on the top right of the card that contains the web link. The web image automatically fills the card, but you can resize it the same way you resize pictures. To visit the web link, just tap on the globe button.
Figure 15. Inserting Web Links
Adding Text
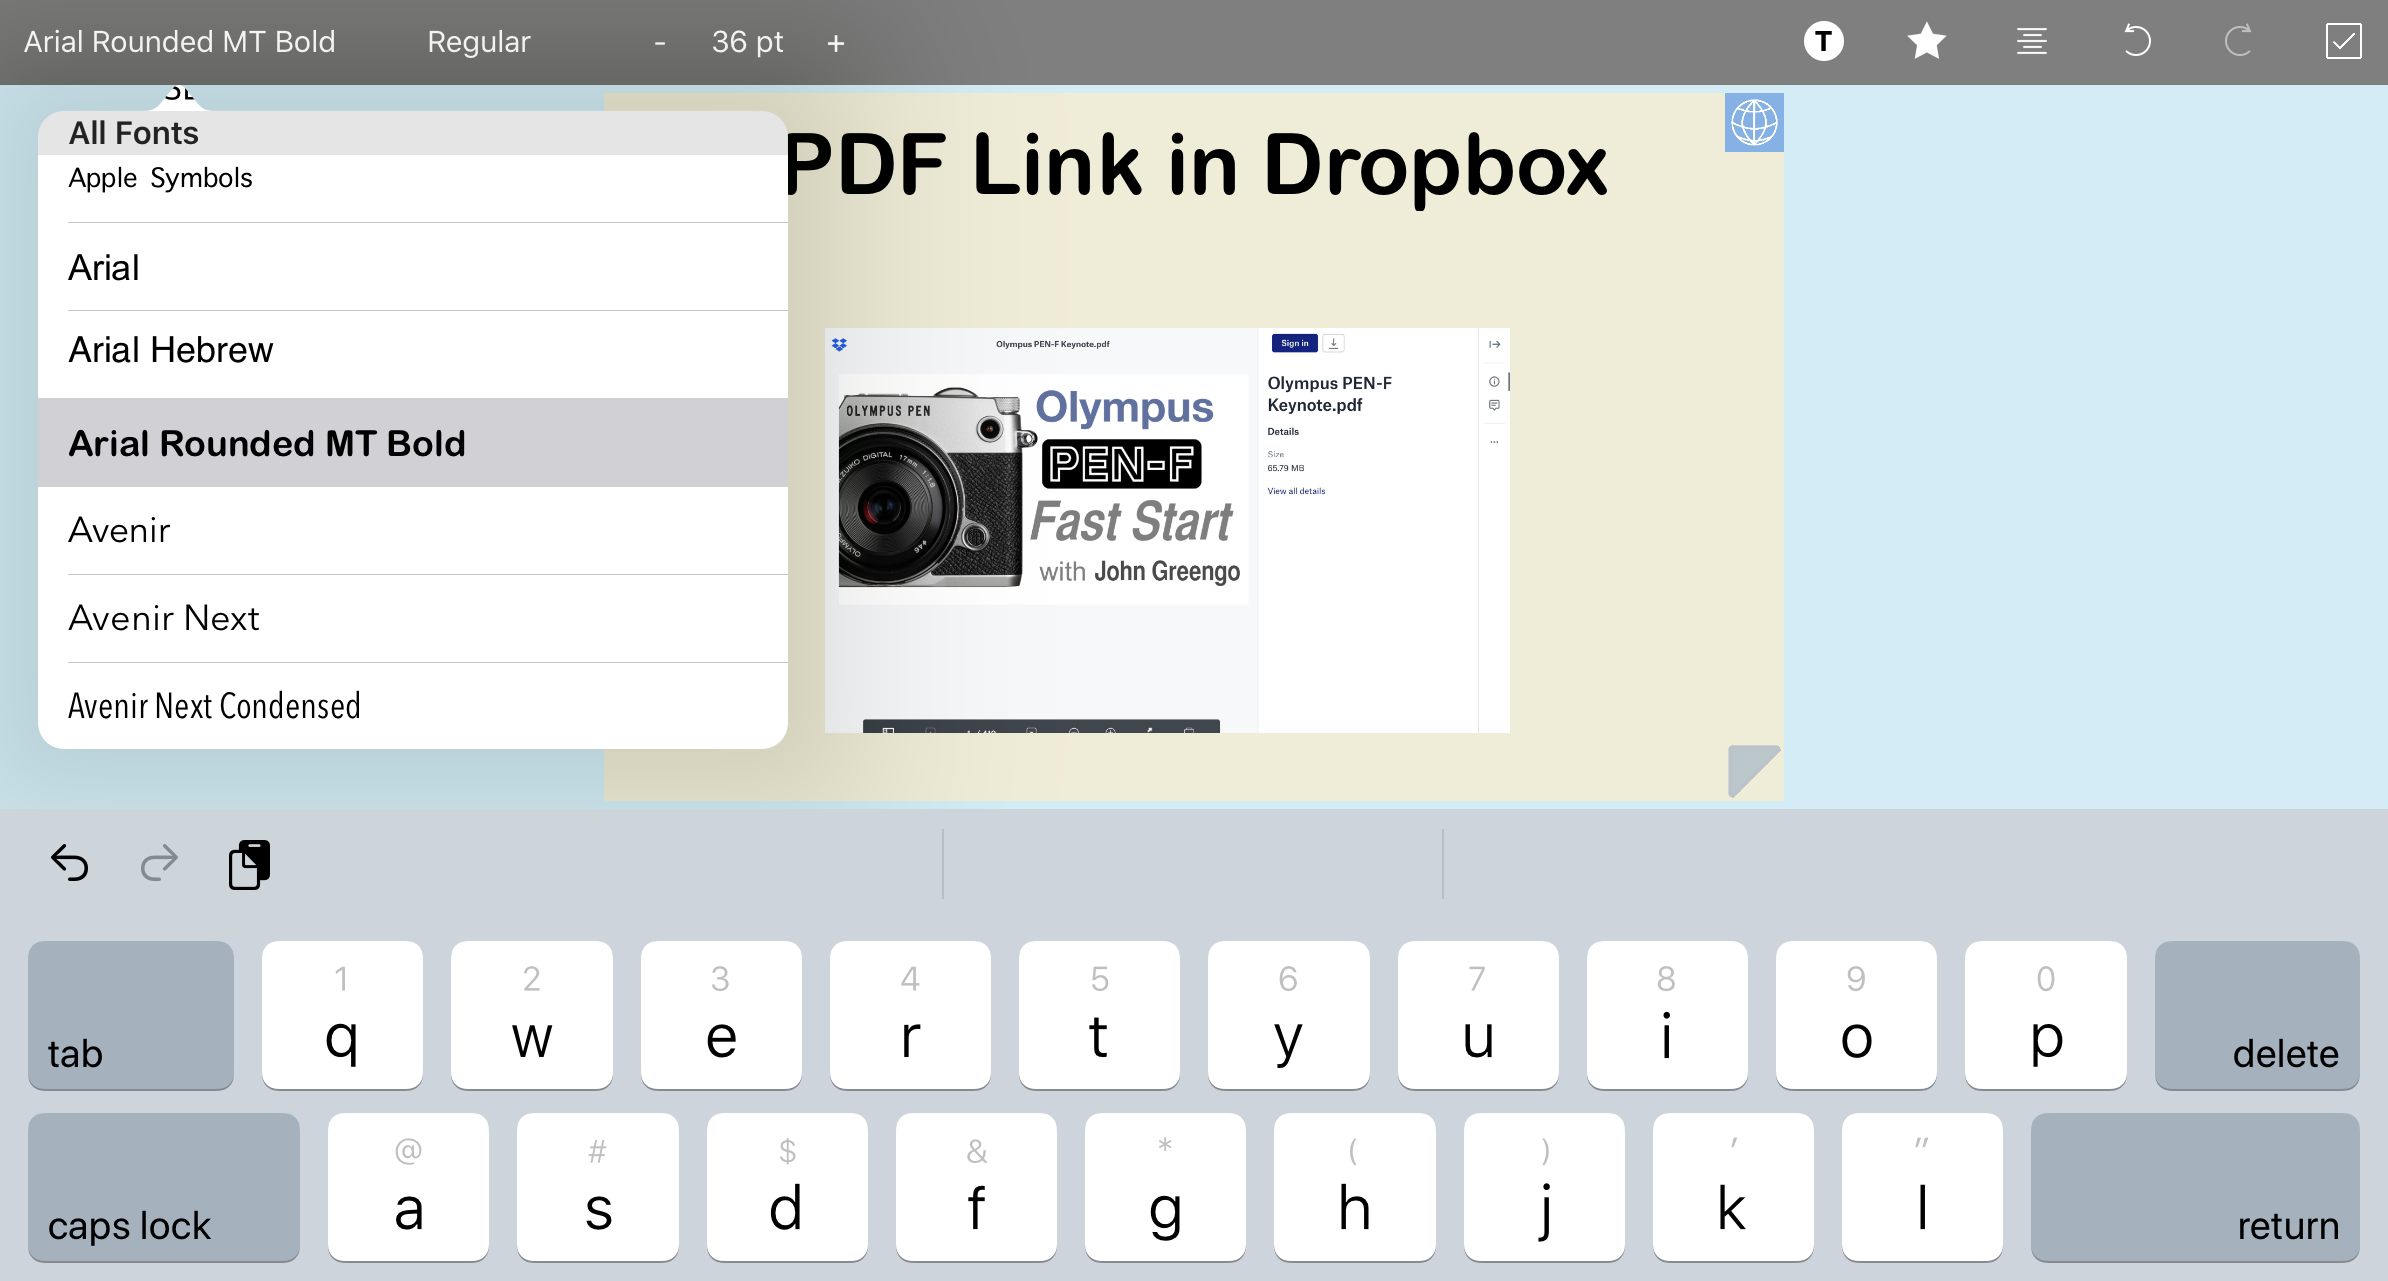
If you prefer to type your content onto cards instead of hand writing, use the text button. The keyboard will automatically pop up for you to type. The menu bar will change once again, letting you select from a variety of fonts and styles. You can also adjust the type size, color, and alignment. If you are familiar with the markup language, you can use that for basic formatting. You can also cut and paste text from another app or a web page. The text box is the whole card and cannot be moved or adjusted, but you can add photos or web pages to the text card.
Figure 16. Adding Text
If you have a lot of data or need to import a lot of information for your cards, you can do so from a CSV file. I tested this option and it seemed to work well in bringing in the data and creating new cards for each record.
Exporting Cards and Boards
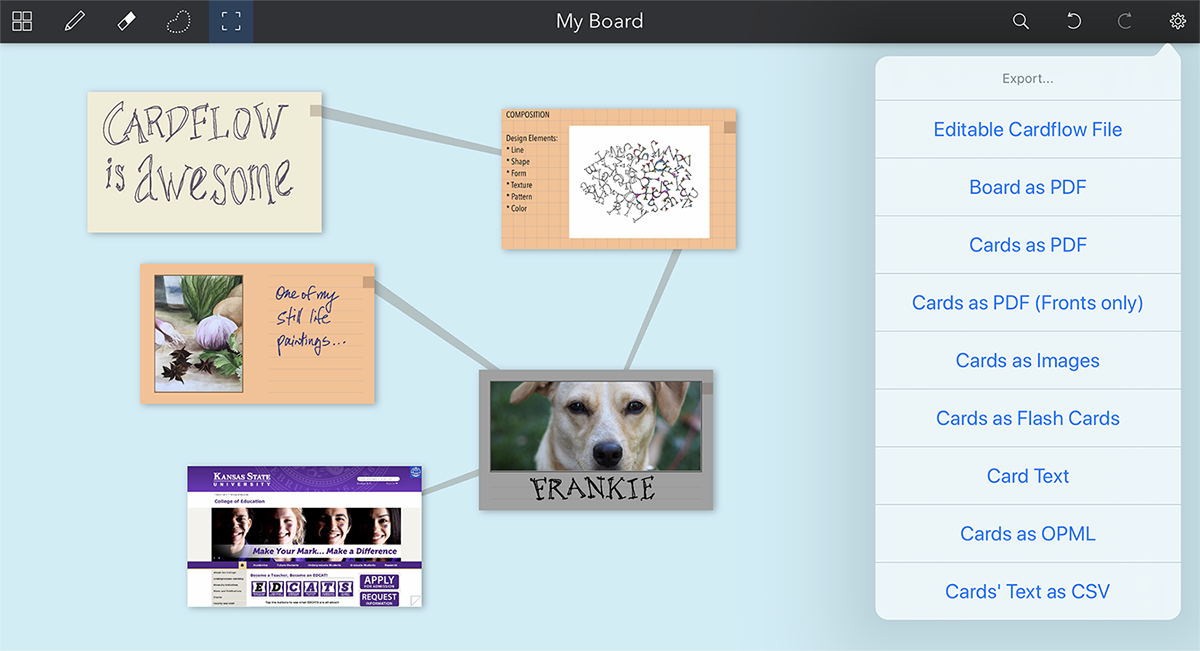
The standard Cardflow app does not allow export, but cards and boards can be exported from Cardflow+. In Board view, tap the settings gear button and select Export. The options that I have found useful are: Board as PDF (captures the whole board); Cards as PDF; Cards as PDF (Fronts only); Cards as Images; and Card Text. If you want to export only specific cards, you can select just those for PDF export. Any website and card links that you have created on the cards will work in exported PDFs, no matter the platform. In Card view, you can select Export as Image from the settings to save the card that you have on screen to your Photos app camera roll. If the card has a flip side, you will have to export it separately.
Figure 17. Export Options
Other options available that I have not tried include Editable Cardflow File, Cards as Flash Cards, Cards as OPML, and Cards' Text as CSV. The CSV option will create four columns: card front text, card back text, front web URL, and back web URL. If your cards have sketches, handwriting, or images, this option would not work well.
Cloud Syncing and Transferring Boards
Cardflow has the ability to store your files in iCloud Drive for both backup and transferral to other iPads or your desktop computer. You might want to back up your boards after doing any editing. I have successfully transferred boards from the basic Cardflow app to Cardflow+, from one iPad to another, and from my iPad to the desktop version of Cardflow.
To transfer a board from Cardflow to Cardflow+, tap and hold on the board square until the contextual menu comes up, then select Transfer. You will be able to select Copy to Cardflow+ from the action menu.
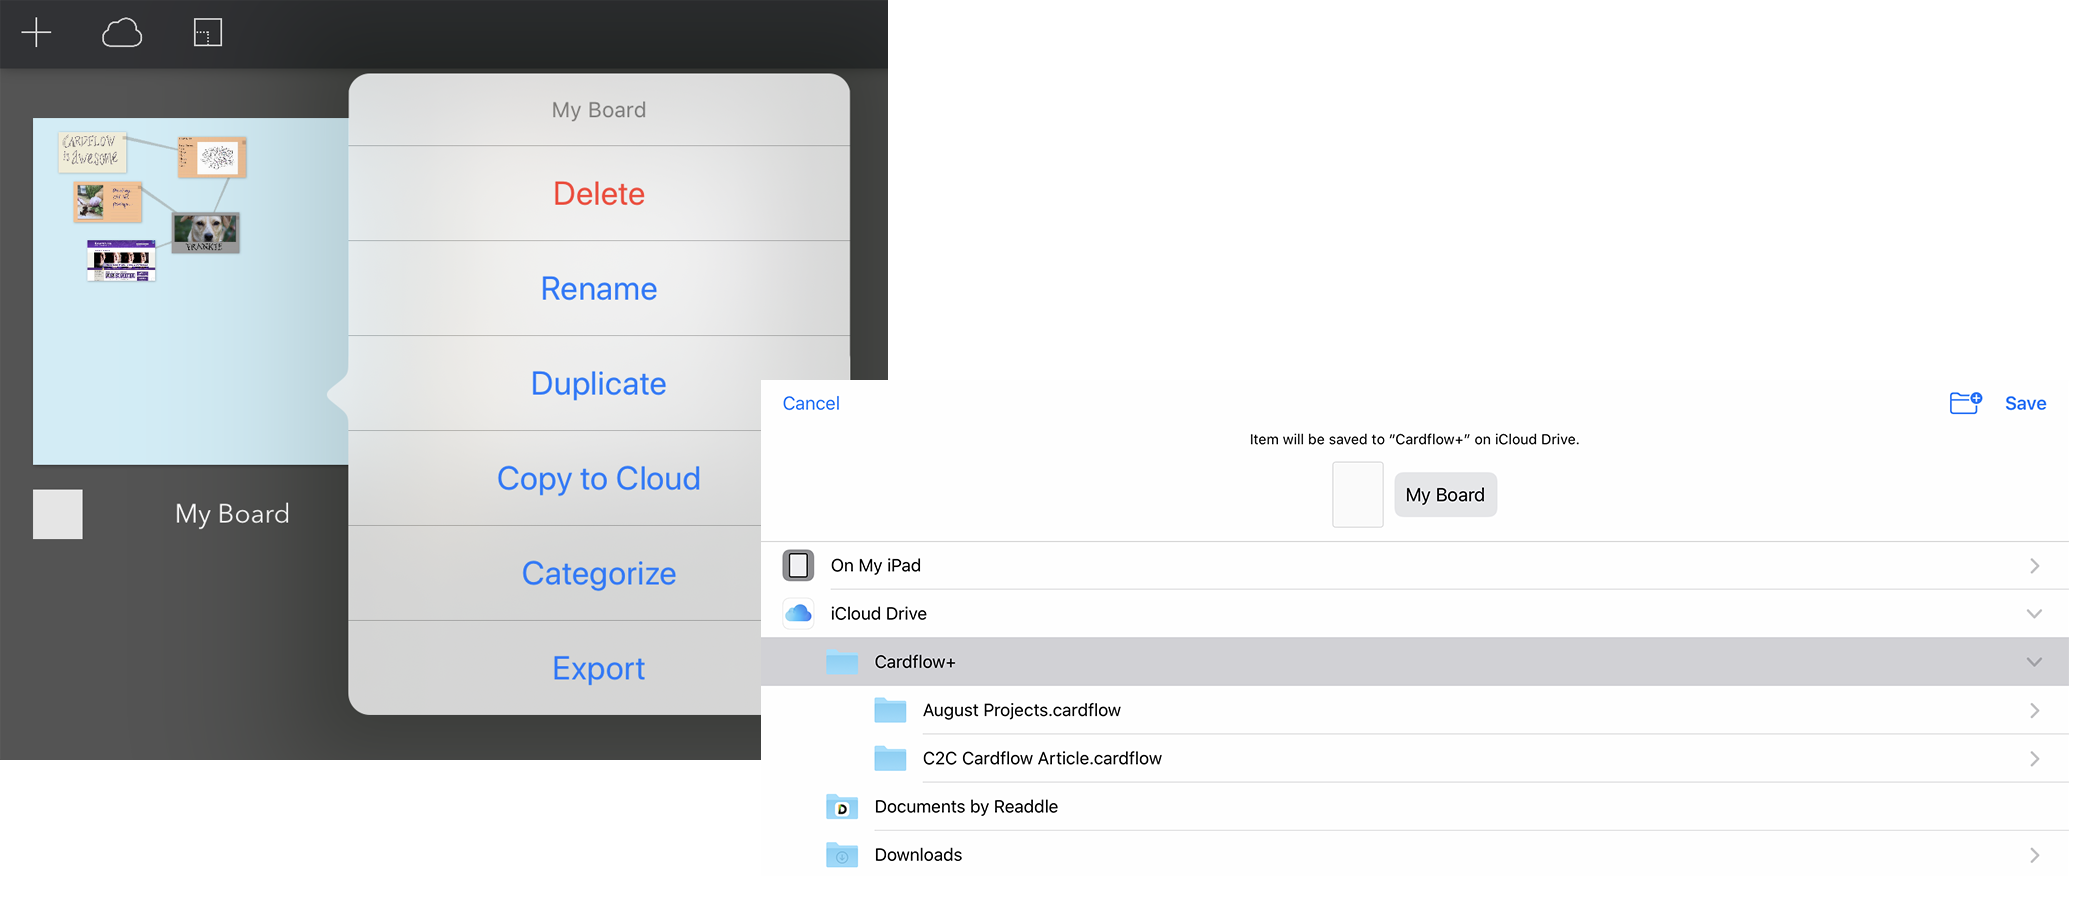
To transfer a board to another iPad or to the desktop version, tap and hold on the board to bring up the contextual menu and select Copy to Cloud. The Files app will appear. Select a folder to store the board files in (you can create a new folder in iCloud), then tap Save. A folder with the board title is created within your selected folder. On the iPad you are transferring to, you will need access to your iCloud Drive. Find the folder that you transferred and tap and hold for the contextual menu. Select Move, then navigate to the Cardflow folder within the On My iPad folder and tap Copy (top right). Tap the Cancel button to close the Files app browser to go back to Cardflow. Your transferred board should be waiting for you in Board view. If you are transferring to the desktop version, just go to File > Open and navigate to your iCloud Drive folder to open your boards. The Cardflow documentation warns against simultaneous editing of boards on multiple devices, as it can lead to data loss.
Figure 18. Transferring Boards
Cardflow Support
Cardflow has a useful online user guide with tips and videos available.
My Use of Cardflow+
I have used Cardflow+ for the past two years, and I have slowly discovered some of its subtle features, mostly buried within contextual menus. I like the ability to create card decks with web links. You can actually use these decks for presentations. It is also useful for planning, especially website prototyping, as you can use the linking feature to simulate interactions. I guess I'm an old-school planner, but I like the retro index card approach with the digital touch that Cardflow offers.
About the Author
Mary Hammel is Associate Director of the Catalyst Technology and Media Services, College of Education Kansas State University. Her work involves design and production of print and digital materials for educational publications and classroom use.
She can be reached at mhammel@ksu.edu.
| Previous page on path | Cover, page 3 of 21 | Next page on path |
Discussion of "Cardflow: Digital Index Cards on the iPad"
Add your voice to this discussion.
Checking your signed in status ...