Using Google YouTube’s Automated Closed Captioning to Enable Accessibility of Educational Videos
By Shalin Hai-Jew, Kansas State University
Anyone who has manually created transcripts for educational videos knows that this work is time-consuming and tedious.
This work may be complicated by working with videos with multiple speakers, complex domains, and multiple languages. Getting the timings fully accurate can be difficult without special technologies, and then there are several other steps to create timed-text transcripts to align with a video. Enriched transcripts—with annotations of background sounds and alt-texted images—require even more effort and attention. On top of these challenges, there is the requirement that transcripts should be 99% accurate to meet accessibility standards, and alt-texting has to enable the equal informational value of any imagery or figures.
Straight to video. For all the transcription challenges, many subject matter experts (SMEs), content experts, and instructors prefer the affordances of video. Video can be engaging. It is dynamic. Videos are highly portable. They can be overlaid with interactivity.
The common technologies used in content capture enable going right to video. Think about Microsoft PowerPoint 2016 and its built-in straight-to-video converter from timed audio-recorded slides. Screen captures are enabled by TechSmith’s Camtasia, Adobe’s Captivate. Mediasite’s desktop recorder, among others. Web conferencing tools like Zoom enable recordings, which can be turned into guest lecture presentations, group presentations, single-lecturer presentations, and others. Many smart classrooms have built-in recording capabilities, including some automated ones.
Then there are videos that are not “born digital,” but have to be captured from other media: old-school eight-track tapes and VHS tapes. There are video captures using a range of modern camcorders, recording to internal memory and from external memory devices (DVD, mini DV video cassettes, memory cards), and others.
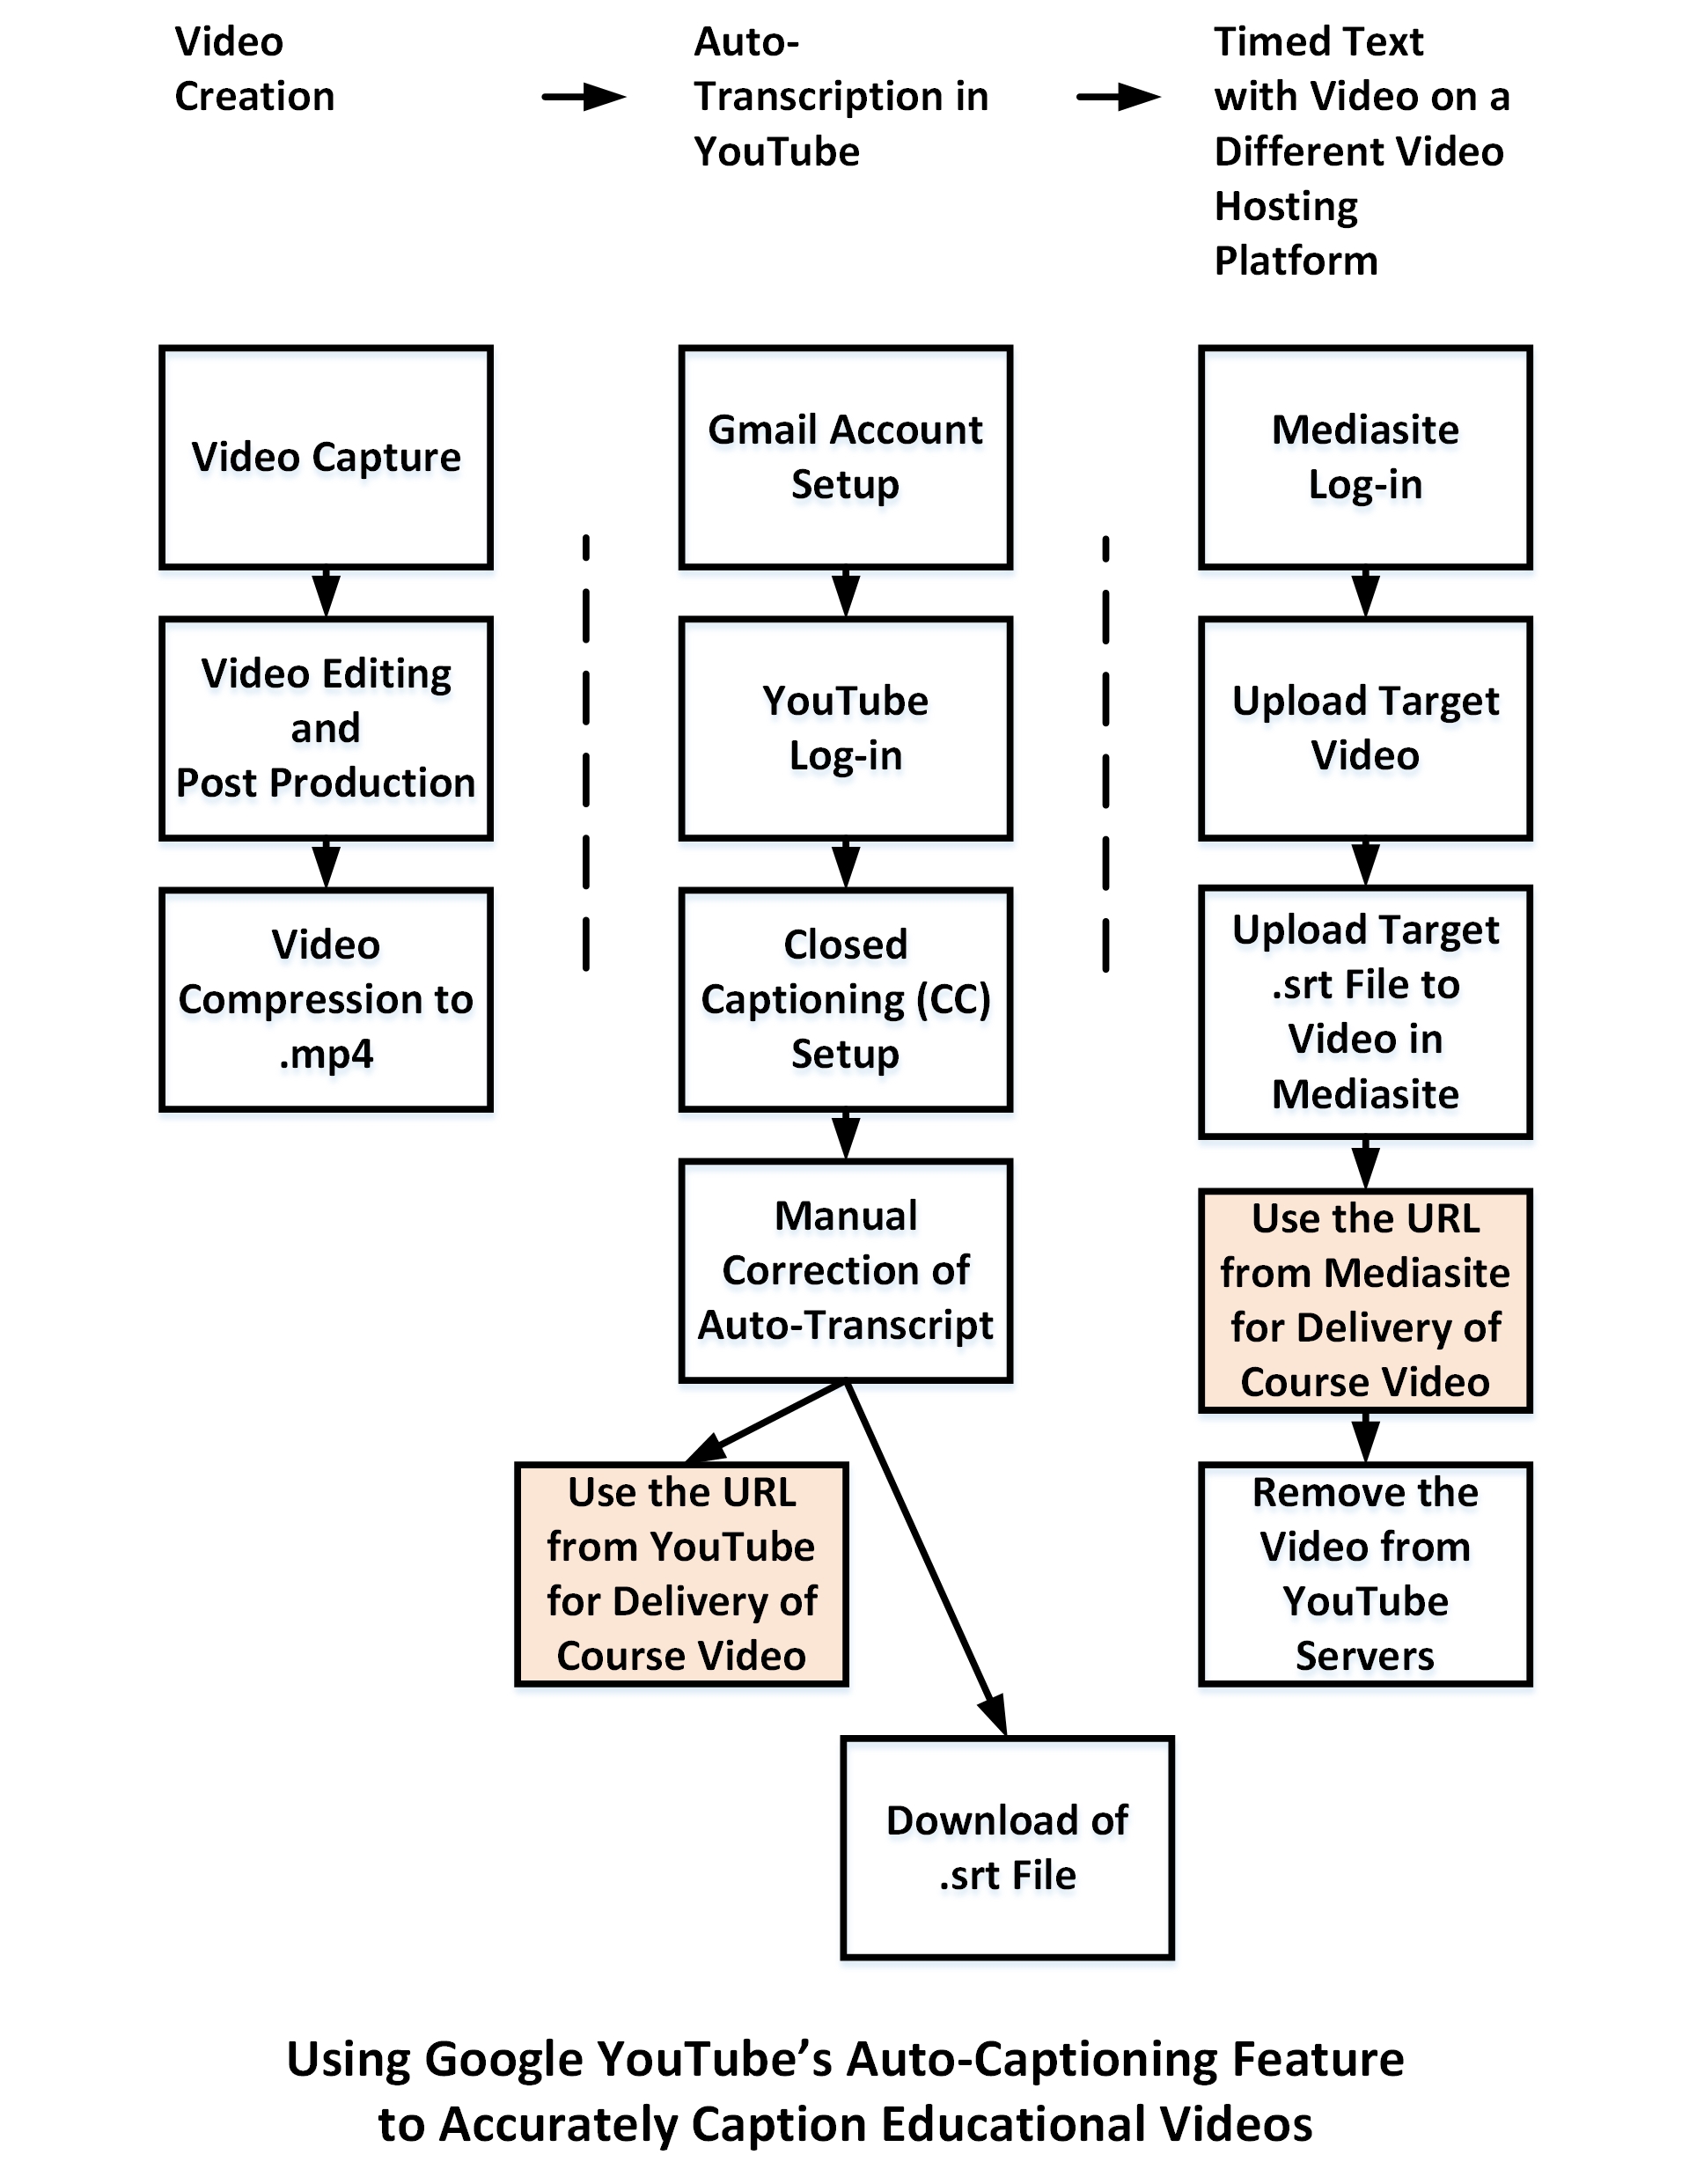
Automated voice-to-text closed captioning. One approach used in higher education is to use Google YouTube’s automated voice-to-text closed captioning in over 120 different languages (“Cloud Speech-to-Text”). An overview of this process is depicted in Figure 1.
Figure 1: Using Google YouTube’s Auto-Captioning Feature to Accurately Caption Educational Videos
This short article will describe the steps in harnessing Google YouTube for auto-captioning.
On YouTube. First, unless one wants to use a personal Google mail account for setting up the videos, it may be a good idea to start a new Gmail account. (This will be linked back to the individual by verifying email or phone number or other identifier like the IP address, but in terms of the public-facing side, this will mean that the account name and email will be one step away from personally identifiable information (PII). This work-based Gmail may enable a group or a department to use the account for their shared videos.
Once the Gmail account has been logged into, open up another tab in the same web browser.
Navigate to YouTube.
Go to the log-in identification at the top right of the YouTube site, and left-click.
Go to the Creator Studio in the dropdown.
In the left menu navigation, go to the Video Manager.
At the top right is an “upload” indicator. (An arrow pointing up.) Click the icon.
The next screen enables you to select .mp4 videos to upload to the account (Figure 2). Note that you have a choice of sharing the video in four states: Public, Unlisted, Private, and Scheduled. The Public setting makes the video findable by web crawlers based on text annotations. The Unlisted setting enables the video to be viewable by direct linkage, but the video itself is not directly findable by the broad masses. The Private setting enables the video to be viewed only by the user who uploaded the contents, and there is no public-facing URL on which that video may be seen. The Scheduled setting allows a private video to be released at a particular future time.
Figure 2: Uploading .mp4 Videos to YouTube
Upload the selected video. While the video hosting site is processing the upload, do not navigate away from the page.
Input some textual descriptors. Add some folk tags to increase the findability of the video. YouTube will create three thumbnails from the video sequence, but users may swap out the main one used to represent the video. (Figure 3)
Figure 3: Adding Descriptions and Tags to the Uploaded Video
If this is ready for publication, click Publish at the top right corner.
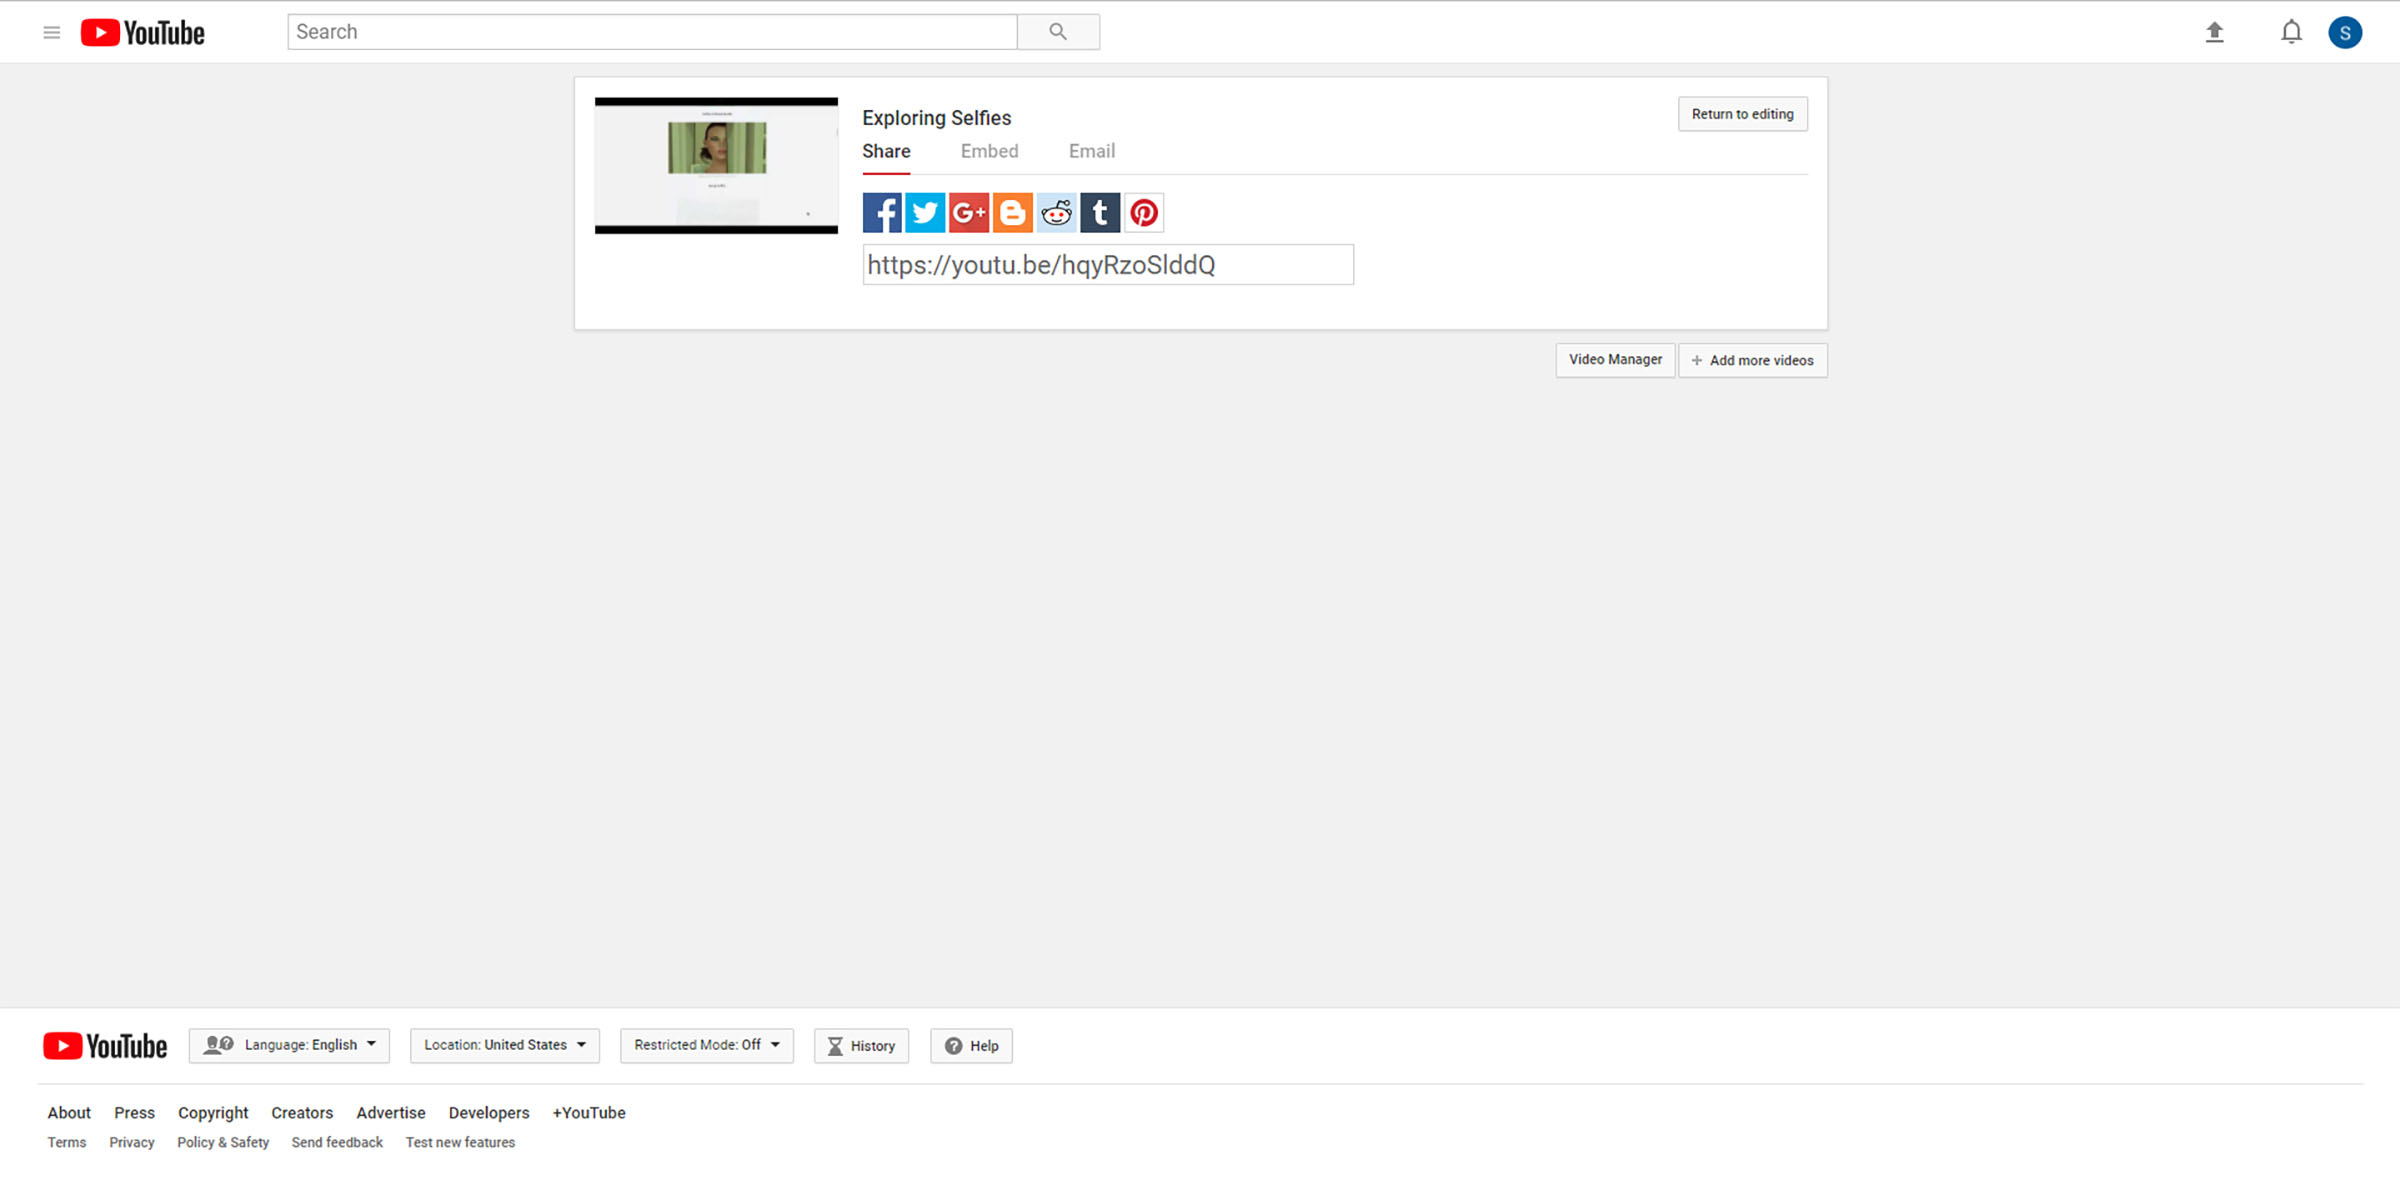
The next screen enables sharing via various social media platforms: Facebook, Twitter, Google Plus, Blogger, reddit, Tumblr, and pinterest. There is also a short URL provided to access the video. At the top right, click “Return to editing.” (Figure 4)
Figure 4: Social Sharing Opportunities
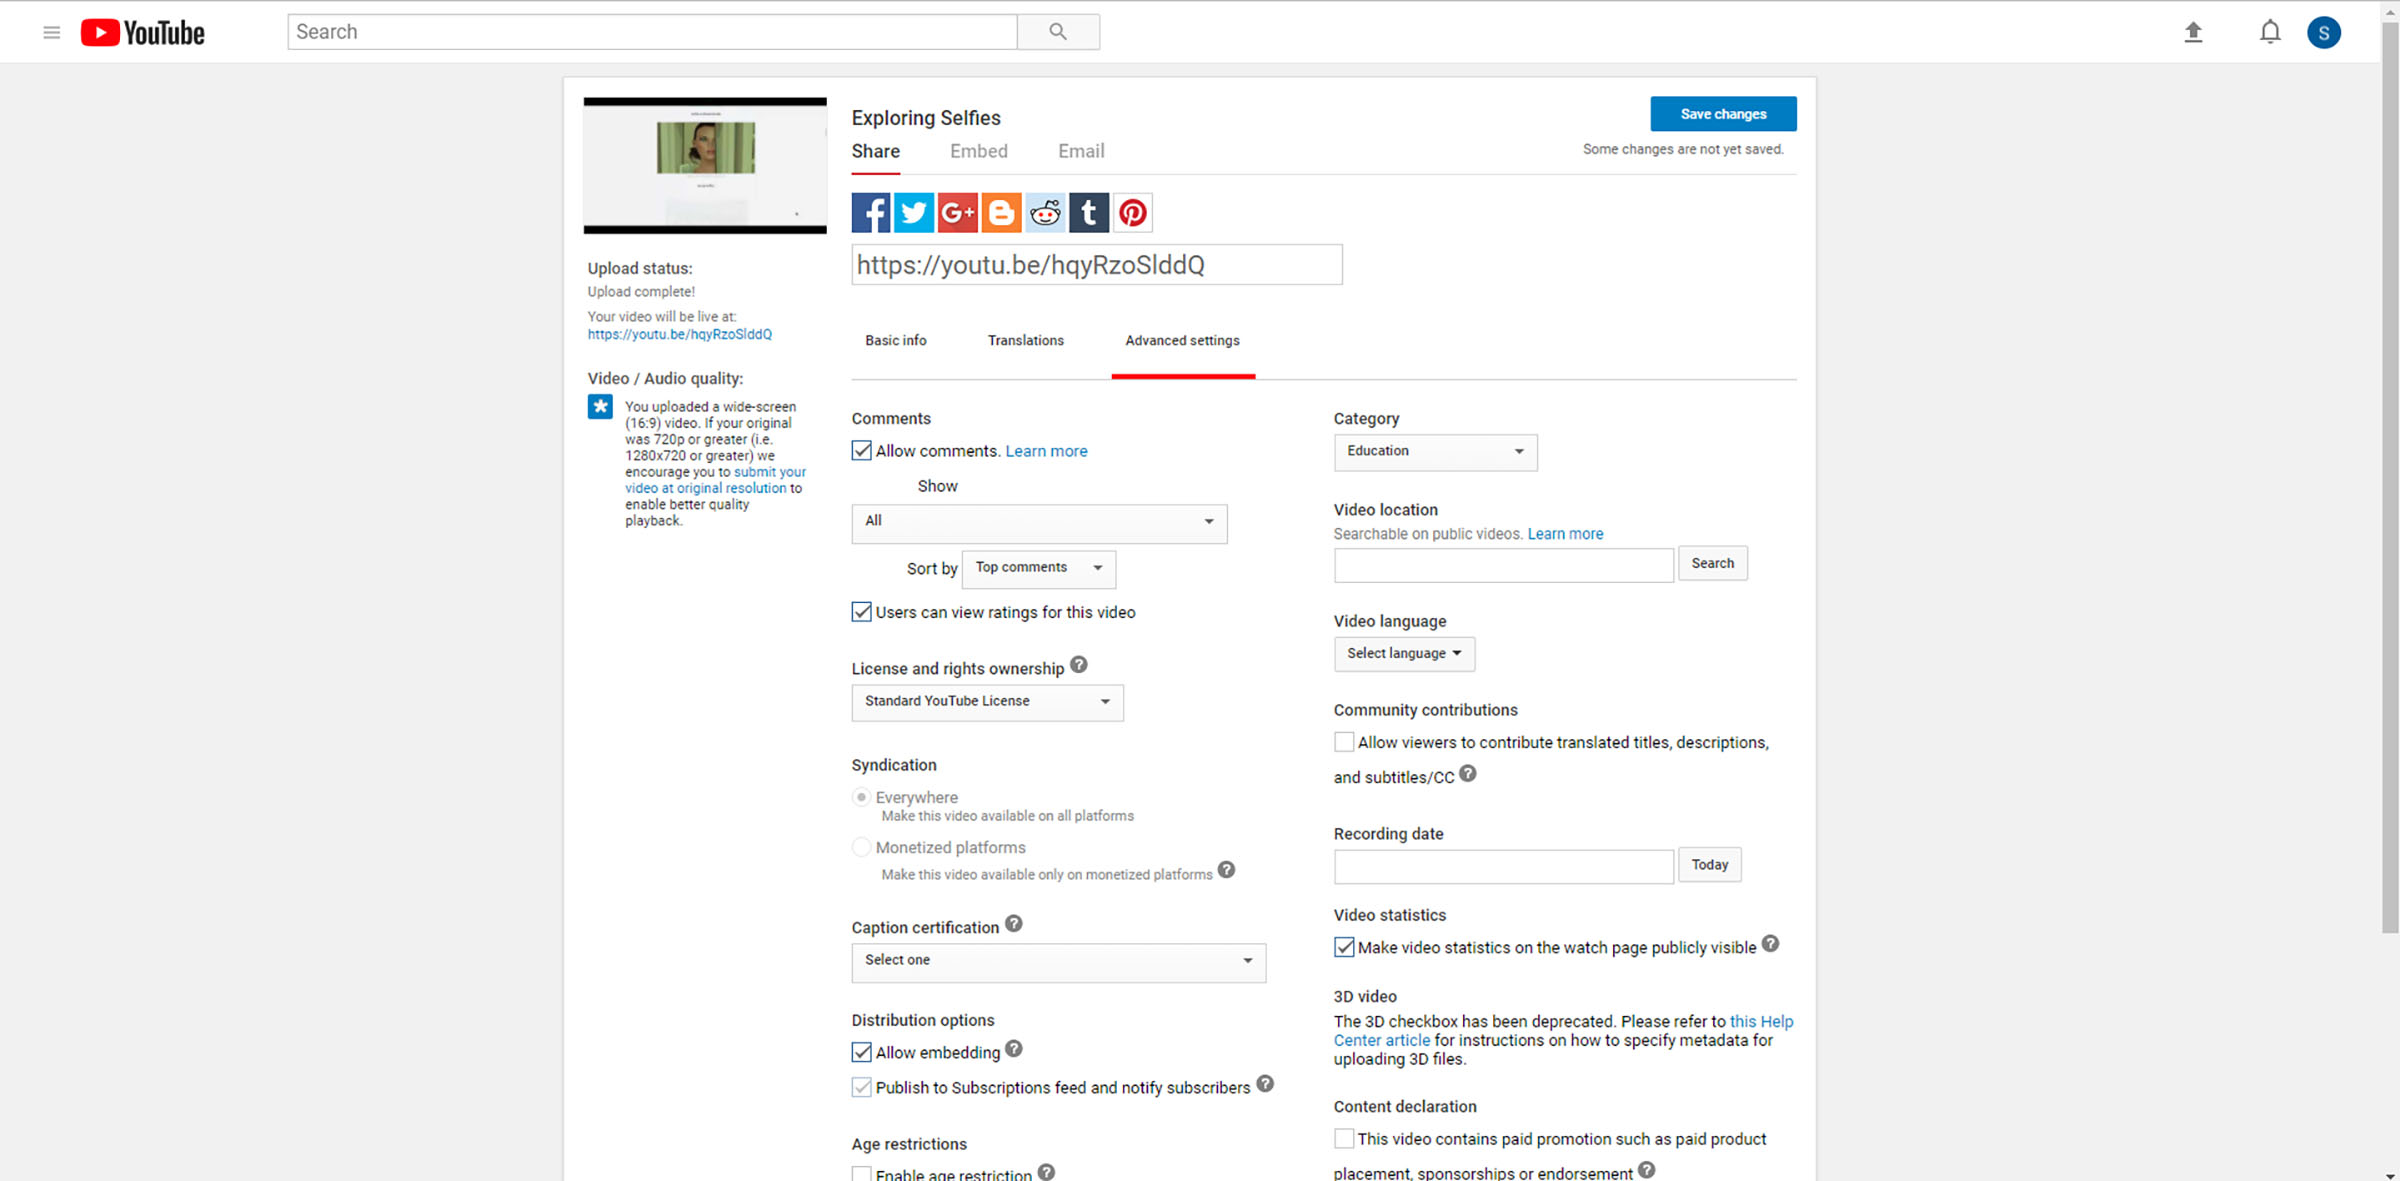
Click on Advanced Settings. Define the terms of usage for those viewing the video, and define the category that this video belongs to. Save changes at the top right button. (Figure 5)
Figure 5: Defining Advanced Settings
At the bottom right, return to the Video Manager.
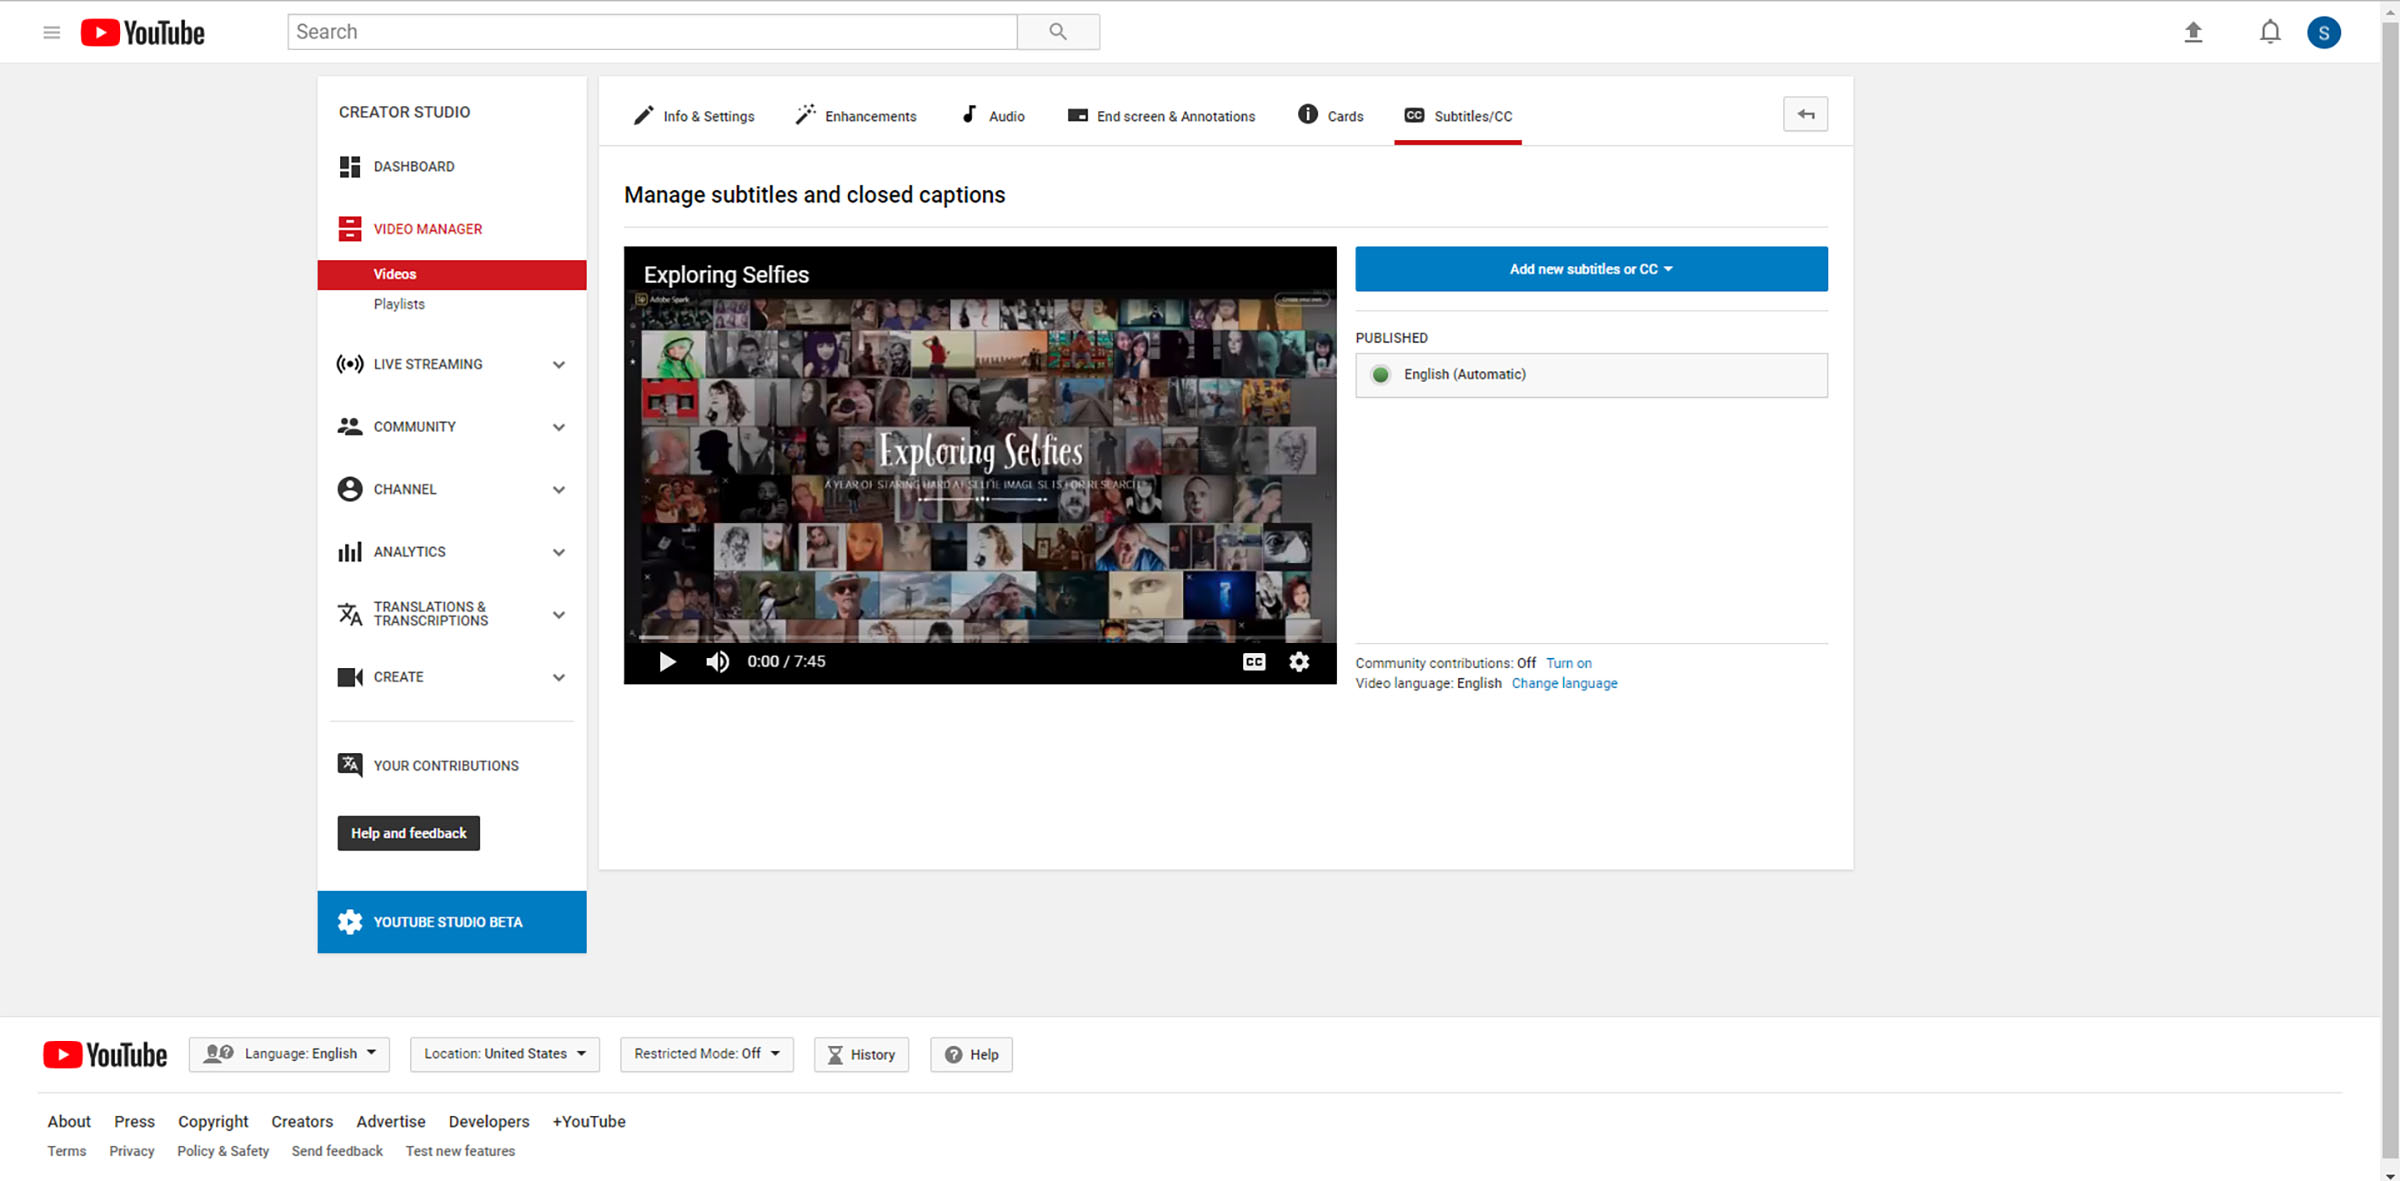
Turning on the automatic closed captioning. To enable the Closed Captioning on YouTube, go to the “Edit” dropdown for the target video. Select “Subtitles/CC”. (Figure 6) When prompted, select the default language.
Figure 6: Select “Subtitles/CC”
In the next screen, you will see the video with a “cc” button at the bottom right of the YouTube player. This means that the video is cued to have closed captioning added. This may take about 2 – 30 minutes or so, depending on how much load is on the YouTube servers. (Figure 7)
Figure 7: Cued for Closed Captioning on YouTube
After waiting for a reasonable amount of time, return to the Creator Studio - > Video Manager. Return to the “Subtitles/CC” for the target video. To the right of the video, there will be a new button indicating “English (Automatic).” (Figure 8)
Figure 8: English (Automatic)
Click the “English (Automatic)” button to view the transcript. The timings are quite accurate to the tenth of a second.
Click the button at the top right to “Edit.” You’ll notice that the transcript is fairly accurate, but that there is no beginning-sentence sentence capitalization or end-sentence punctuation. Some of the words may be misunderstood by the machine learning applied to the voice-to-text work. (Enriched annotations may be added in between the timed speaking. Remember that the enrichment offers relevant background descriptions and other details.)
Make the necessary changes to the transcript, and click “Publish edits.” Please do not move words from one time-location box to another because the timings are accurate. Also do not change what people said because the audio is still what it is. The idea is to correct mistakes by the machine learning (and in so doing improving the transcript and improving Google’s machine learning for this complex task.) (Figure 9)
Figure 9: Editing the Auto-created CC Transcript
Once the edits have been published, there will be both the “English (Automated)” transcript available, and the “English” one.
Click on the corrected “English” one. In the Actions dropdown, select .srt as the preferred download format. This file format includes both the video timings and the spoken text. The file is exported as captions.srt. (Have a clear method of knowing which captions.srt goes with which video if you’re handling multiple videos at a time. Rename the .srt file informationally but without changing the extension.) (Figure 10)
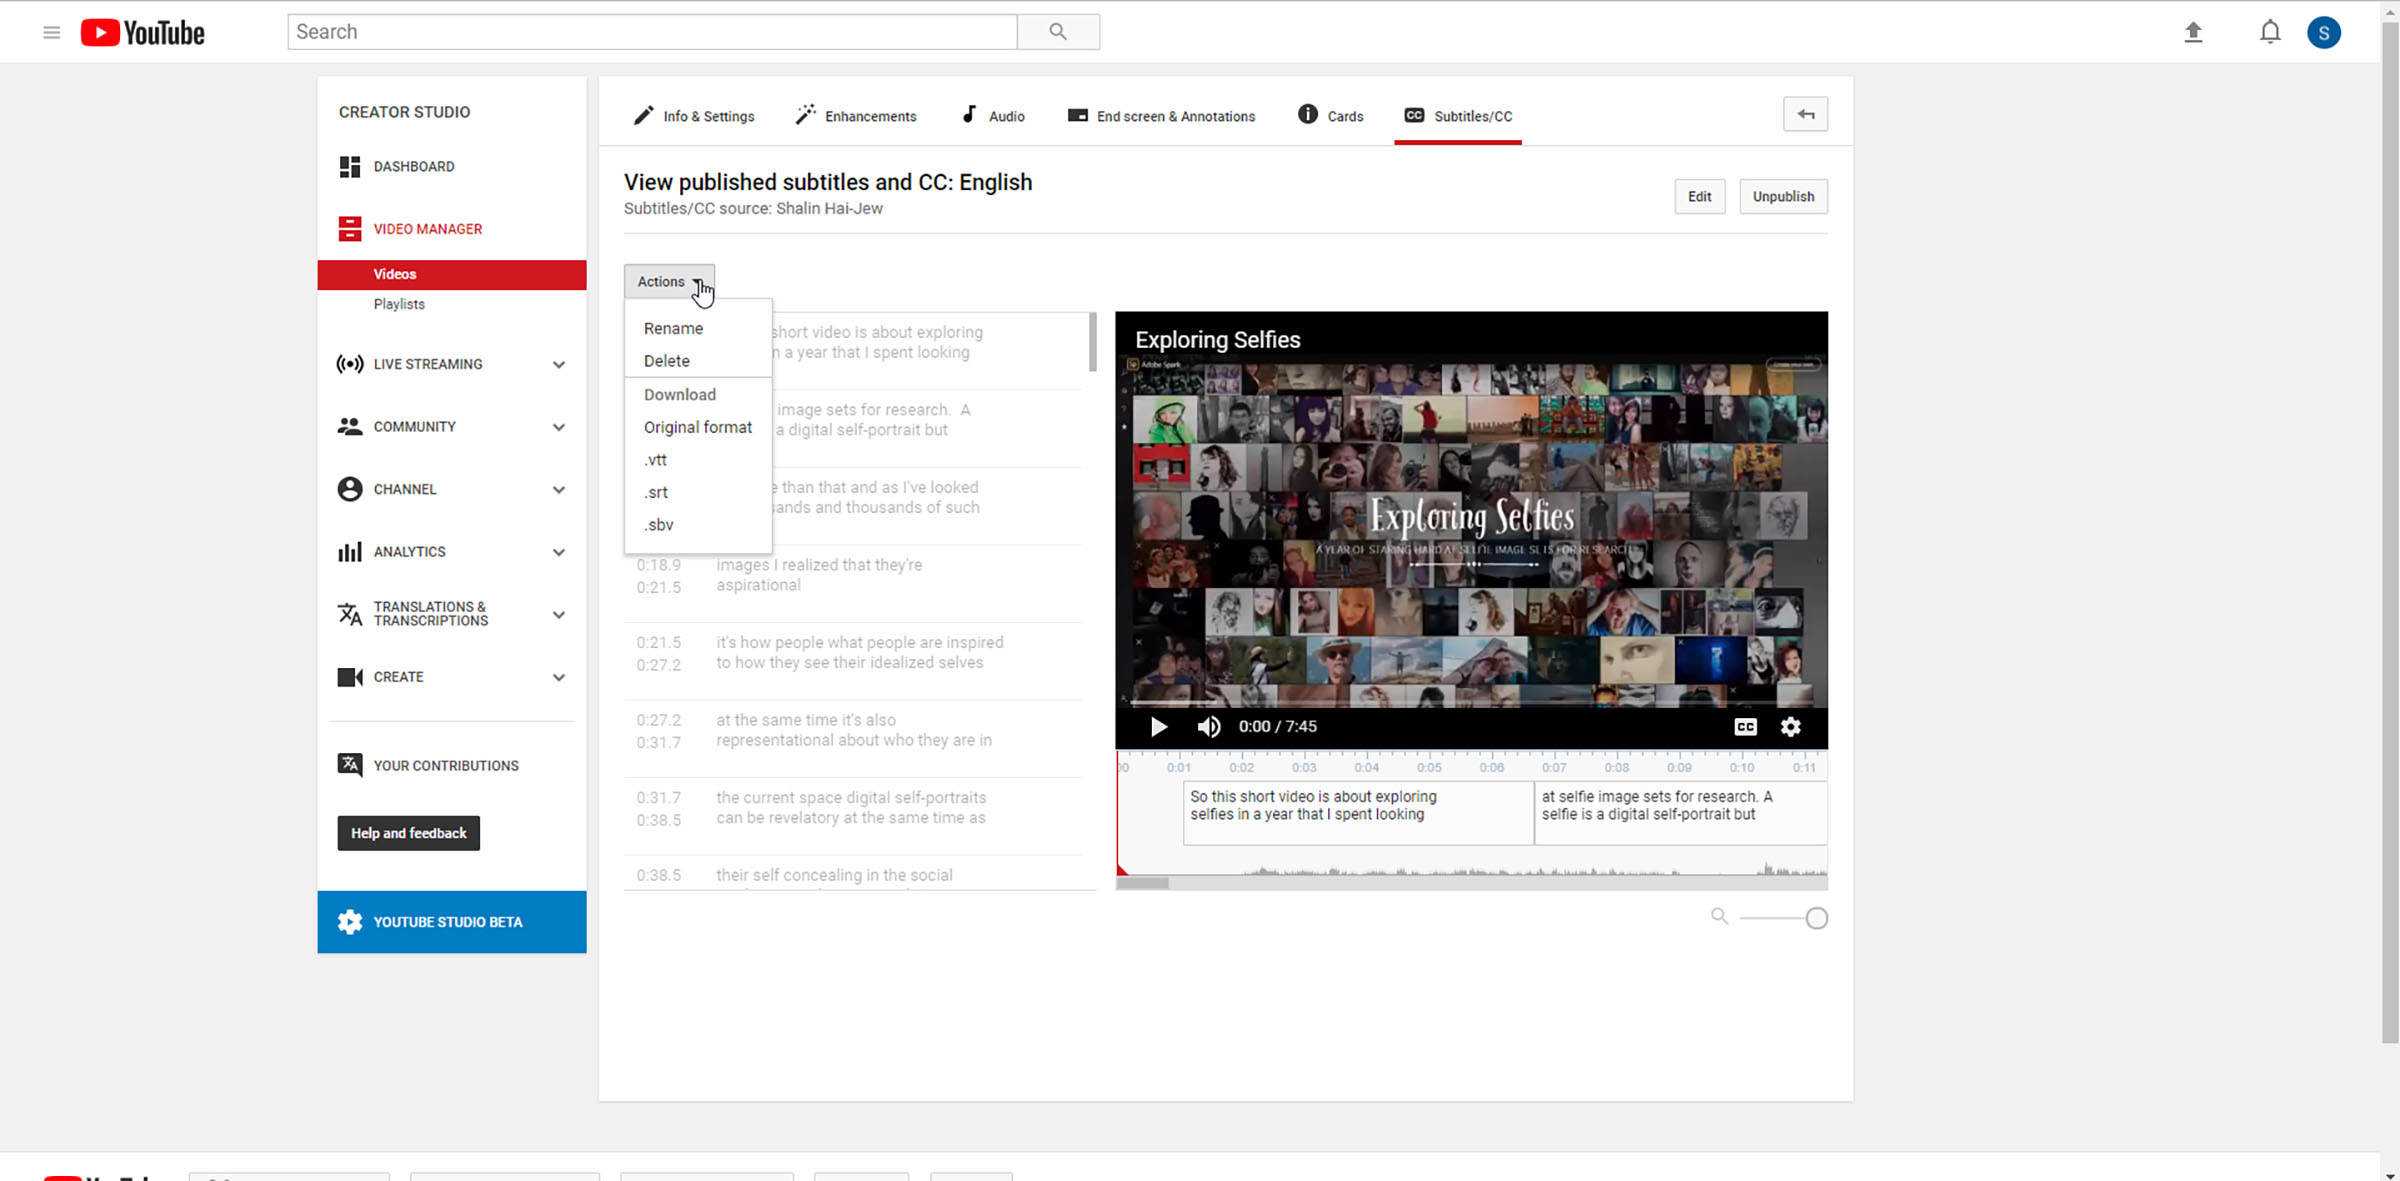
Figure 10: Selecting the .srt Format
(More will follow on how to get the .srt file into Mediasite.)
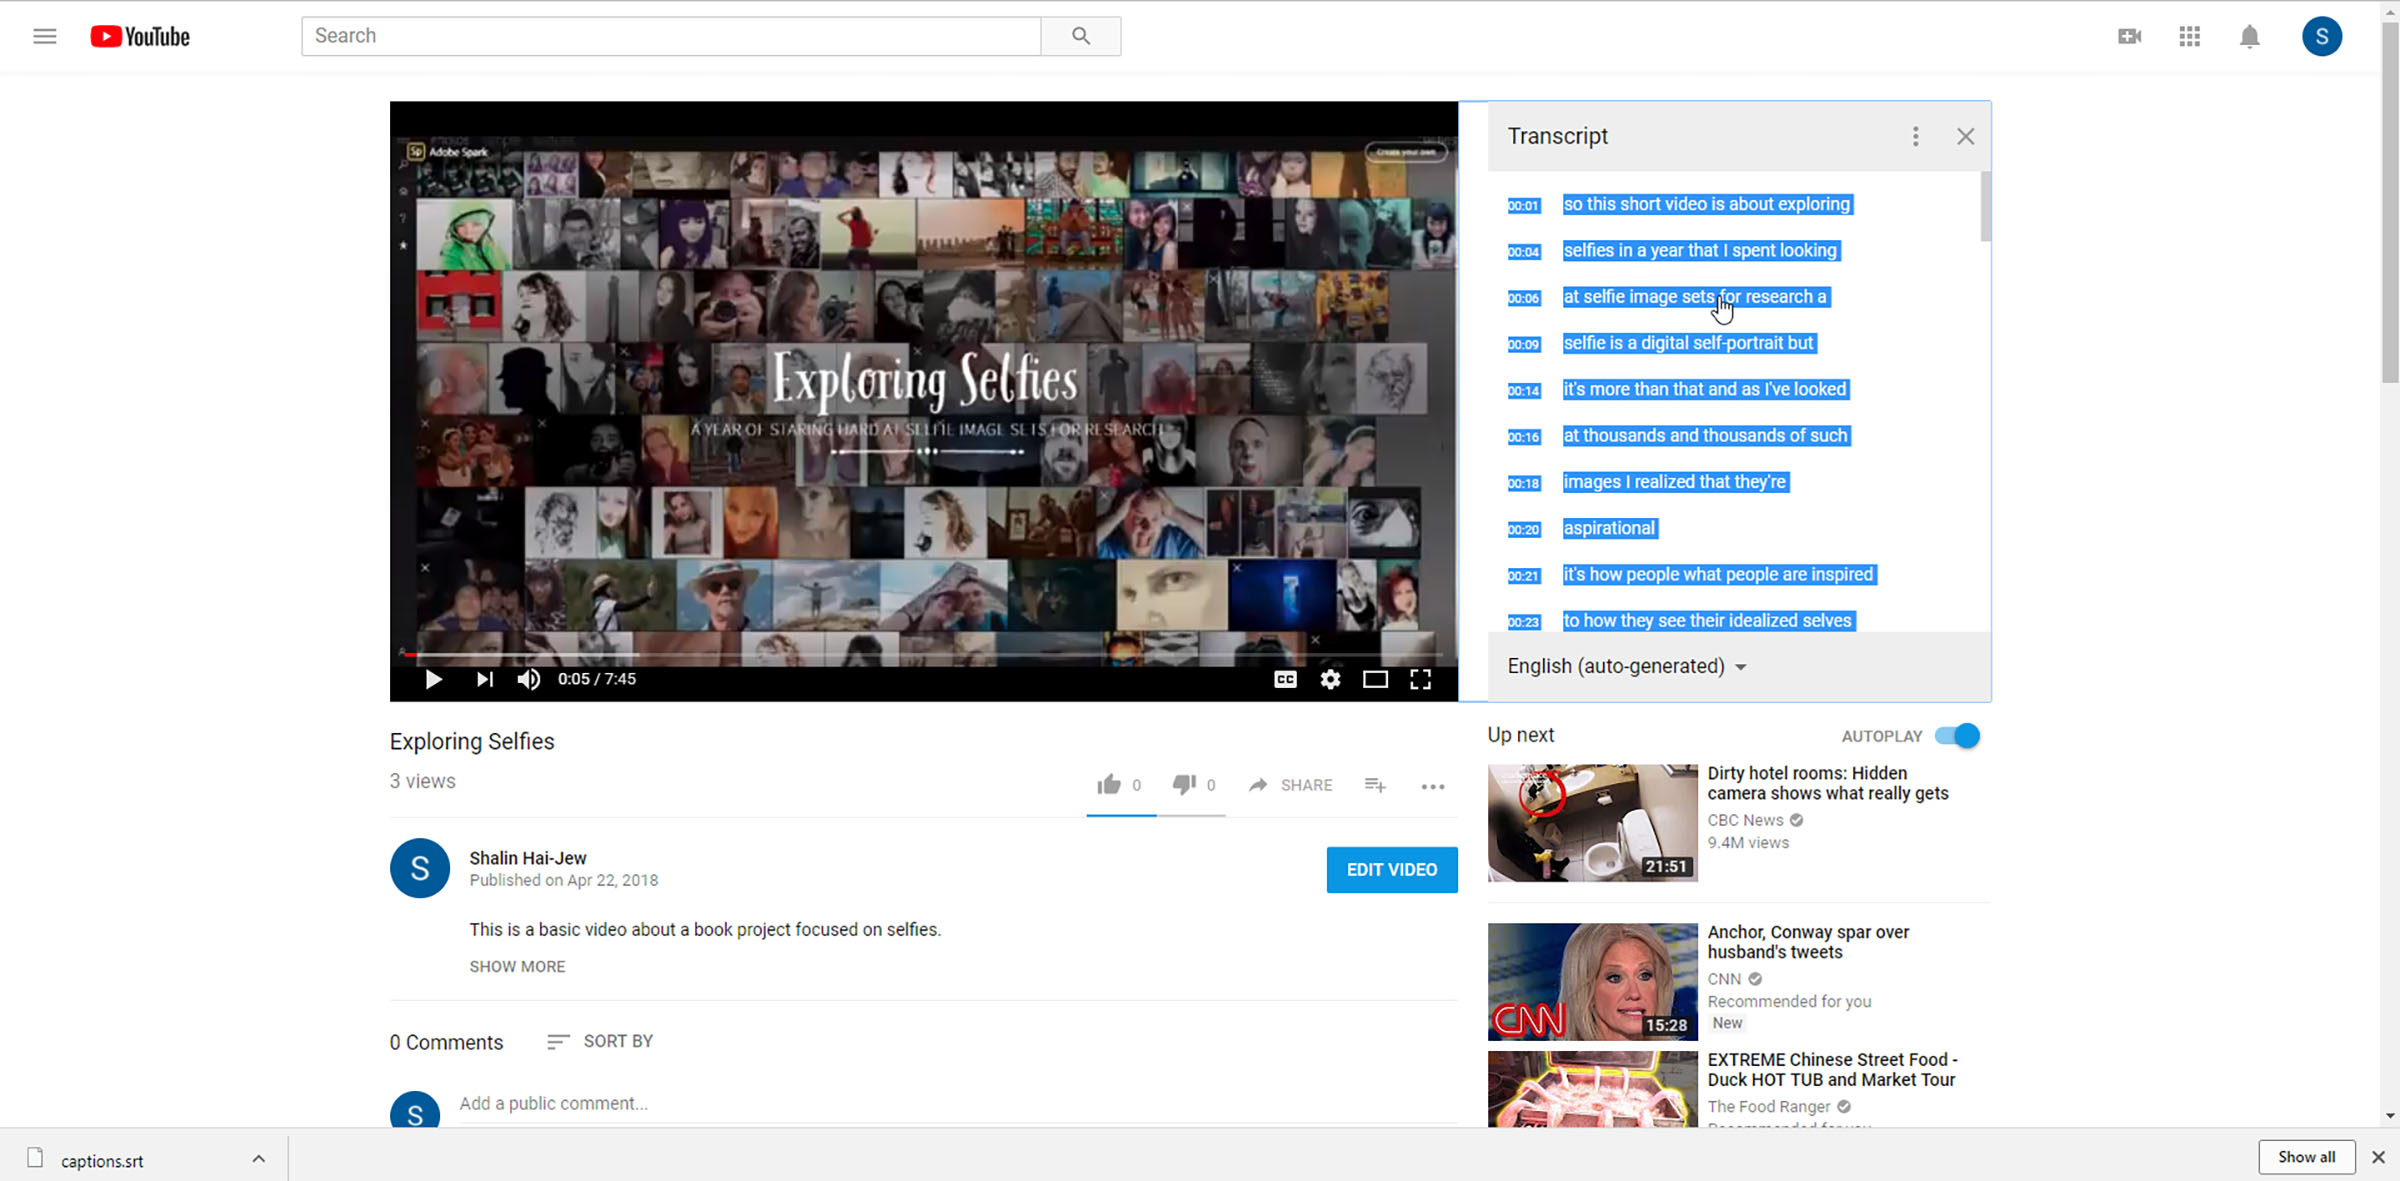
Accessing a human-readable version of the transcript. If you want a simple timing and text version, you can go to the public facing side of your YouTube video and access a human-readable version of the transcript.
Simply go to the video based on the provided link.
At the bottom right, under the player, there is an ellipses (…) symbol.
Click that, and select “Open transcript.”
Select whether you prefer the auto-generated English version or the human-edited English version. The transcript will appear to the right of the video. Scroll to the bottom of the text, and highlight the entire transcript, and copy. Paste into a Word file or a .txt, .rtf, or other file. (Figure 11)
Figure 11: Accessing a Human-Readable Transcript from YouTube
This process of accessing the transcript may be done for any public video on YouTube that has Closed Captioning!
Uploading an .srt file into Mediasite. On Mediasite, log in. Add Media. Browse files to the desired video. Input the descriptive data for the video. Click “Create Presentation.”
Once the video is uploaded, click Edit to the right of the video.
Below the video, click “Delivery.”
Check the radio box next to “Audio Transcriptions.”
Select Manually Upload an Audio Caption File.
Select the correct file.
Click “Save” at the top right. (Figure 12)
Figure 12: Uploading the Caption File in Mediasite
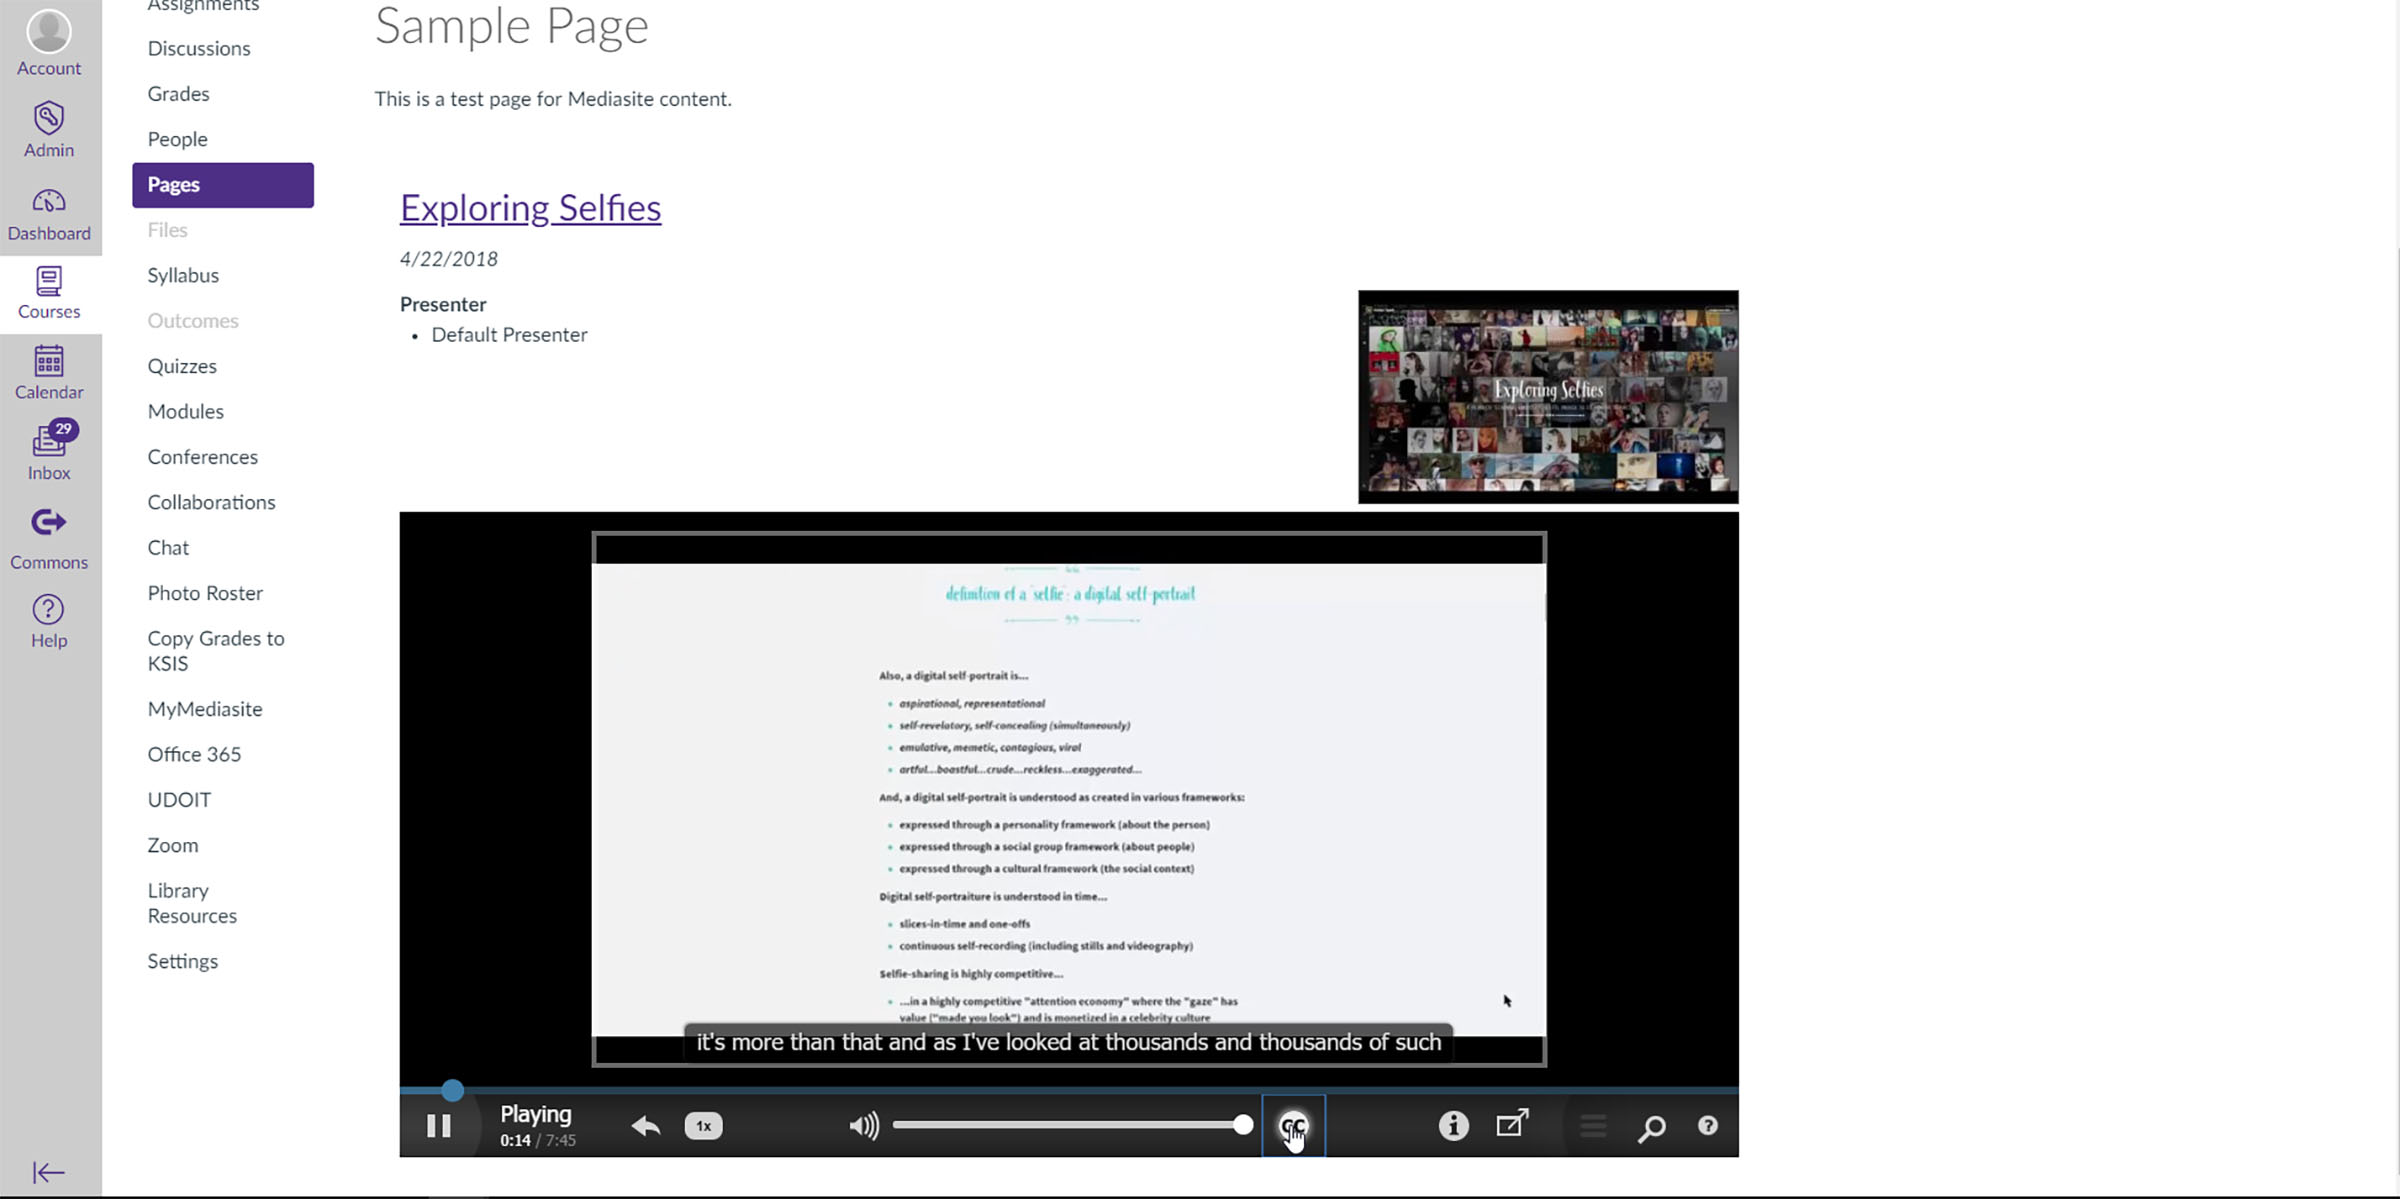
When the video is embedded into a page, the cc button is visible, and the closed captioning plays on the bottom third. (Figure 13).
Figure 13: A Closed Captioned Video in Mediasite (thanks to Google YouTube)
The next figure shows a popped-out full-screen version (Figure 14).
Figure 14: A Full-screen Version of the CC Video on Mediasite
Some Cautions
Clearly, it is important to carefully read all End User License Agreements (EULAs) of all social media platforms that you might use and to be ready to adhere to them if you’re going to sign on. It is important to read updates to these EULAs as well. EULAs describe not only user rights but also their responsibilities.
If a person is only using Google as a pass-through, it would make sense to download the corrected .srt files and then remove the video.
No sensitive videos should ever be uploaded to Google’s YouTube for transcription, such as those protected videos from sensitive research. The reason, in part, is that improper usage may result in the release of the videos. Also, it is impossible to know if videos are moved en masse to servers outside the U.S., and the transfer and hosting means that such videos may be exposed in ways that users may not expect.
Deciding where to host educational videos will vary depending on the affordances and enablements of the hosting technologies: their video players, their back-end data capture, their user support, and others.
People consume videos in different ways, and they have differing needs. Closed captioning is not an end point but more of a start.
Some caveats: YouTube Studio Beta is being rested currently. The screenshots for this article were done in the pre-beta version, so by the time this article comes out, the interface may look somewhat different. Also the sample video used here is not directly educational but was used as a stand-in.
References
Multimedia Accessibility FAQ. (2008). W3C. Retrieved from https://www.w3.org/2008/06/video-notes.
About the Author
Shalin Hai-Jew works as an instructional designer at Kansas State University. Her email is shalin@k-state.edu.
| Previous page on path | Cover, page 9 of 23 | Next page on path |
Discussion of "Using Google YouTube’s Automated Closed Captioning to Enable Accessibility of Educational Videos"
Add your voice to this discussion.
Checking your signed in status ...