By Shalin Hai-Jew, Kansas State University
In all likelihood, a “fillable PDF” is something that people have encountered. These may be forms that are integrated into a web page that enables the submission of information to a database. Or these may be downloadable .pdf files that enable filling in form fields (blanks) and clicking a “submit” button to send the information to someone. These may be contacts that are digitally signable.
Such fillable PDFs are actually fairly straightforward to create, at least at the basic level.
This work offers a few basic sequences that enable the creation of such PDFs and some tips.
Accessing the Form Creation Feature in Adobe Acrobat Pro DC
First, open Adobe Acrobat Pro DC. From the menu bar, select the Tools tab. Scroll down to the Forms & Signatures section, and select the “Prepare Form” button. (Figure 1)
Figure 1: Tools Screen in Adobe Acrobat Pro DC
In the next window, either select a file (Word or PDF), or use an input device to scan a document into the software to begin. (For example, an input device could be a flatbed or a hand-held scanner.) Also, note that there is a checkbox at this stage to indicate whether this particular form will require a digital signature. (Figure 2)
Figure 2: Selecting a File or Scanning a Document to Begin
Once a file has been selected, the software will process the file and auto-place form fields.
Figure 3: File Processing
Auto-placed form fields have default settings for the function of each field and the types of data that will be collected. It would be rare for the auto-form fields to be fully accurate in one run-through. Invariably, some revision will be required. (Figures 3 and 4)
Figure 4: Auto-applied Fields in Original Word Document
Making Adjustments to the Fillable PDF Form Fields
There are ways to revise the form fields.
If there are form fields where none are desired, click the blue space of the form field. The field edge will highlight. Click delete.
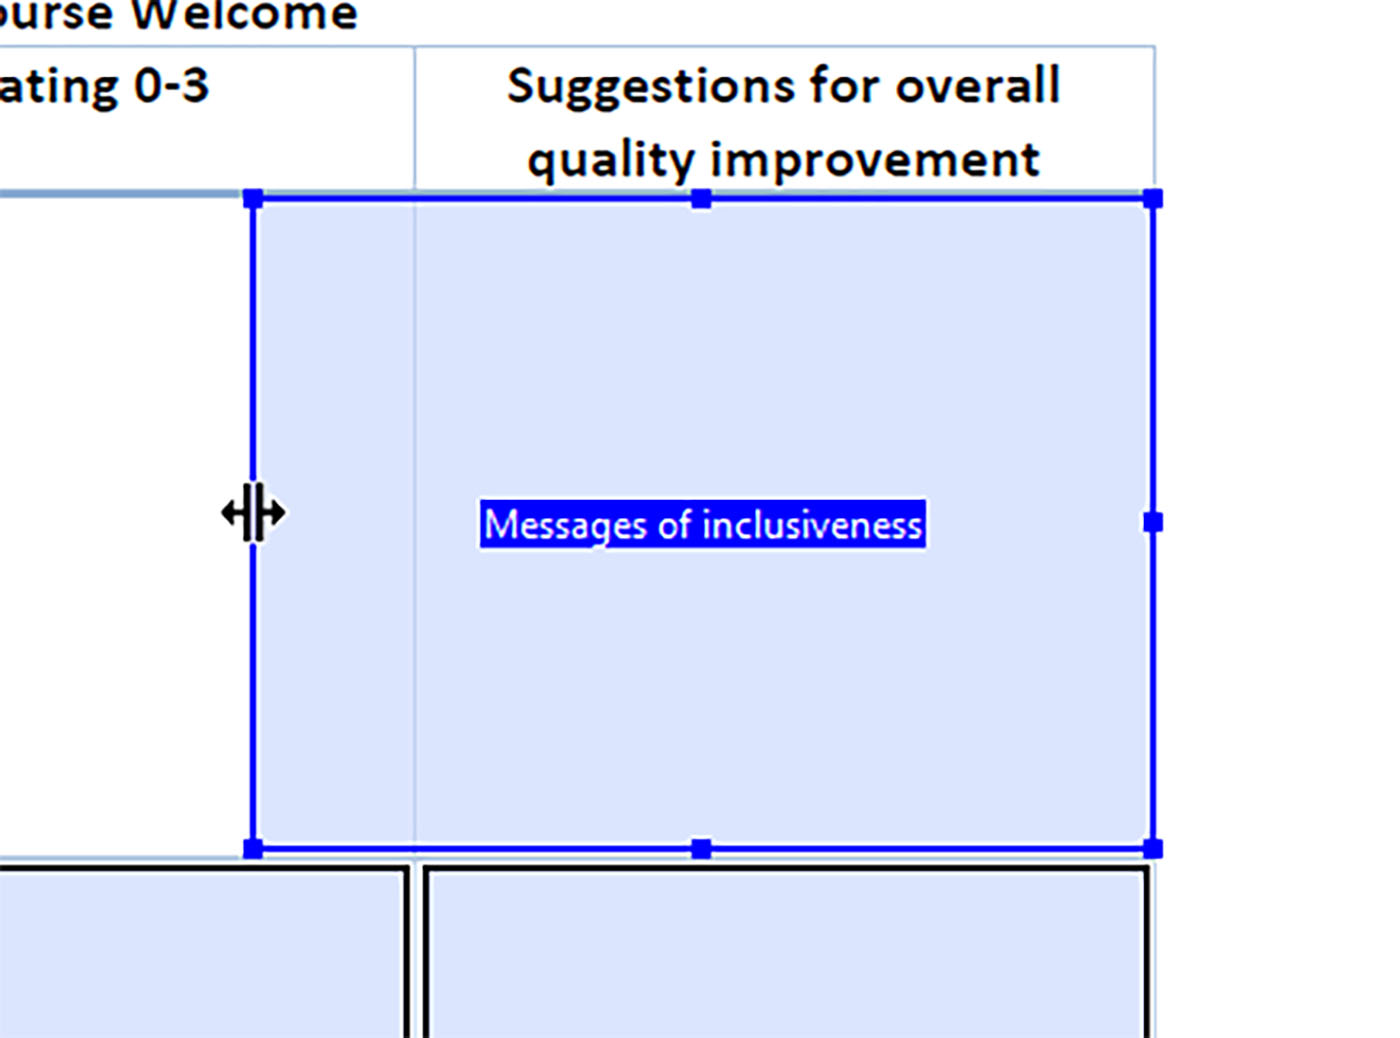
If a form field window needs to be resized, click to activate the space, and hover over the edge that you want to move on one of the square tabs. Drag and move the edge. (Figure 5)
Figure 5: Dragging and Dropping the Edges to Resize the Form Field
In more complex documents, like rubrics, it may be helpful to delete all the pre-made form field cells, and code a form field sample with the optimal scripted features, and copy and paste that into the respective columns (albeit with unique names). This way, one can be guaranteed that the settings are correct.
Scripting the Form Fields
It is important to see what coding is within each form space. To access the scripting, double-click on the form space. A new Text Field Properties window opens. This window will show the following tabs:
General
|
Name of the Form Field (as a variable)
Whether the Text is Read Only (as a label)
Whether the Form Field is Required (as a forced response)
|
Appearance
|
Border Colors
Fill Colors
(Otherwise, the form field is implied and invisible.)
Text Sizes
|
Position
|
Size Unit of Text (points, picas, millimeters, centimeters, or inches)
|
Options
|
Text Alignment (left, center, or right)
Text Handling: Is the text field used for file selection? Is the text field for a password or not? Is the text spell-checked? Are multiple lines allowed for the response? Is the long text set in a scrolling way? Is rich text formatted? Are there limits to characters? Are there a certain number of characters desired for the form field (comb of characters)?
|
Actions
|
What is the trigger for the text form? The options include the following: Mouse Up, Mouse Down, Mouse Enter, Mouse Exit, On Focus, and On Blur.
Then, there should be explanation of what the mouse action triggers. The options include the following: Execute a menu item Go to a 3D/Multimedia view Go to a page view Import form data Multimedia Operation (Acrobat 9 and later) Open a file Open a web link Play a sound Play Media (Acrobat 5 Compatible) Play Media (Acrobat 6 and Later Compatible)
|
Format
|
This section allows a user to define whether the form field contains particular types of data by format: None, Number, percentage, Date, Time, Special, and Custom. The Custom option enables the use of JavaScripts for custom formatting and keystroke validation (provided by the user).
|
Validate
|
The Validation tab enables defining constraints on field values (between certain ranges) or the ability to run JavaScript to provide custom validation.
|
Calculate
|
Finally, the Calculate tab enables summing up numbers from multiple text fields for running sums…or calculating products…or computing averages…or capturing minimum and maximum ranges from data. These are for viewer use…and / or for use by whomever receives the completed fillable PDF.
|
Table 1: Adjustable Features of the Text Field Properties Window
Text Sizes
One common fix is to ensure that the form field is the right size. The Options tab is especially important for this. For a multi-line response, the following seems to work fairly well…and with the units in the Position Tab set to “points.”. Otherwise, text sizing can be problematic (super-sized). (Figure 6)
Figure 6: Enabling Multiline Text Responses
Locking or Unlocking the Text Field Properties Window
At the bottom left of the Text Fields Properties window is a “Locked” box. If that is checked, all settings are locked, including the positioning of the text box in the form. (If you want to copy the text field and its properties elsewhere to rename and to use, the original copy cannot be “Locked.”)
Calculating Fields
A calculated field collects data from the form and applies some simple mathematical function to it: summing, multiplication, average computation, and min- max- computation.
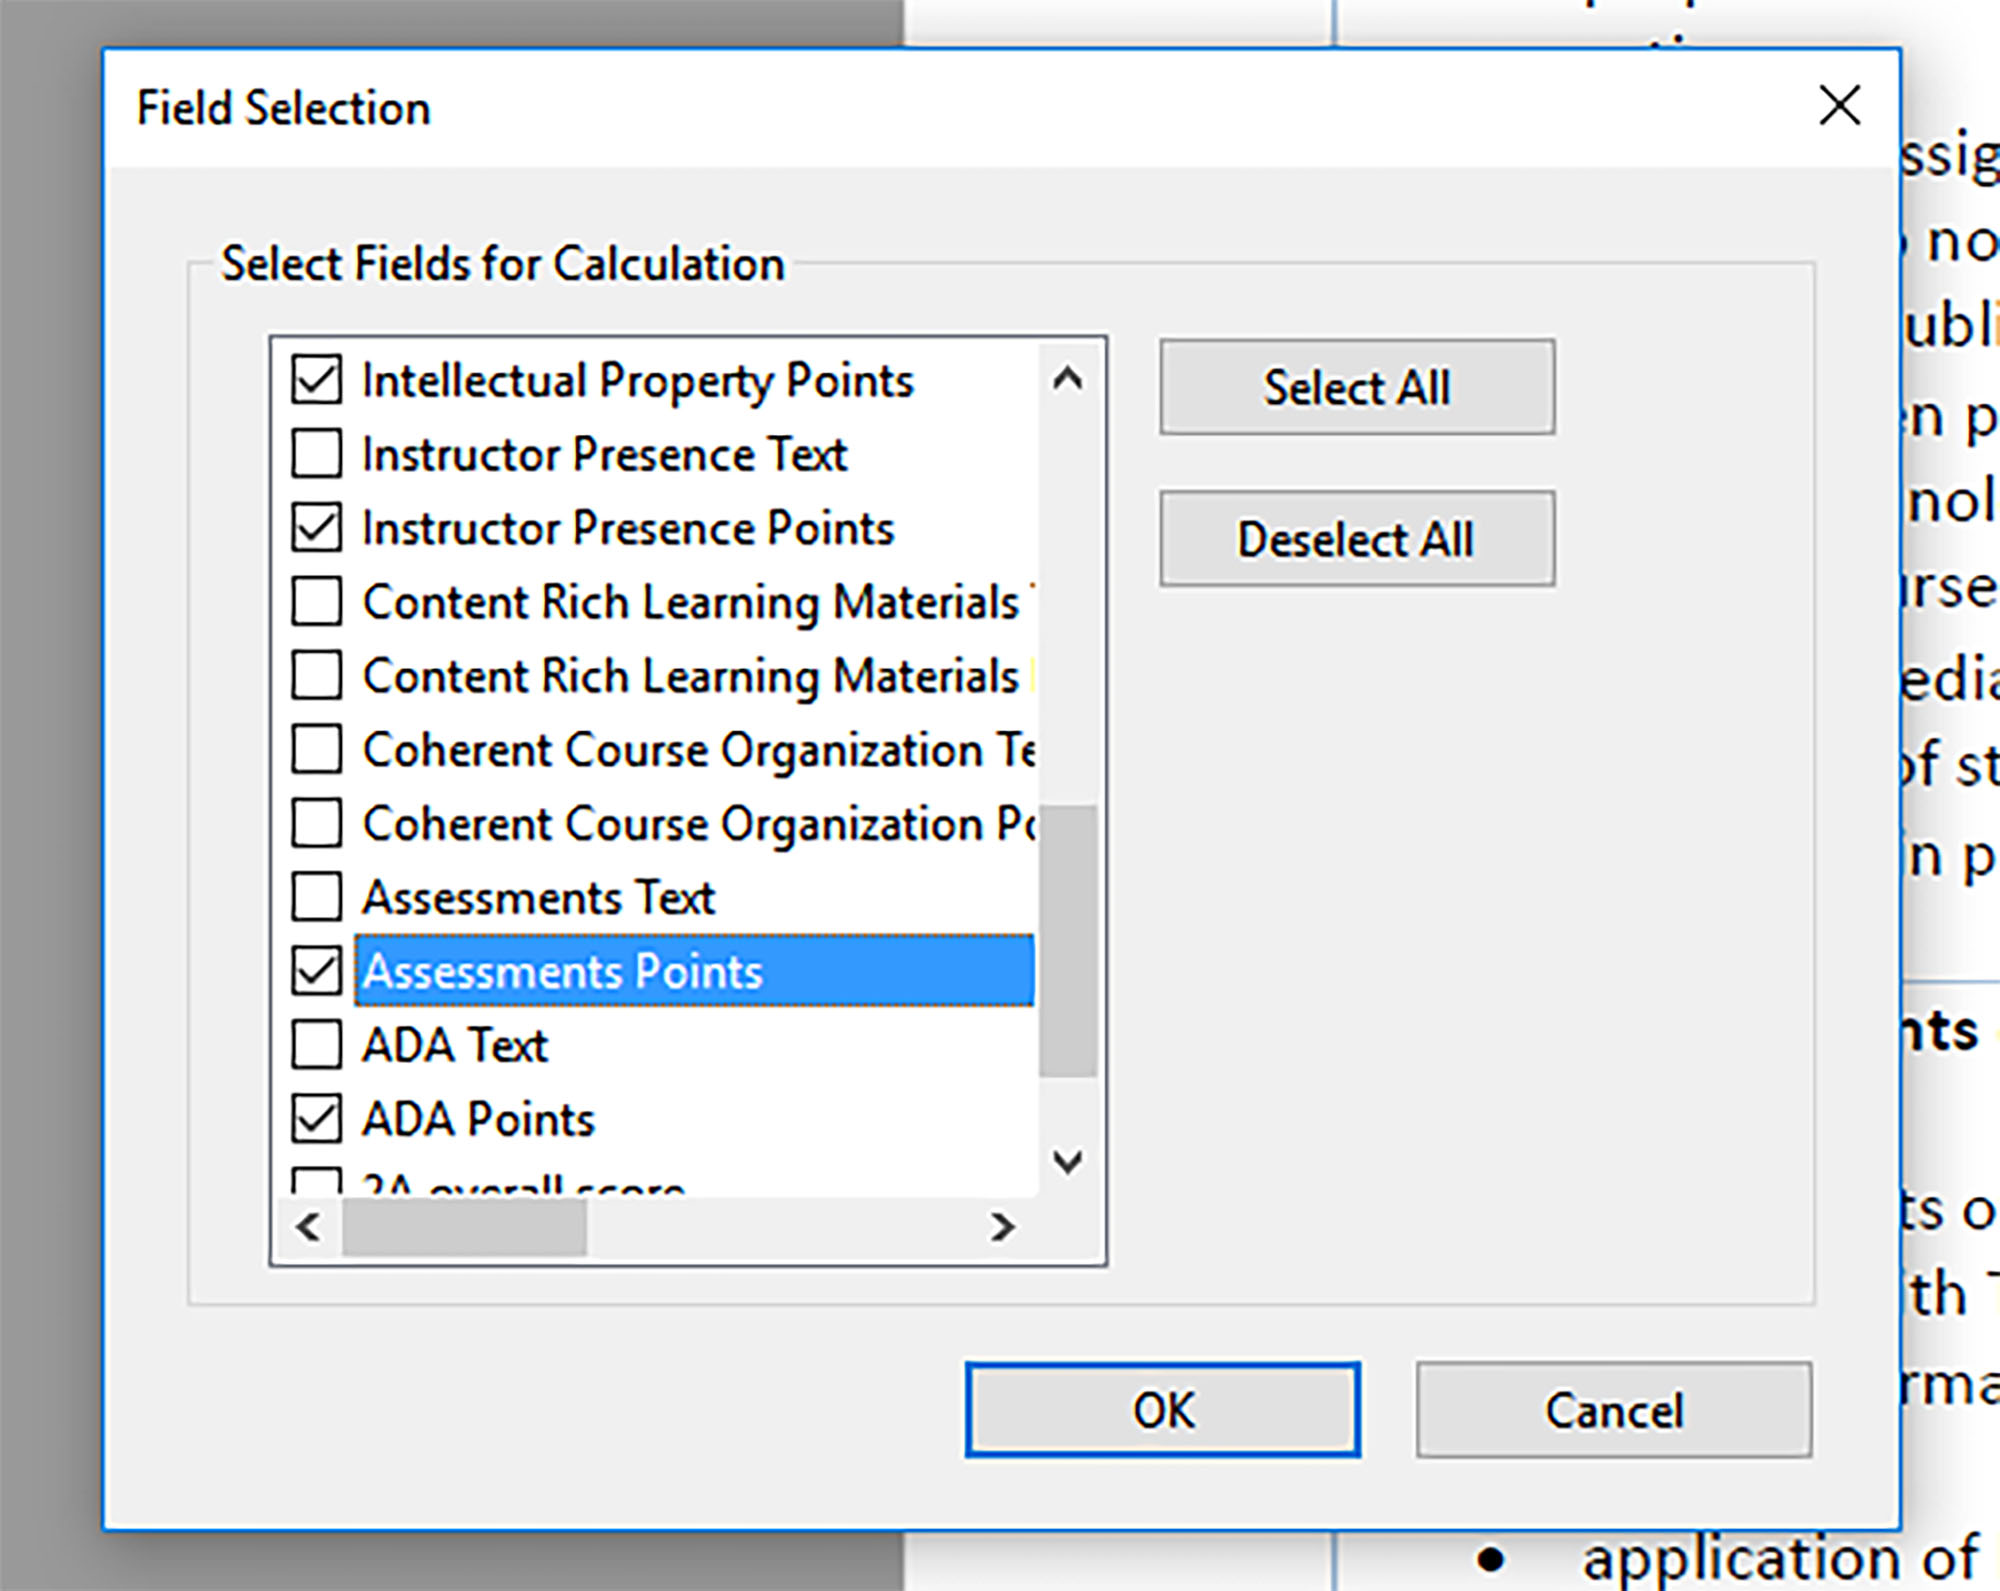
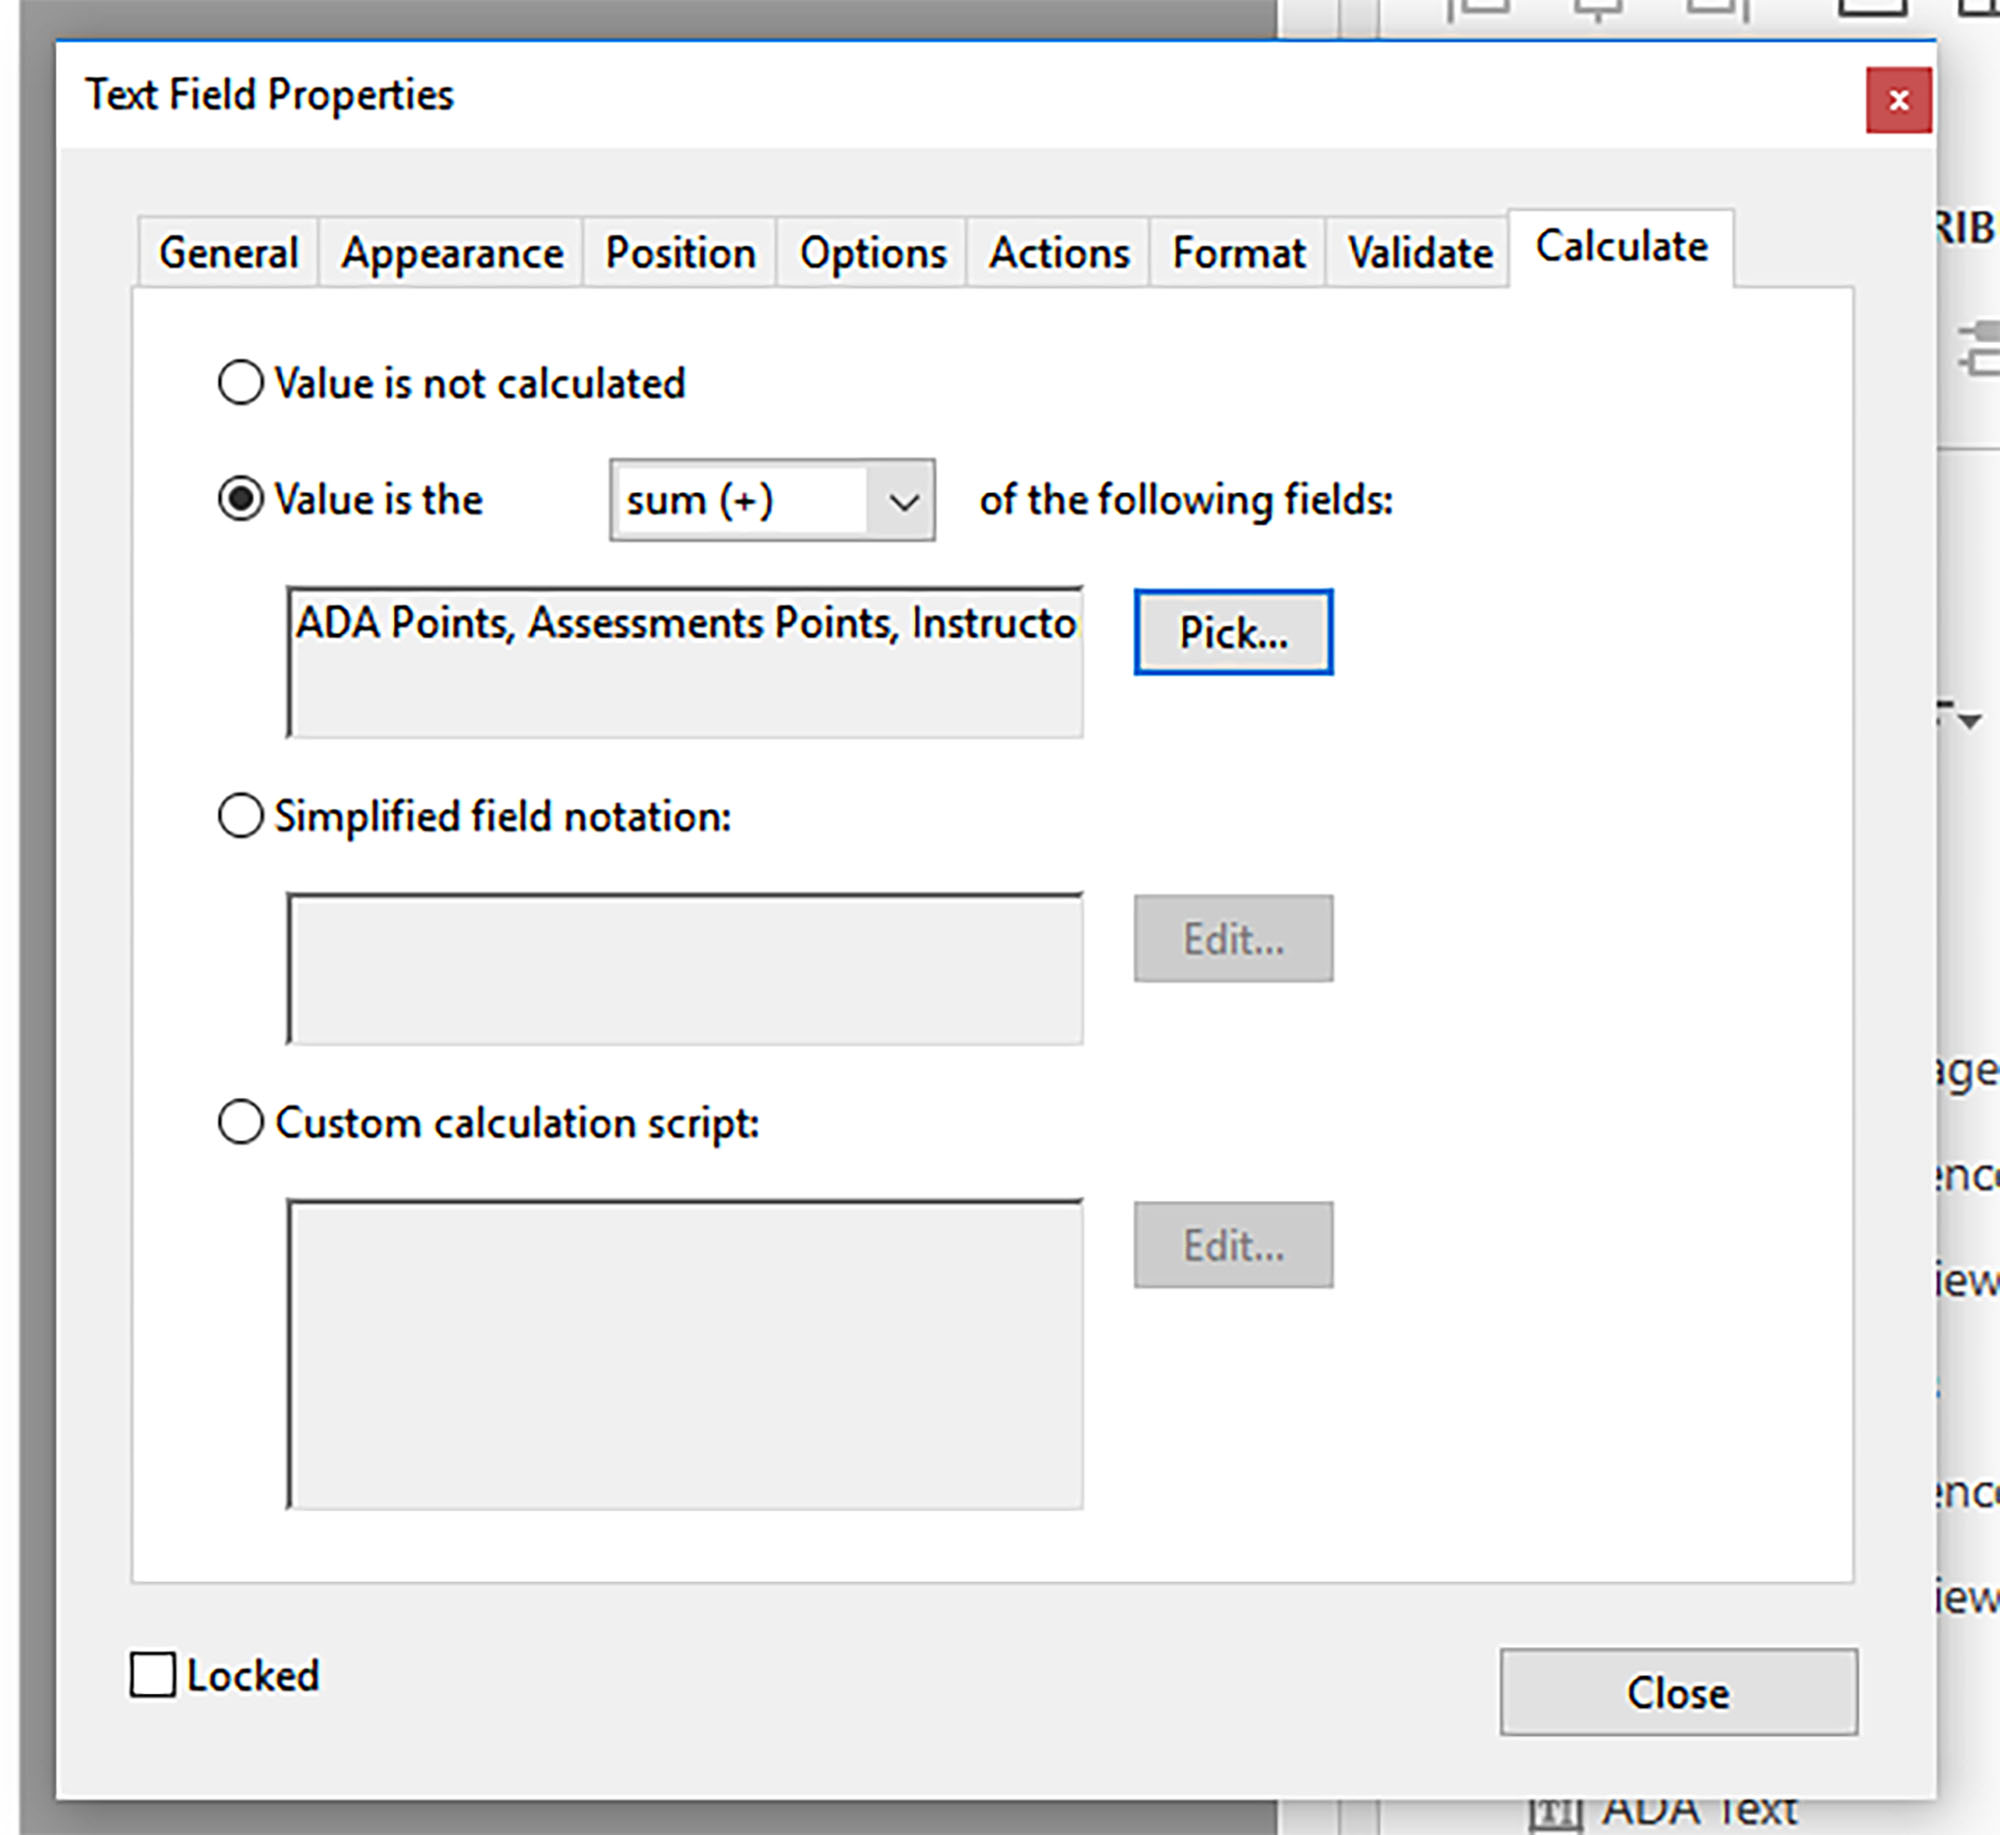
To set this up, just click on the target text field, and in the window, select the Calculation tab. Define the mathematical or light statistical operation…and then select the variables that will serve as the operands. (This is where naming protocols are critical, so one is clear where the data will come from.) (Figures 7 and 8)
Figure 7: Adding Up Points for a Cumulative Point Field
Figure 8: Value is the Sum Of…
Adding New Fillable Features
Beyond text boxes, there are a number of other features that may be added to a fillable PDF:
- Text boxes
- Check boxes for selections
- Radio buttons to select from mutually exclusive options
- List of choices
- A dropdown list of choices
- A print or clear button
- An image field
- A date field
- A digital signature field
- A barcode field, and others
These features may be accessed in the Top Menu selection of the Tools tab. These features may be deployed in various combinations. (Figure 9)
Figure 9: Add-able Features in the Top Menu
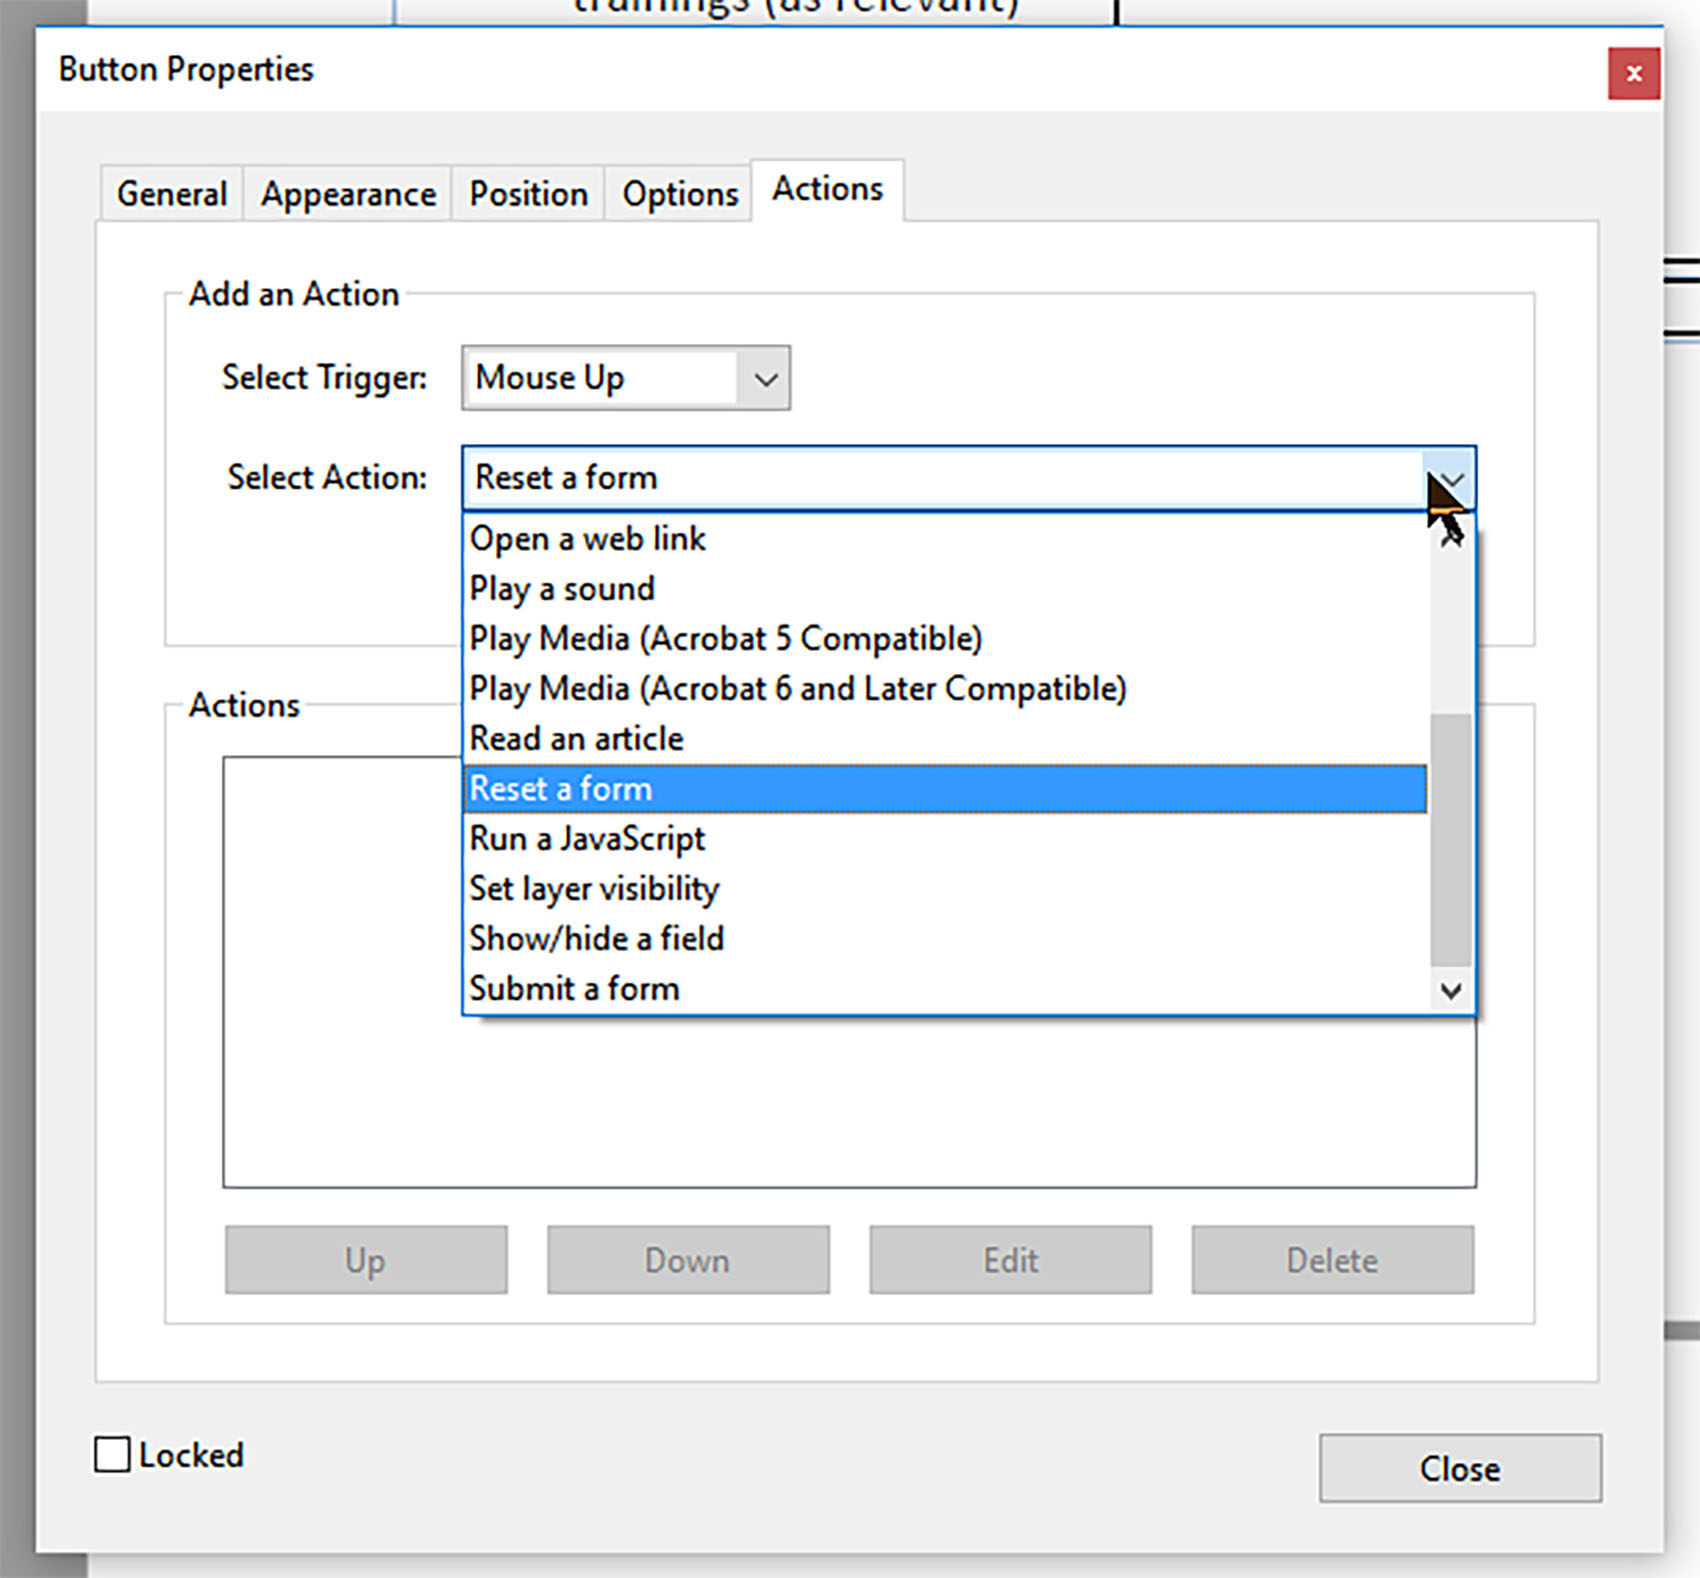
One of these features is a functioning button—to print the document…or to clear the data from the document (reset it). (Figure 10)
Figure 10: Inserting a Button and Resetting a Form
Required Testing
With any complex document that involves scripting and scripted functions, it is important to test the document. Once the first draft is done, save it, and close out Adobe Acrobat Pro DC. Double click on the fillable PDF. Test *every* functionality… for accuracy's sake.
About the Author
Shalin Hai-Jew works as an instructional designer at Kansas State University. Her email is shalin@k-state.edu.
Discussion of "How to Make a Fillable PDF (Basics)"
Add your voice to this discussion.
Checking your signed in status ...