Airtable: Organizing Your Data with Hybrid Spreadsheet/Databases
By Mary L. Hammel, Kansas State University
The beginning of the year is upon us, when we vow that this year we will get ourselves organized. I think I have found the perfect tool to help you keep your 2018 resolution – Airtable. Airtable is a mobile, flexible, collaborative hybrid organizational tool – with the features of both a spreadsheet and a database. Your information/data is contained in a Base, Airtable’s primary component (think Excel workbook). Each Base can have one or more Tables (types of items) and Views (ways to look at data), and a multitude of Fields (columns with types of data) and Records (rows with your items). With this variety of building components that let you customize to your heart’s content, you can organize virtually anything – research, projects, events, collections, inventory, sales – and also collect information via a shared form that is saved automatically to a Base.
A cloud-based service, Airtable has a web version and apps for both MacOS and Windows desktops and iOS and Android devices. Because it is a cloud service, you do have to create an account and login. When a Base is created, it is automatically hosted to the cloud and available real-time to any of your devices.
Link: Airtable Website
Figure 1: Airtable Mark
Airtable is available for free, but Plus, Pro and Enterprise accounts are offered for a fee. The free account lets you have unlimited Bases, unlimited views, forms for data collection, real-time collaboration and commenting, 1,200 Records per Base, 2 GB attachment space per Base, and two weeks of revision and snapshot history. The paid accounts allow more Records per Base, more attachment space, and more time for revision and snapshot history, as well as more styling options. See link below for plans and pricing.
Creating a Base
Airtable gives you several ways to get your Base started. There is an amazing variety of pre-built templates that you can adapt to your needs, plus a publishing platform called Airtable Universe that lets users open-source publish and share their workflows as templates. You can also start from an existing spreadsheet by uploading a CSV (comma separated values) file or copy and pasting table data from a spreadsheet program into a new empty Base. If you have an existing Base that you like, you can duplicate it and customize. If you are the adventurous type, you can start your Base from scratch.
Figure 2: Starting a Base
To start a Base from a template, you can browse the various categories to find something that might fit your needs. All templates have previews so you can see what’s inside before you add it to your Workspace. These templates are pre-filled with relevant Tables and Fields, but you can modify as needed. Airtable Universe has a wide variety of practical Bases that actual people have created for their own projects, and you can get a good feel for what is possible. The web and desktop apps give you more specific options than the mobile versions.
Figure 3: Starting a Base from a Template
Figure 4: Airtable Universe
To start a Base from an existing spreadsheet, you will need to export that spreadsheet as a .CSV file, then import it into Airtable. You can also copy a table from a spreadsheet program (such as Excel or Google Sheets) and paste it into the data box provided when you go to import.
Figure 5: Create a Base by Importing a Spreadsheet
To create a Base by duplicating an existing Base, click the dropdown at the bottom right of the Base icon and choose “Duplicate.” You will then select a Workspace and decide whether or not to duplicate the Records and comments already within that Base.
Figure 6: Create a Base by Duplicating an Existing Base
To create a Base from scratch, you will only need to give it a name and choose an icon and color. The Base will have a generic Table with a name, notes and attachments Fields. You will need to do the rest!
Figure 7: Create a Base from Scratch
Customizing a Base
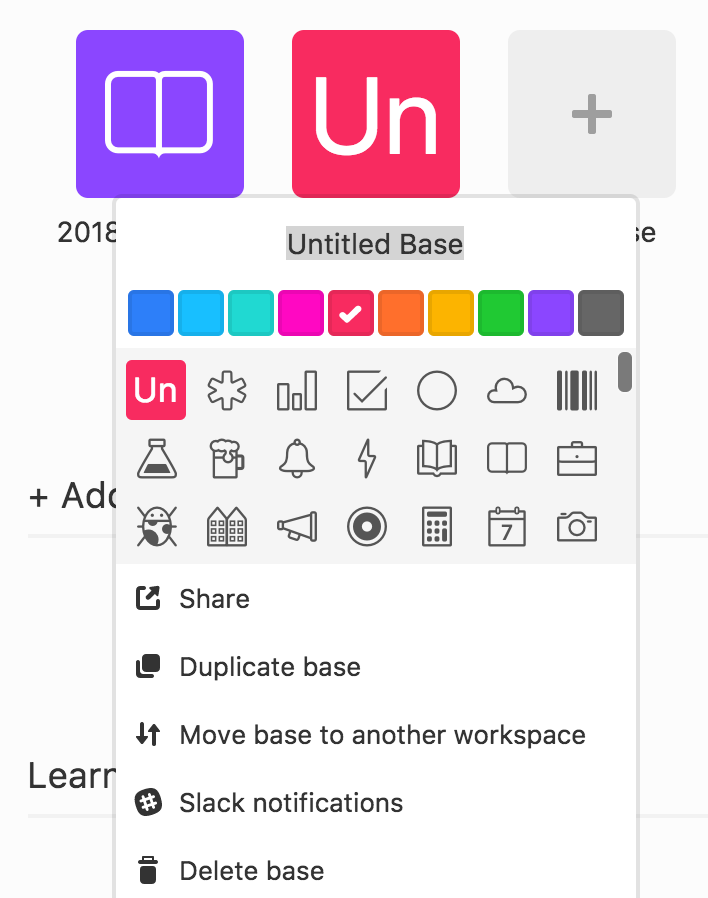
Each Base that you create can be customized at any time by clicking the dropdown at the bottom right of the Base icon. You will be able to change the name, icon color and graphic, share with collaborators, move to another Workspace, or delete.
Bases can contain multiple Tables, where you can store lists of data items. Tables are created by clicking the + button to the right of any existing Tables.
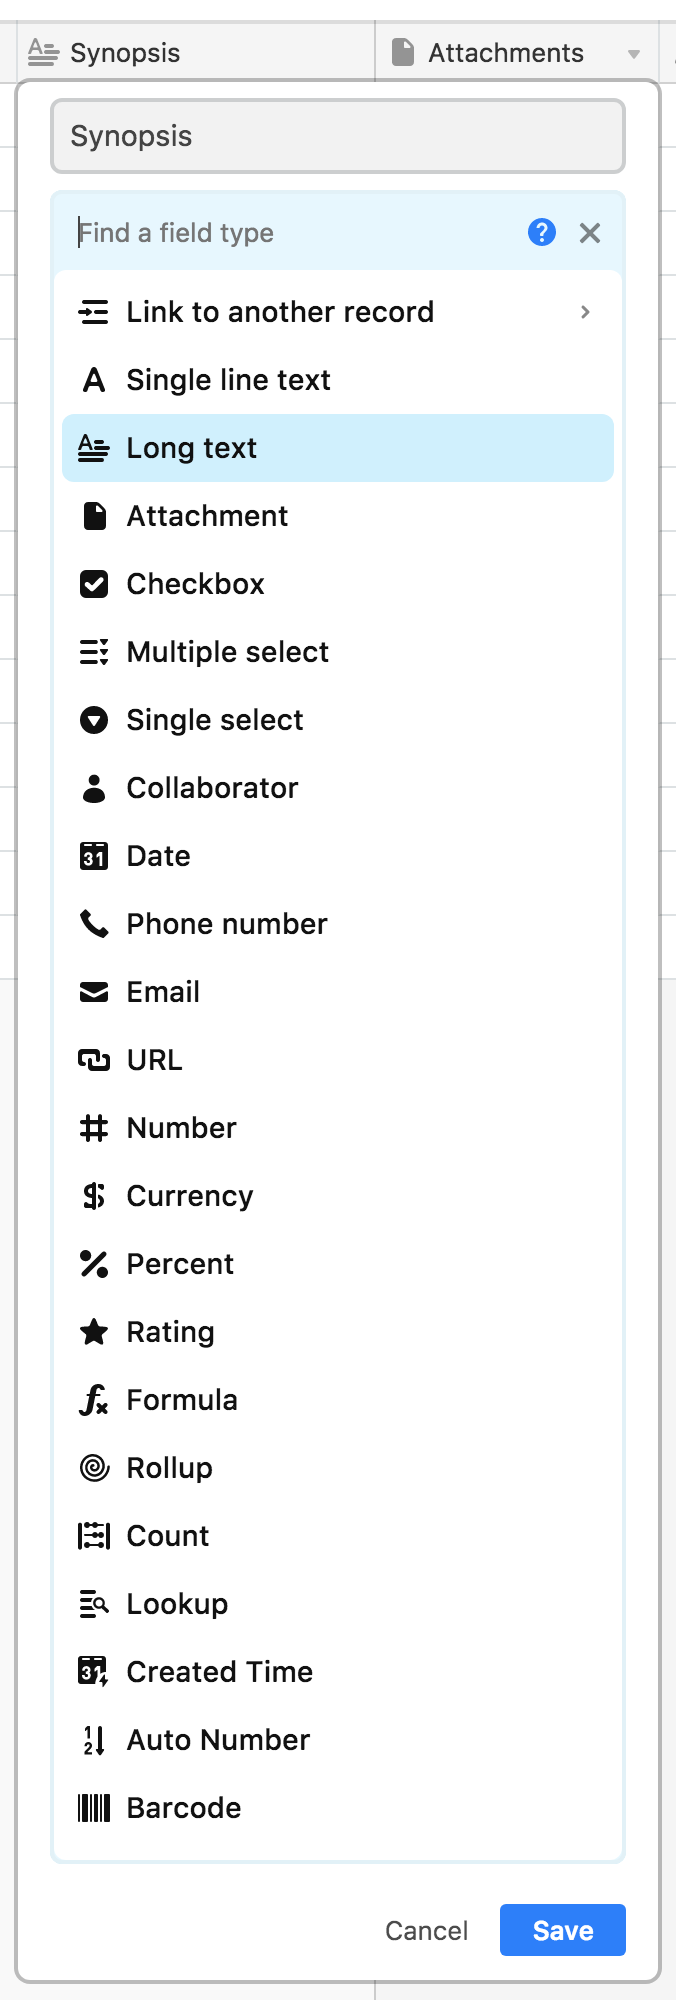
Fields are particular types of data represented in a column. You will need to determine what specific Fields your Base will need, then add these by clicking the + button on the right side of a Table. After you create it, name it and specify the Field type. Airtable currently has a multitude of Field types, and they keep adding more. These include single line text, long text, attachment, checkbox, single option select, multiple option select, date and time, phone number, email, URL, number, currency, percent, auto number (automatically generates incremented numbers), and formula.
Figure 8: Field Types
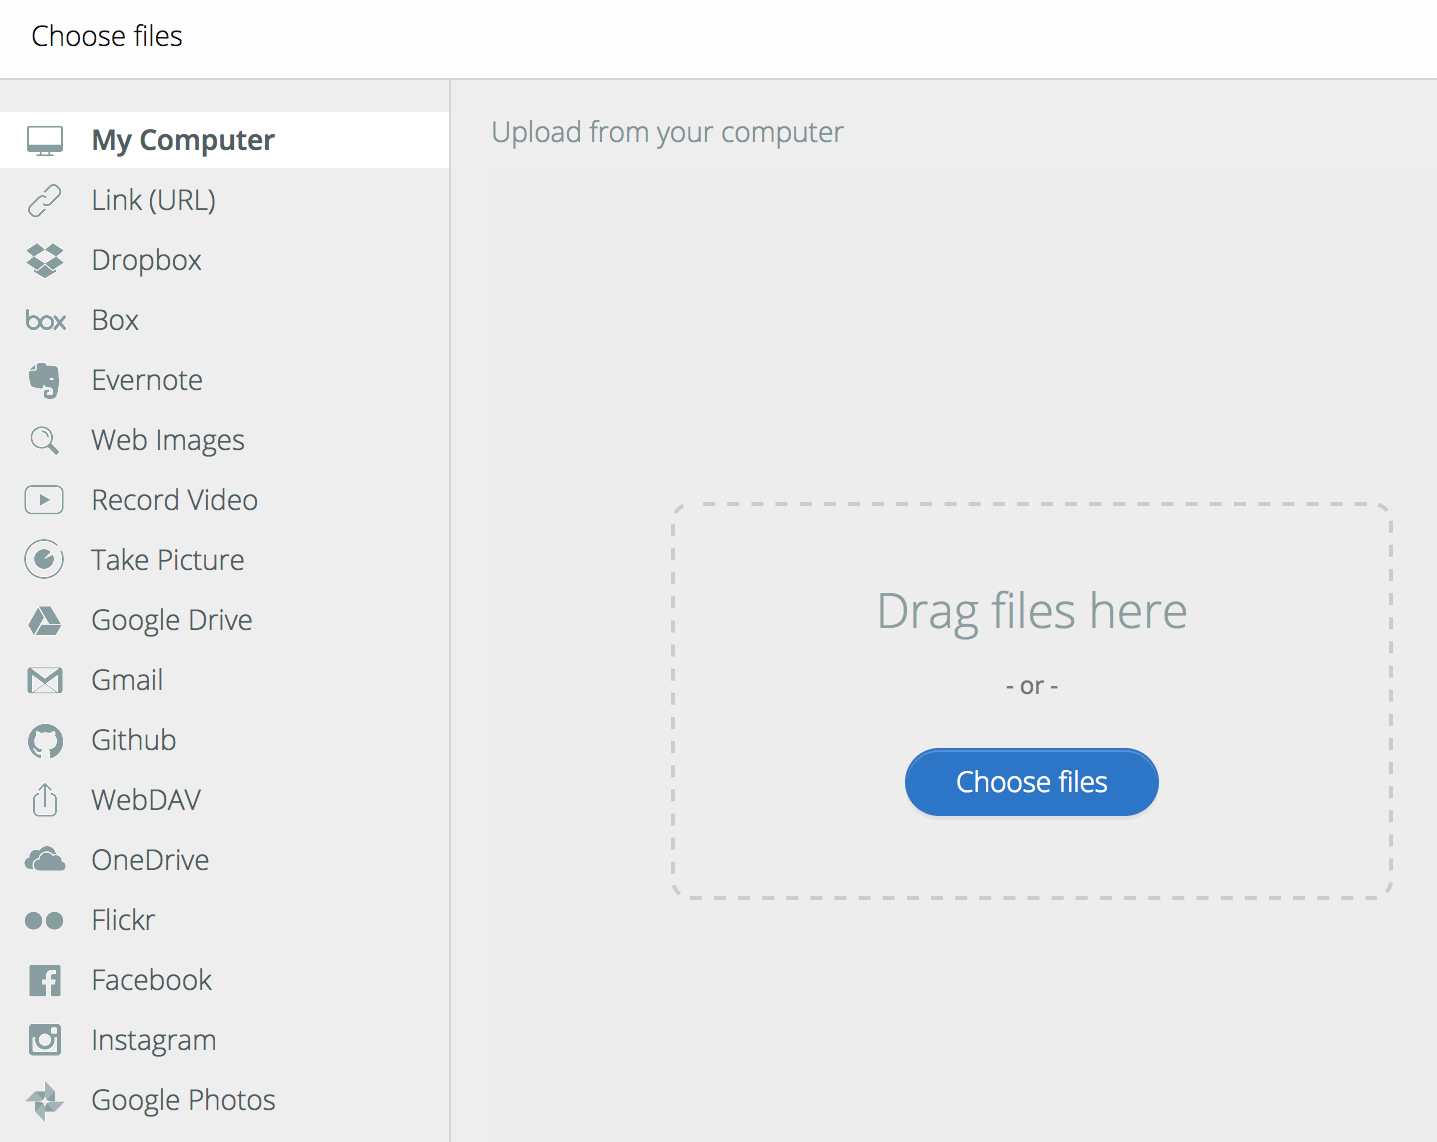
The attachment Field type allows you to choose or drag and drop various file types, including mp3, pdf, photos, and Word docs. You can select items from your various cloud and social media accounts such as Dropbox, Evernote, Flickr, Facebook, Instagram, Google Photos, Google Drive, etc. You can also record a video or take a photo directly from the insertion box. You can do some basic image editing as you upload files – rotate, crop, sharpen and blur. Remember, if you have a free account, you are limited to 2 GB attachment space per Base.
Figure 9: Uploading Attachments
The first column of every Table is the primary Field, and it is used as the name of the Record. It cannot be moved or deleted, and it is always visible as you scroll right and left.
Creating and Working with Records
Now it’s time to populate your Base with your data. There are several ways to add new Records, but the easiest way is to scroll to the bottom of a Table and click in the last row (there’s a + there). After Records are added, they can be continually edited, hidden, filtered, grouped, sorted or deleted. All changes are updated in real-time across all devices and collaborators.
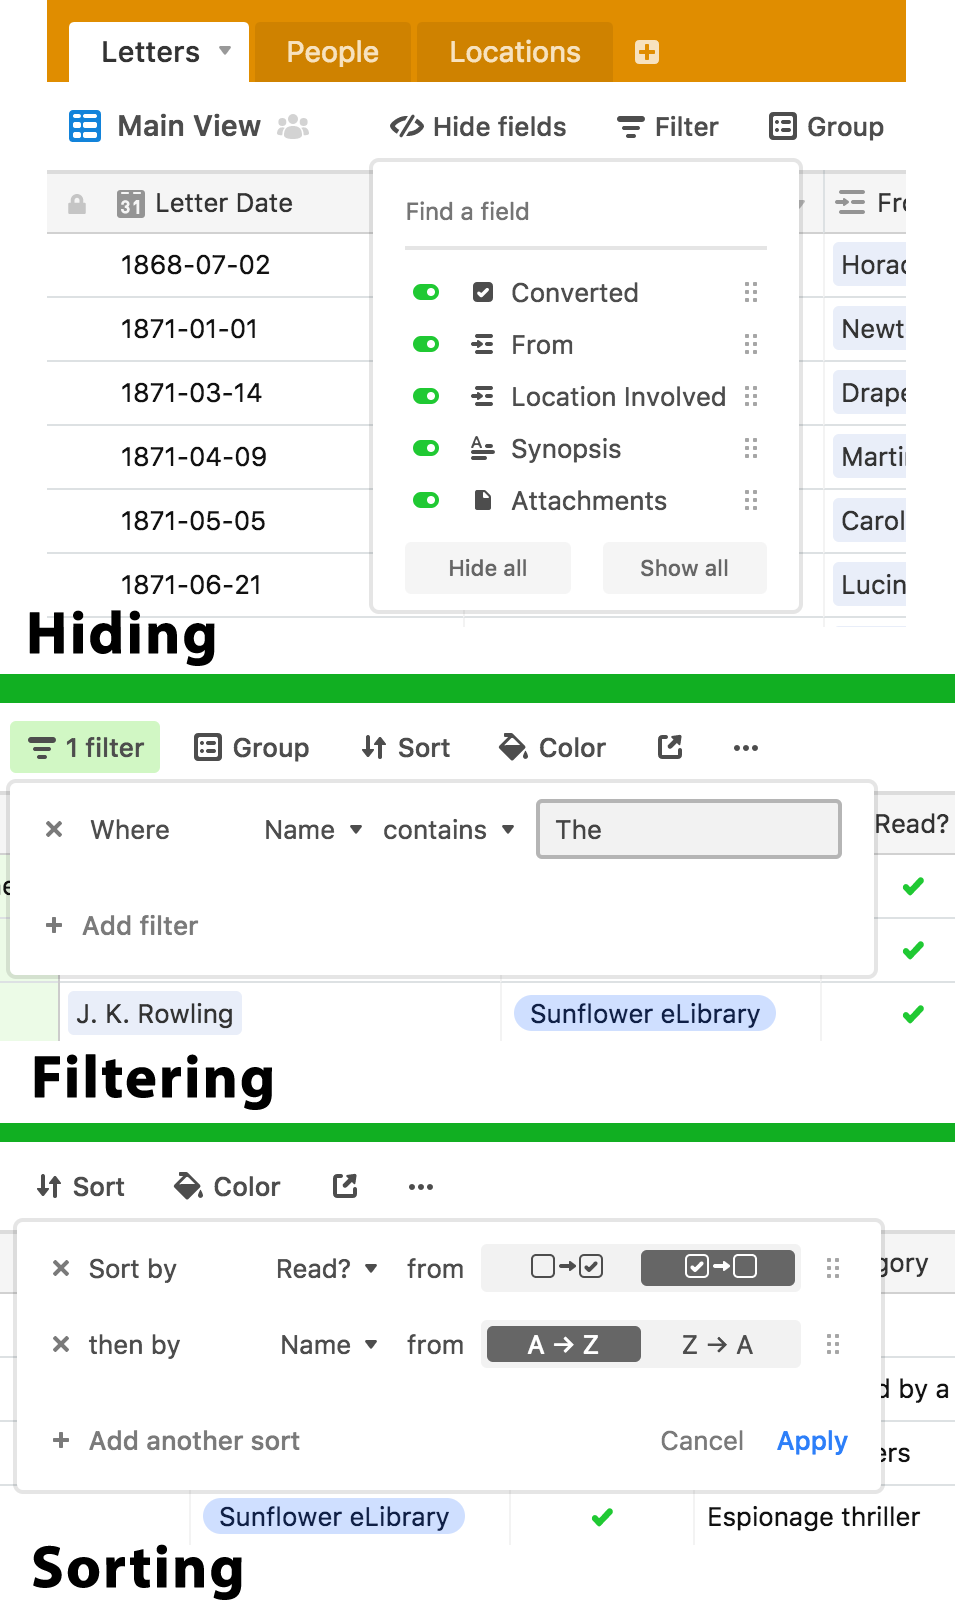
Sometimes you might not want to see all of your data. Fields can be hidden from view by selecting the Table, then clicking on the Hide Fields button in the Table’s top menu bar. You can toggle specific Fields on or off with the green toggle button. Your data can be instantly filtered with the adjacent Filter button – click the + Add filter to select what to filter. You can also selectively group your Fields or sort in various different ways. Records can be deleted by right clicking (control + click on Mac) on a Record and selecting Delete Record. If you need to delete multiple Records, select the checkboxes at the left of the Records, right click and choose Delete All Selected Records.
Figure 10: Working with Fields – Hiding, Filtering and Sorting
If you want to see an expanded view of your Record, click the round button that appears next to its name when you roll over it. This will show all linked Tables and Records, Fields, the history of changes made (with a free account you have two weeks of revision history) and comments that collaborators have made.
Figure 11: Sample Expanded Record Views
Exporting Records
If you need specific data for use in other applications, you can export it as a .CSV file. You can export all Records in a view by clicking the (…) button in the Table’s menu bar, then select Download CSV. If you need data from more than one Table, you will have to export each separately.
Figure 12: Export Records to CSV
Creating Relationships with Other Tables
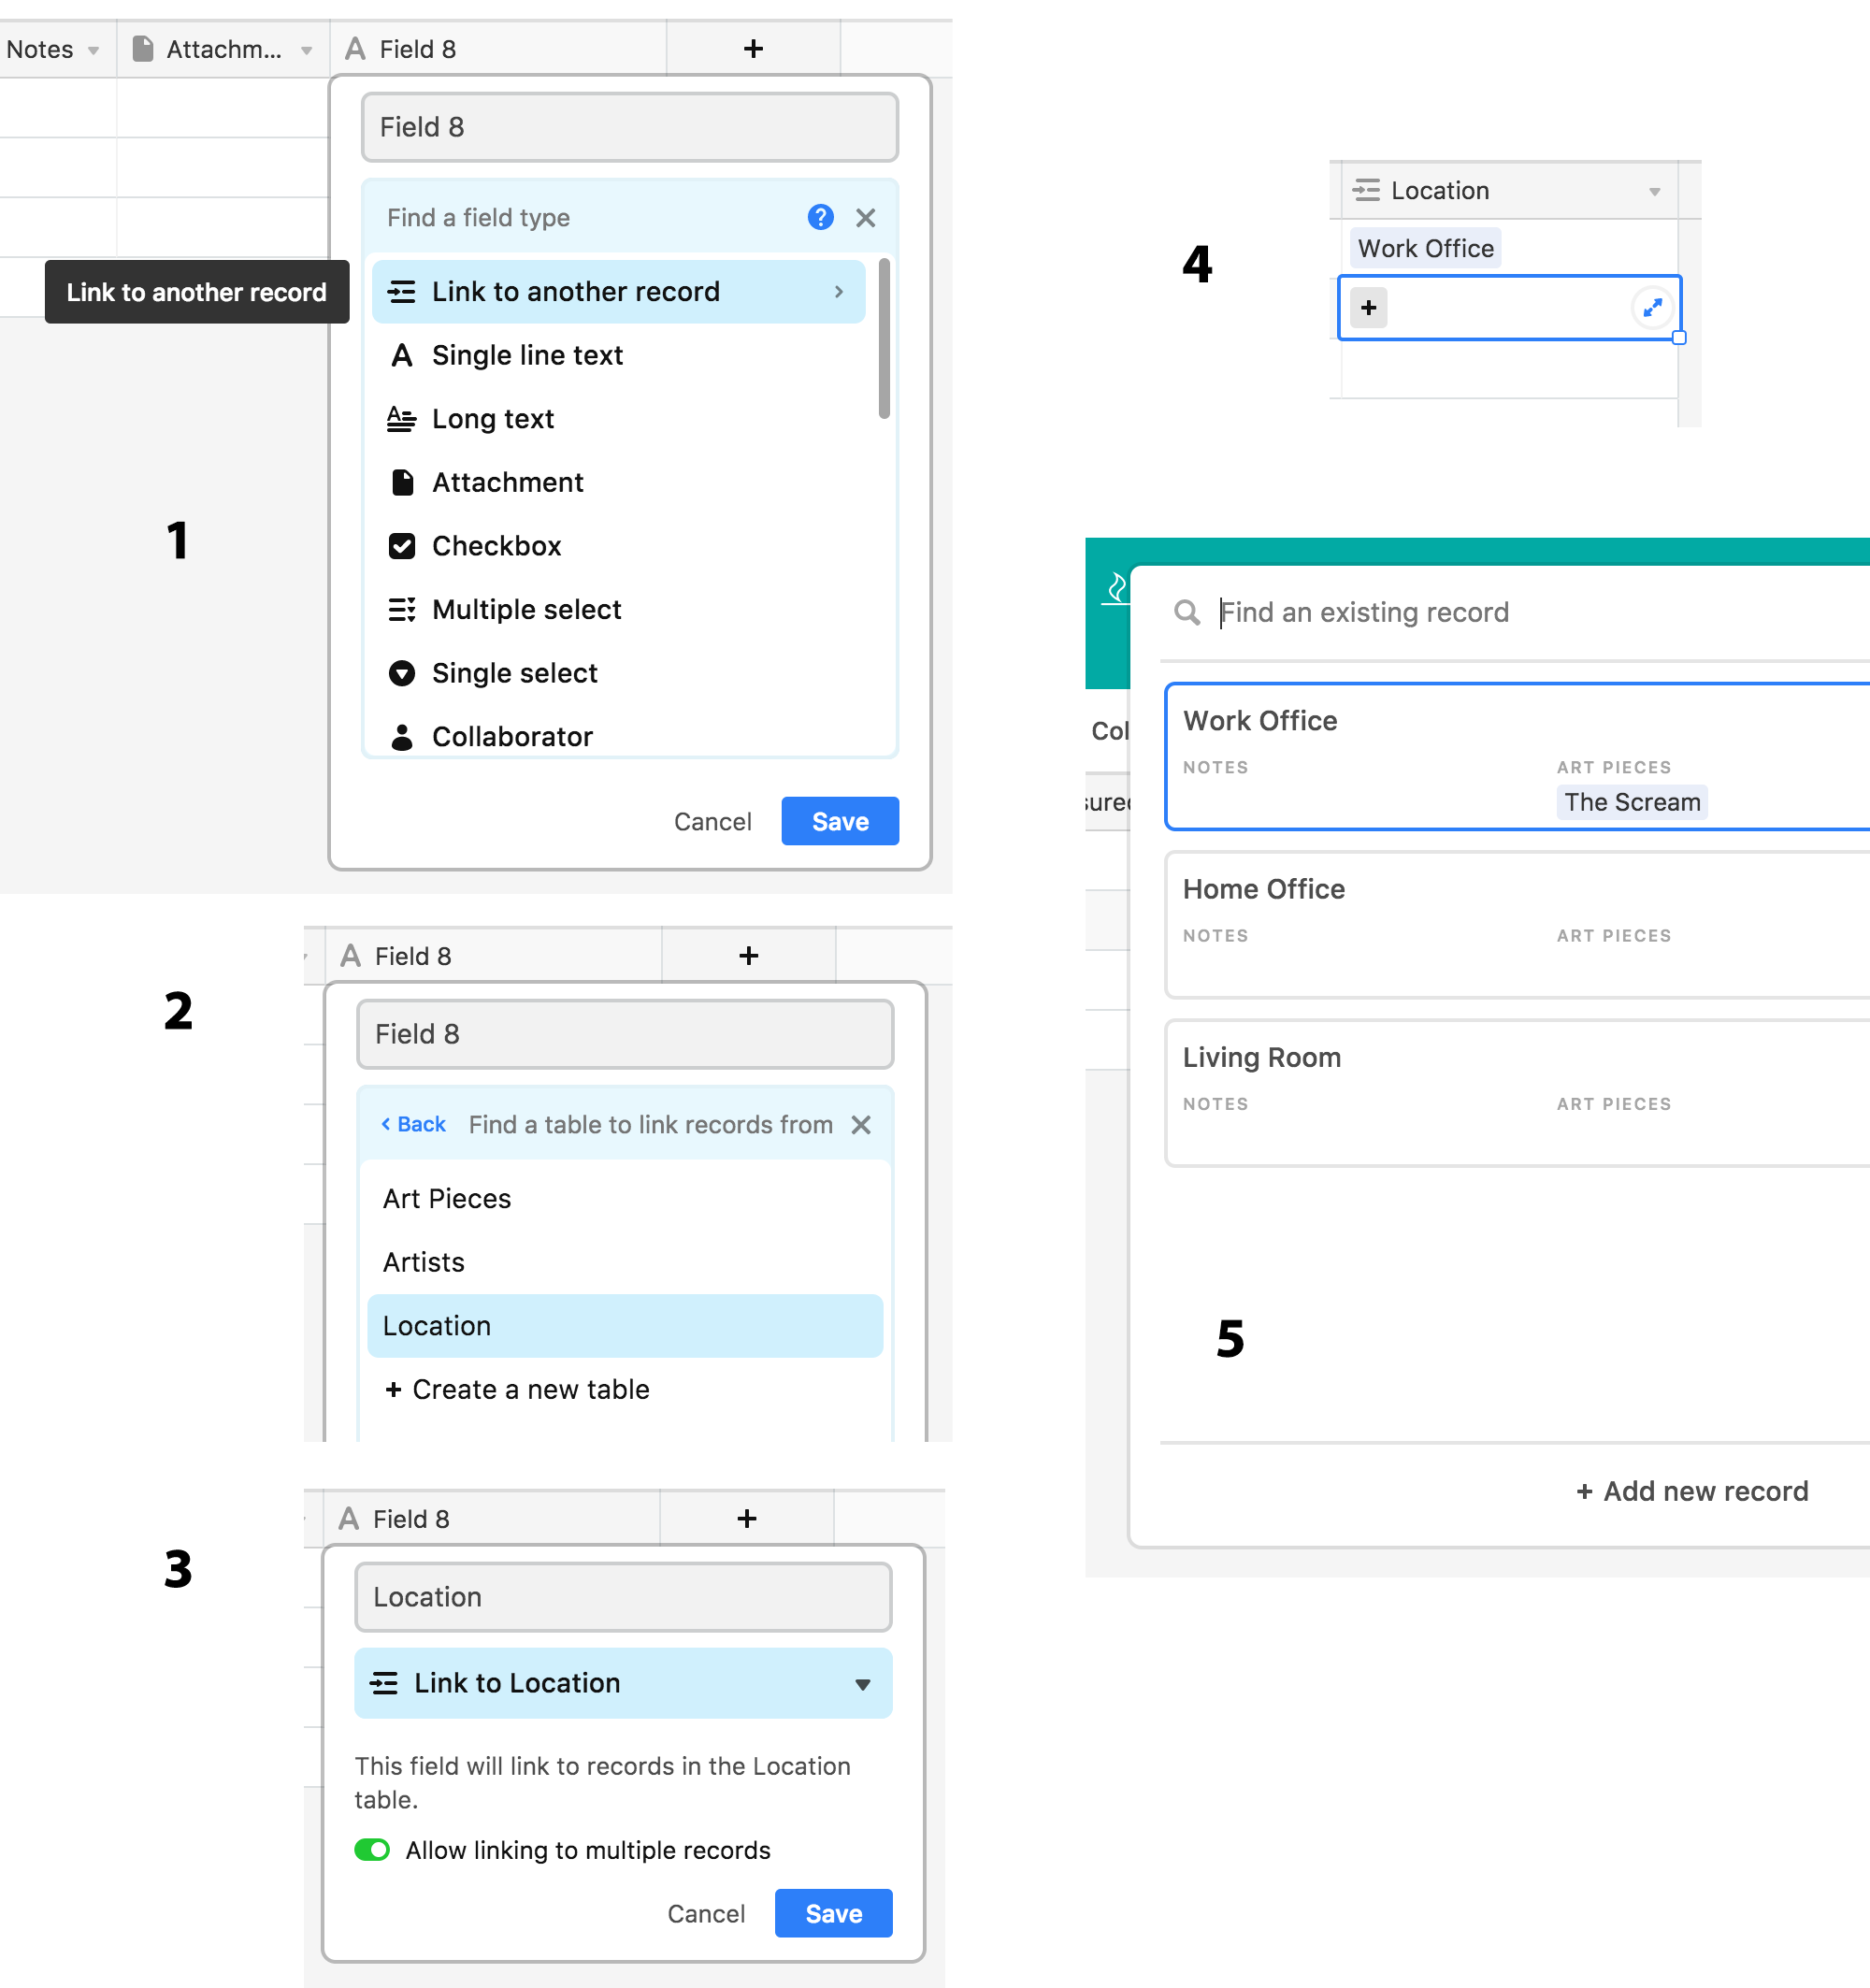
Airtable excels at its ability to link related concepts. To create relationships between data in more than one Table, you can link Records. These relationship links can be one to one, one to many, or many to many. For example, if I have an Art Collection Base with an art pieces Table, an artist Table and a location Table, I can create a linked Record Field that links the data between my Tables.
This is done by clicking the (+) at the top of a new column on your Table and selecting Link to Another Record. You will then choose which Table to link to, and the option to allow linking to multiple Records within that Table. Make sure you name your Field at the top of the column. Now you can link specific Records to data in your other Tables. Tap in the Record cell until you see a + (plus) sign, and your individual Records from the other Table will show up for you to link. You can delete a link at any time.
You can also create a new linked Table from scratch at any time by changing the linked Record Field type. If you have a Field that you think should have its own Table, click on the Field drop down to customize the Field type and choose Link to Another Record. From here, go to Create a New Table and Save. Now you will see another Table with your data from that Field listed in the primary Field. You can then fill out your Table with other Fields to link to other pieces of your data.
There seems to be almost endless ways to show your data relationships with Airtable, and they have excellent guides and videos to help you represent your data links.
Figure 13: Steps to Creating Record Links Between Tables
Creating Views
After all of your Base creation, you might wonder: How can I view my data? Airtable gives you various styles to customize the way you see your Bases. The default is the grid view, which resembles a spreadsheet. Remember that you can hide, filter, group, and sort your data to make this view what you want. Views are created and customized on the Tables’ top menu bar.
If you have data that involves dates, you can create a calendar view. Your Records will be available for viewing as either monthly or two-week calendars. The Pro plans have useful calendar features if you are using the app with teams.
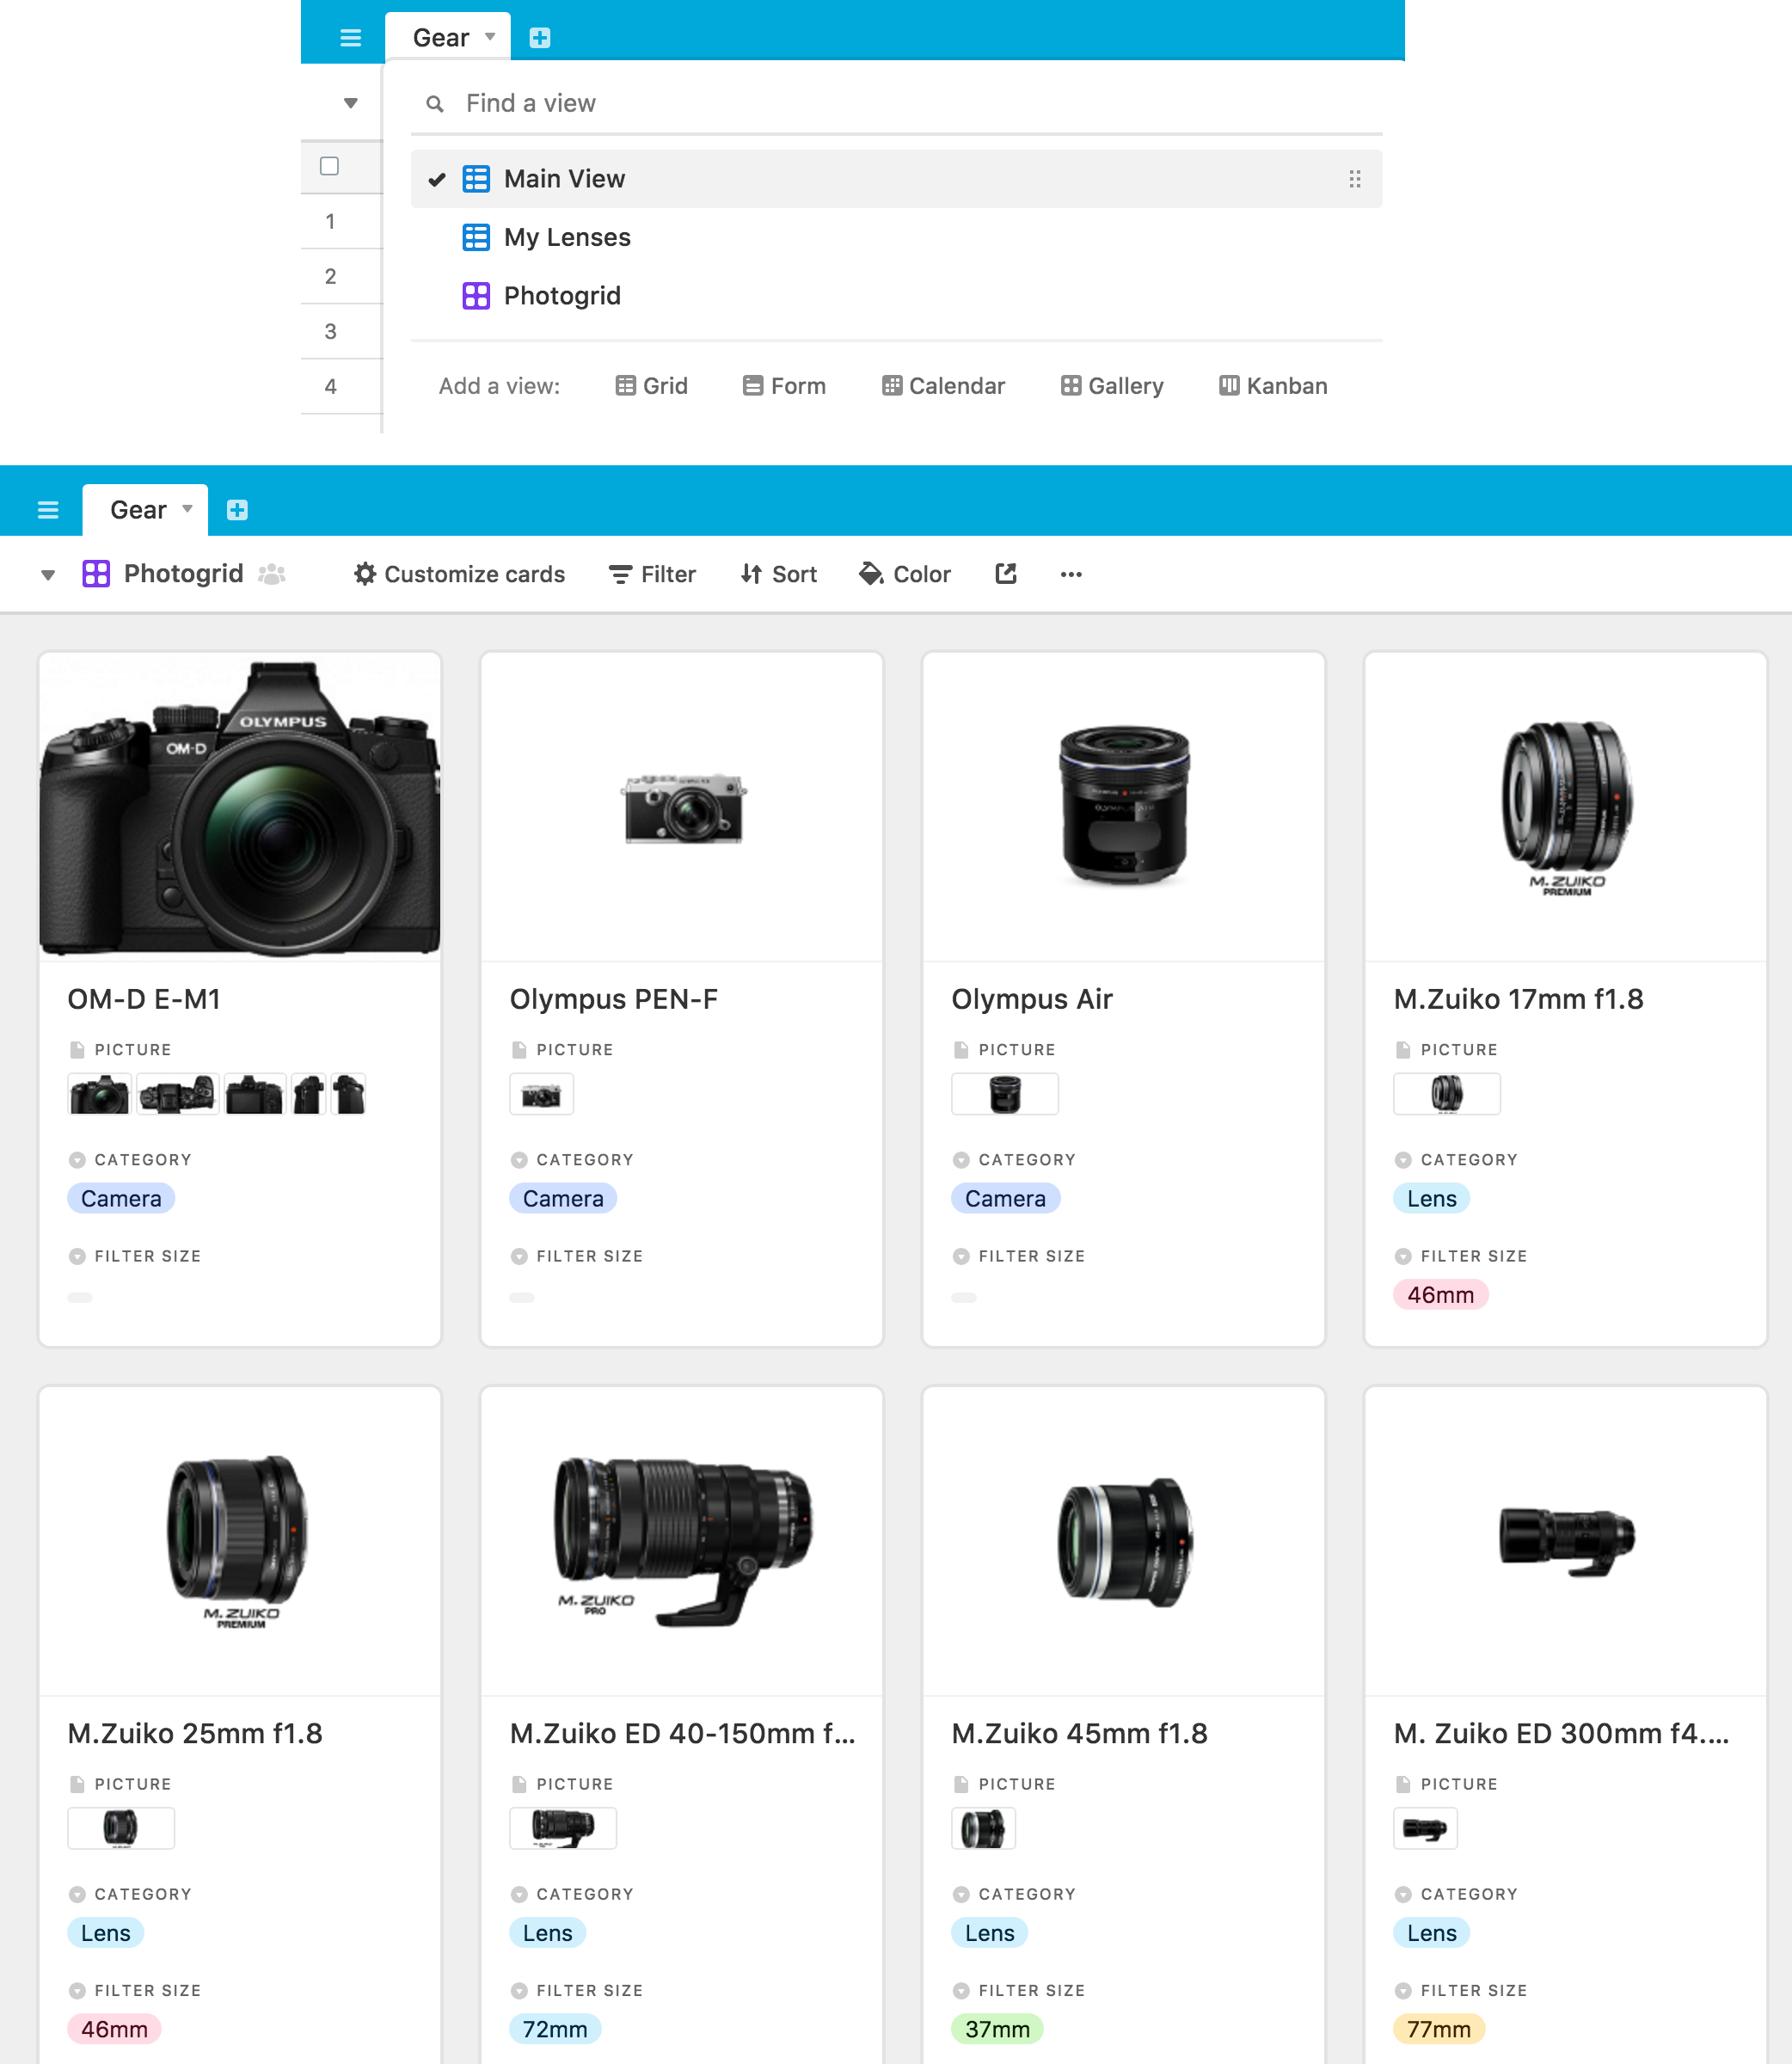
If you would like your Base to be viewed as large index-type cards, choose gallery view. This is useful if your Base has images in an attachment Field. You can designate a cover image from available attachments. The Kanban view is similar to gallery view, but your workflow is a board with stacked cards that you can drag to move around and reorder. When creating this view, you will need to select which Fields to use to create the stacks for the view.
Figure 14: Airtable Views
Creating Forms
There is another very useful feature under the view menu bar – the ability to create forms. If you have the need to collect data of any kind, from anyone, you can do this even if they don’t have an Airtable account. This can be useful in so many ways, such as logging expenses, collecting RSVPs, or creating surveys and quizzes. The forms support file attachments and work great on mobile devices.
Forms are generated from an existing Table. Go to the Table you would like to use for collecting your data, then go to the view bar and select Form. You can type in a title and description, then hide, add, or reorder your Fields as you wish. If you have the Pro plan, you can add your own branding images and remove the Airtable branding. At the bottom of the form, you can customize the message and what will happen after the form has been submitted – it can refresh with a new form after 5 seconds, show a “Submit another response” button, or send you an email notification.
After your form is configured, click the Share Form button in the view bar. You will get a private link to share with anyone. You can also choose to get an iframe to embed the form into a web page. When you are done collecting data, you will return to this tab to disable the form link. Data from submitted forms will automatically show up in a new row in your Base.
Figure 15: Steps to Creating an Airtable Form
Sharing and Collaboration
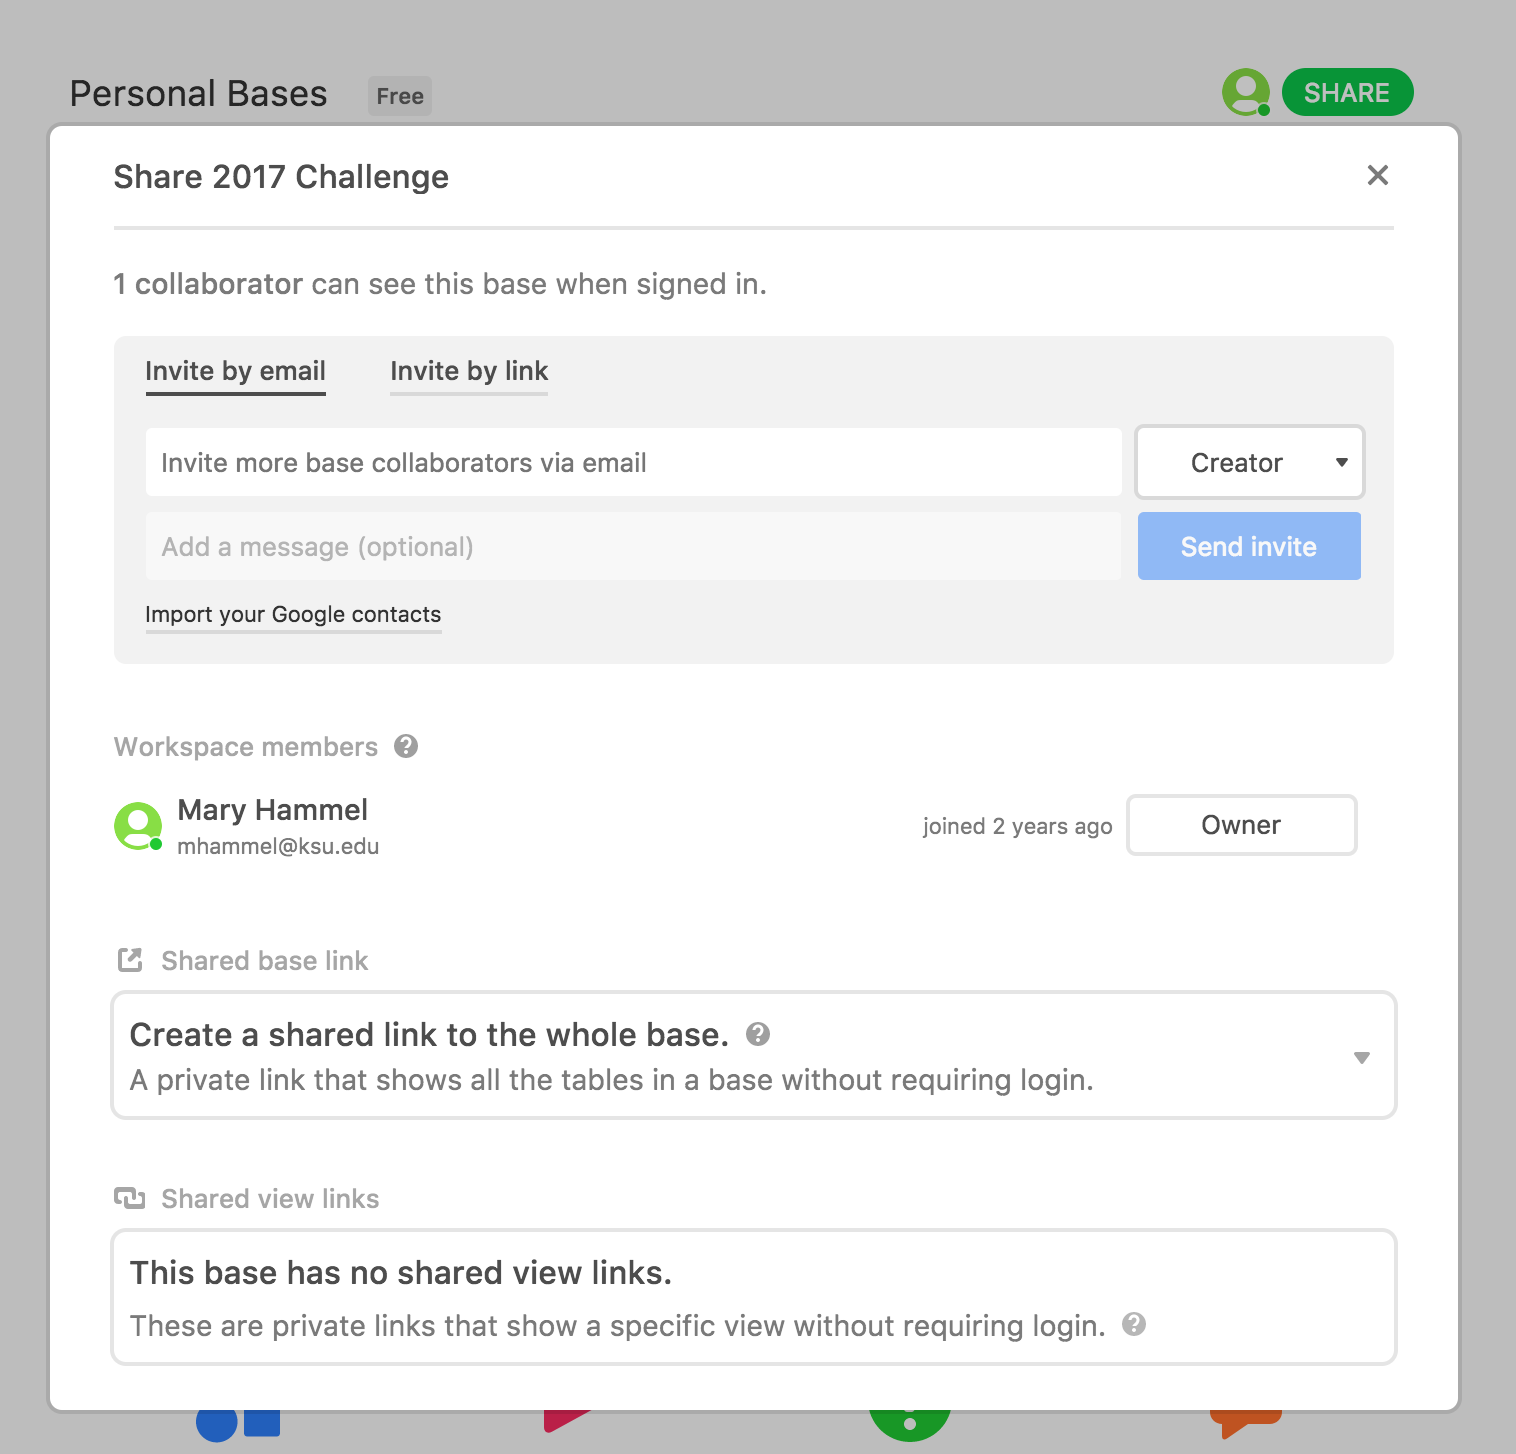
Airtable supports a variety of collaboration options, from sharing a single Base with another person, to sharing a workspace with a team. If you would like to simply share a personal Base with someone, open that Base and click on the Share button at the top right. Alternately, you can click on the dropdown at the bottom of a Base icon and choose Share. Collaborators can be invited via email or by a link. A Base Owner can choose what permission level a collaborator will have – Creator, Editor, or Read-Only access. A Creator has full access to edit the Base, but cannot delete the Base or modify permission settings. An Editor can add, delete and modify Records and Views, but not Fields or Tables. A Read-Only collaborator can only view the data.
Figure 16: Sharing a Base with Collaborators
Workspace collaboration is a little different – collaborators have access to all of the Bases within a Workspace, but type of access can be specified by permission level at the Base level.
Workspaces
Workspaces are created by clicking on Add New Workspace in the main app view (right below your Personal Bases). Click on the dropdown menu to access the settings, change the name, or delete a Workspace. After you have created a Workspace, you can start creating Bases within that space and share them with any collaborators. Workspace collaborators are added the same way as Base collaborators.
Figure 17: Workspace Settings
The permission level specifics of Workspaces are a little more complicated. If you have created a Workspace, you are a Workspace Owner, but you are not the owner of Bases within that Workspace. See the link below for information on Airtable Permissions.
Link: Airtable Permissions
Content Integration with Other Apps
Airtable can be connected to hundreds of other apps and websites via third-party service Zapier. In basic terms, Zapier creates a Zap, where Airtable is a trigger (for example, a new Record is created automatically) or an action (doing something in another service or app creates a new Record in Airtable). A complete guide is available on Airtable’s Support site (see link below). Some common content integrations include Facebook, LinkedIn, Dropbox, Google Drive, Instagram, MailChimp, Slack, Trello, and Evernote.
Excellent Help and Support
I have found Airtable’s support to be outstanding. Help and resources are available within the app interfaces, with a multitude of video tutorials and links to a great online guide. You can also ask a question within the app, with quick response.
Figure 18: Support and Resources
Mobile vs. Desktop
There are functional differences in the desktop and mobile Airtable apps. The desktop version has many tasks that are unavailable in the mobile counterpart: creating forms; creating calendar, gallery and Kanban views; using grouped Records; hiding Fields; importing and exporting CSV files; printing; and sending account-level invitations. But the mobile version has its own unique functionality: it can be used to scan barcodes. Most of us have both a desktop and a mobile device, so I don’t see the shortcomings in the mobile app to be that big of a deal, and you can always access the web version on your mobile device if you need specific functions that the mobile app does not do when you don’t have access to your computer. The mobile version has a separate FAQ to help mobile users (see link below).
Link: Airtable Mobile FAQs
My Use of Airtable
Overall, I really like what Airtable has to offer. I have been using it personally during the past two years to create small Bases that I can take with me everywhere. I have a Base with details of all of my camera gear in case I need it, and I have been documenting my yearly reading challenges, adding new books and authors as I come across them. I have also started planning a history book involving transcribing letters written to one of my ancestors, which are linked to Tables with the letter writer’s names and places where the letters came from. Before long, I’m sure I’ll have other Tables to add as my research grows more cumbersome and I need to get the organization under control.
I thoroughly recommend Airtable to anyone who needs an easy-to-use organizational tool with an attractive layout. Try it out and get your projects, collections, inventory, research or events organized!
About the Author
Mary L. Hammel is Associate Director of the Catalyst Technology and Media Services Center, College of Education, Kansas State University. Her work involves design and production of print and digital materials for educational publications and classroom use. She can be reached at mhammel@ksu.edu.
| Previous page on path | Cover, page 5 of 26 | Next page on path |
Discussion of "Airtable: Organizing Your Data with Hybrid Spreadsheet/Databases"
Add your voice to this discussion.
Checking your signed in status ...