Top Timesavers in Microsoft Word 2013
By Betsy Edwards, Kansas State University
Microsoft Word has a number of features which help users save time. Although this document covers Microsoft Word 2013 (Windows), many of the tools and timesavers are applicable to other Word versions, including Mac Word.
Navigation Pane (a.k.a. Document Map) = clickable roadmap
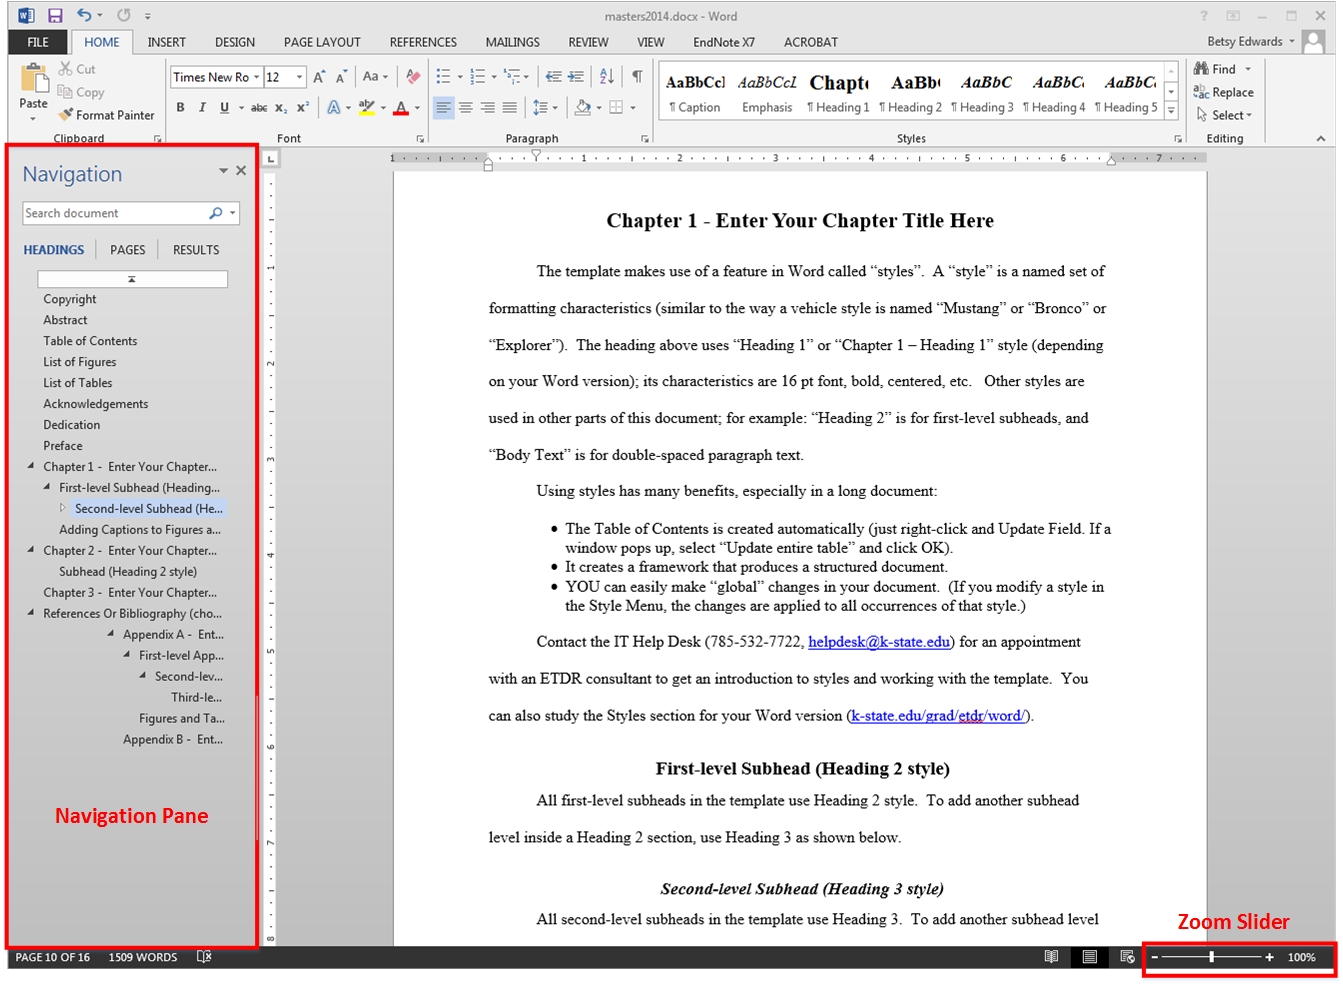
This is the top timesaver in Word that I share with writers. The longer your document gets, the more time it saves. In Word 2013 it’s called the Navigation Pane. Previous versions may call it that or “Document Map”. I call it a “clickable roadmap” because your trip is the entire document and the points of interest are your headings.
HOW TO: On the View tab, checkmark the Navigation Pane box. (It will display to the left.)
In the Navigation Pane:
Zoom slider: Much more than larger or smaller text
Use the Zoom slider (bottom right corner of the Word window) to jump directly to a specific page of a large document. This works best if the page you want has an image or table. Sliding down to a 10%-20% view can display 40+ pages at a time.
HOW TO:
1. Slide the Zoom marker down to 20% or so.
2. Visually skim to find the page you want.
3. Click to put your cursor on the desired page, and zoom back up to 100%.
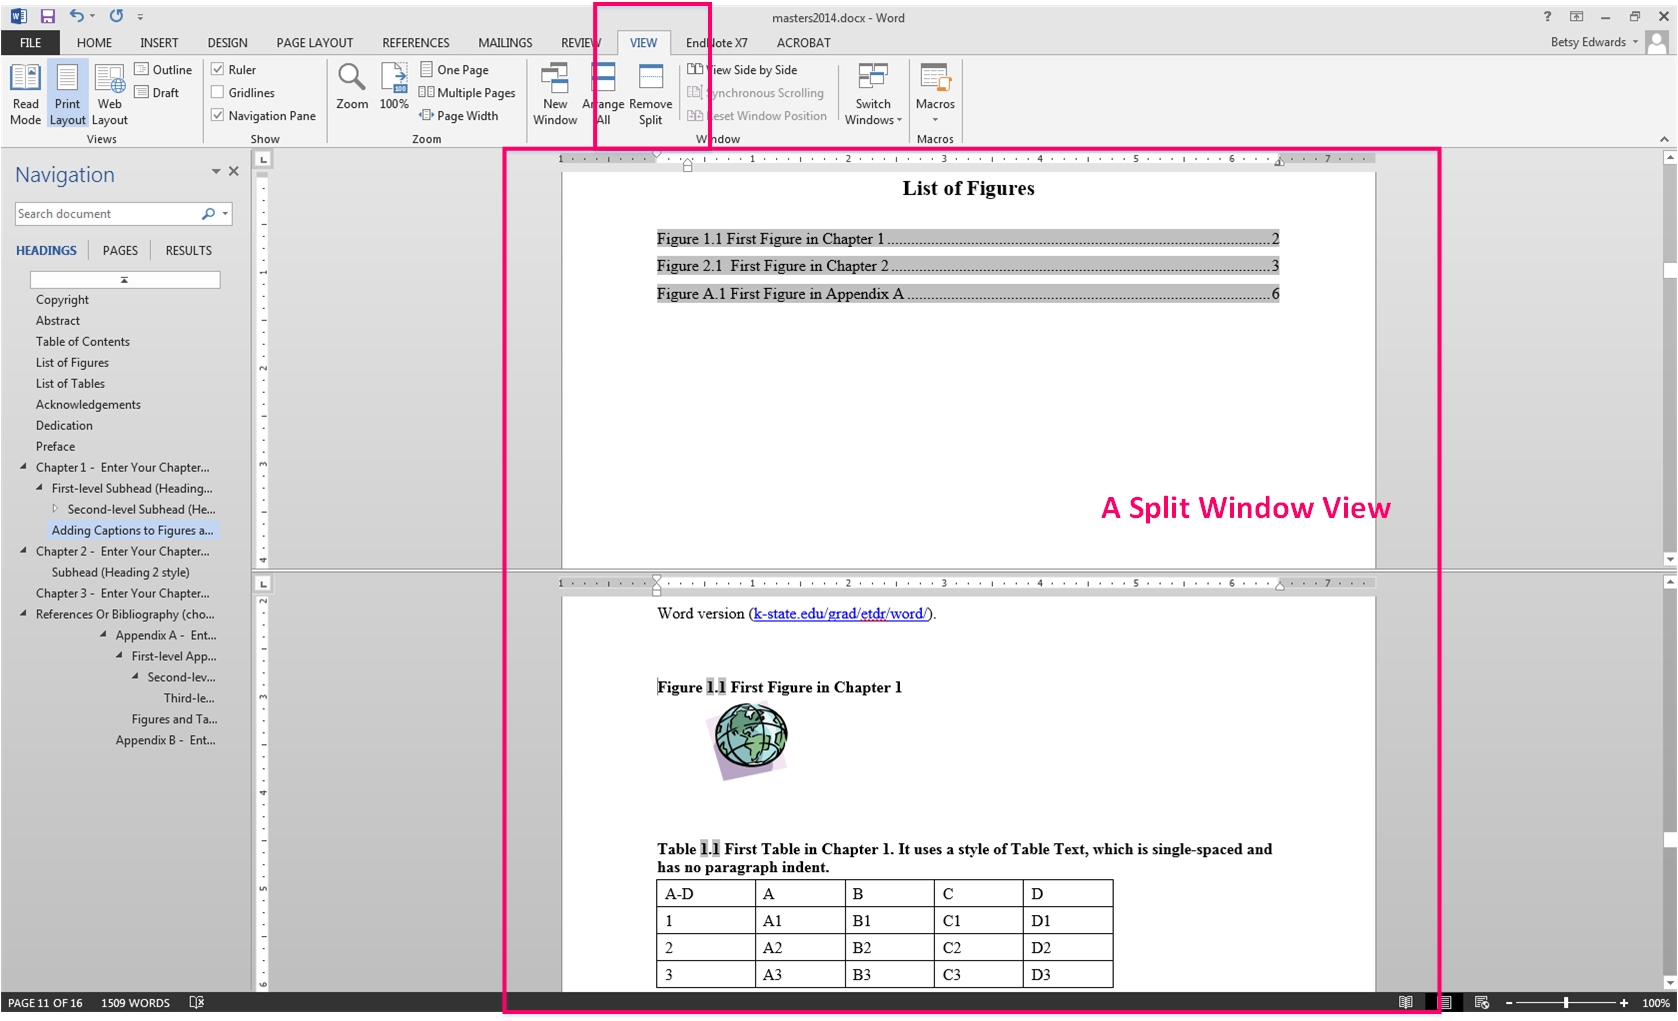
Split Window: See two parts of your document at the same time
This feature is especially useful when you need to view two parts of your document and jump back and forth between them as you develop content. For example, when you need to view a data table and write about it elsewhere.
HOW TO: View tab > click Split (When clicked, the toggle button will change to Remove Split.)
A Word template is a collection of tools and settings that create an organized document. It allows writers to focus on writing instead of formatting. Microsoft Word provides a variety of templates to meet various publishing needs, and you can also create your own template or modify others.
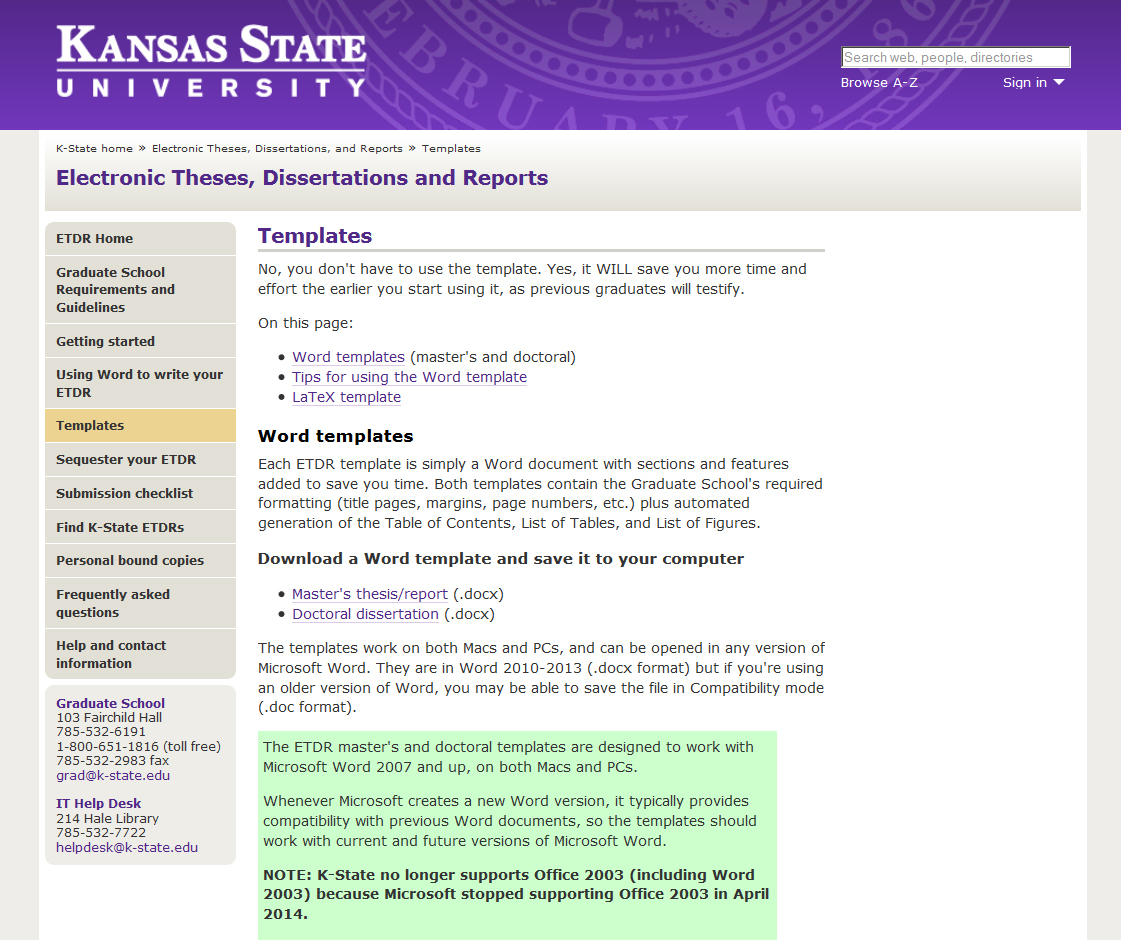
K-State’s ETDR templates. Since 2004, K-State has provided basic “ETDR templates” (Electronic Theses, Dissertations, and Reports) to help graduate students organize their writing in the format required by the Graduate School. The two templates (a master’s thesis/report, and a doctoral dissertation) are just basic Word documents with many features and settings added.
Readers are welcome to delete the K-State references and use the templates as needed. These templates are released for no-cost public use.
Over the years, I’ve come to realize that “ETDR template” sounds way too technical to most students. That in itself becomes an obvious reason for putting off writing in the template, as in “I don’t have time for that right now; I’ll use it later.” The solution? I now tell students, “The ETDR template is simply a Word document with many cool, timesaving tools.”
Although graduate students are the primary users, faculty/staff and undergraduate students are starting to see the benefits of a writing template that can be easily modified to meet their needs. The template includes the following elements:
Using styles saves a lot of time, especially in a long document. With a few easy clicks, you can:
For more information about styles, visit K-State’s ETDR website at http://k-state.edu/grad/etdr and do a search for “Styles”.
Instead of laboriously creating a Table of Contents (TOC), why not insert an automated one that pulls in all the headings and subheadings from your document? And when I say “laborious” I mean I’ve seen students who’ve had up to a 12-page Table of Contents that was manually typed and painstakingly created, with dot lines and page-number checking, over many hours of time.
On the bright side, an automated Table of Contents can be easily inserted, updated with a few clicks, to show the most current headings and related page numbers in a document. Any Table of Contents can also be manually tweaked to add special styles before converting to PDF for publication purposes.
Below is an example of a Table of Contents in Word.
HOW TO: This shows how to use an automated Table of Contents:
The TOC in the ETDR templates is easy to copy/paste into any Word document. It has a few modifications beyond Word’s basic TOC.
IV. Use efficient tools for troubleshooting Word. Save time while problem-solving.
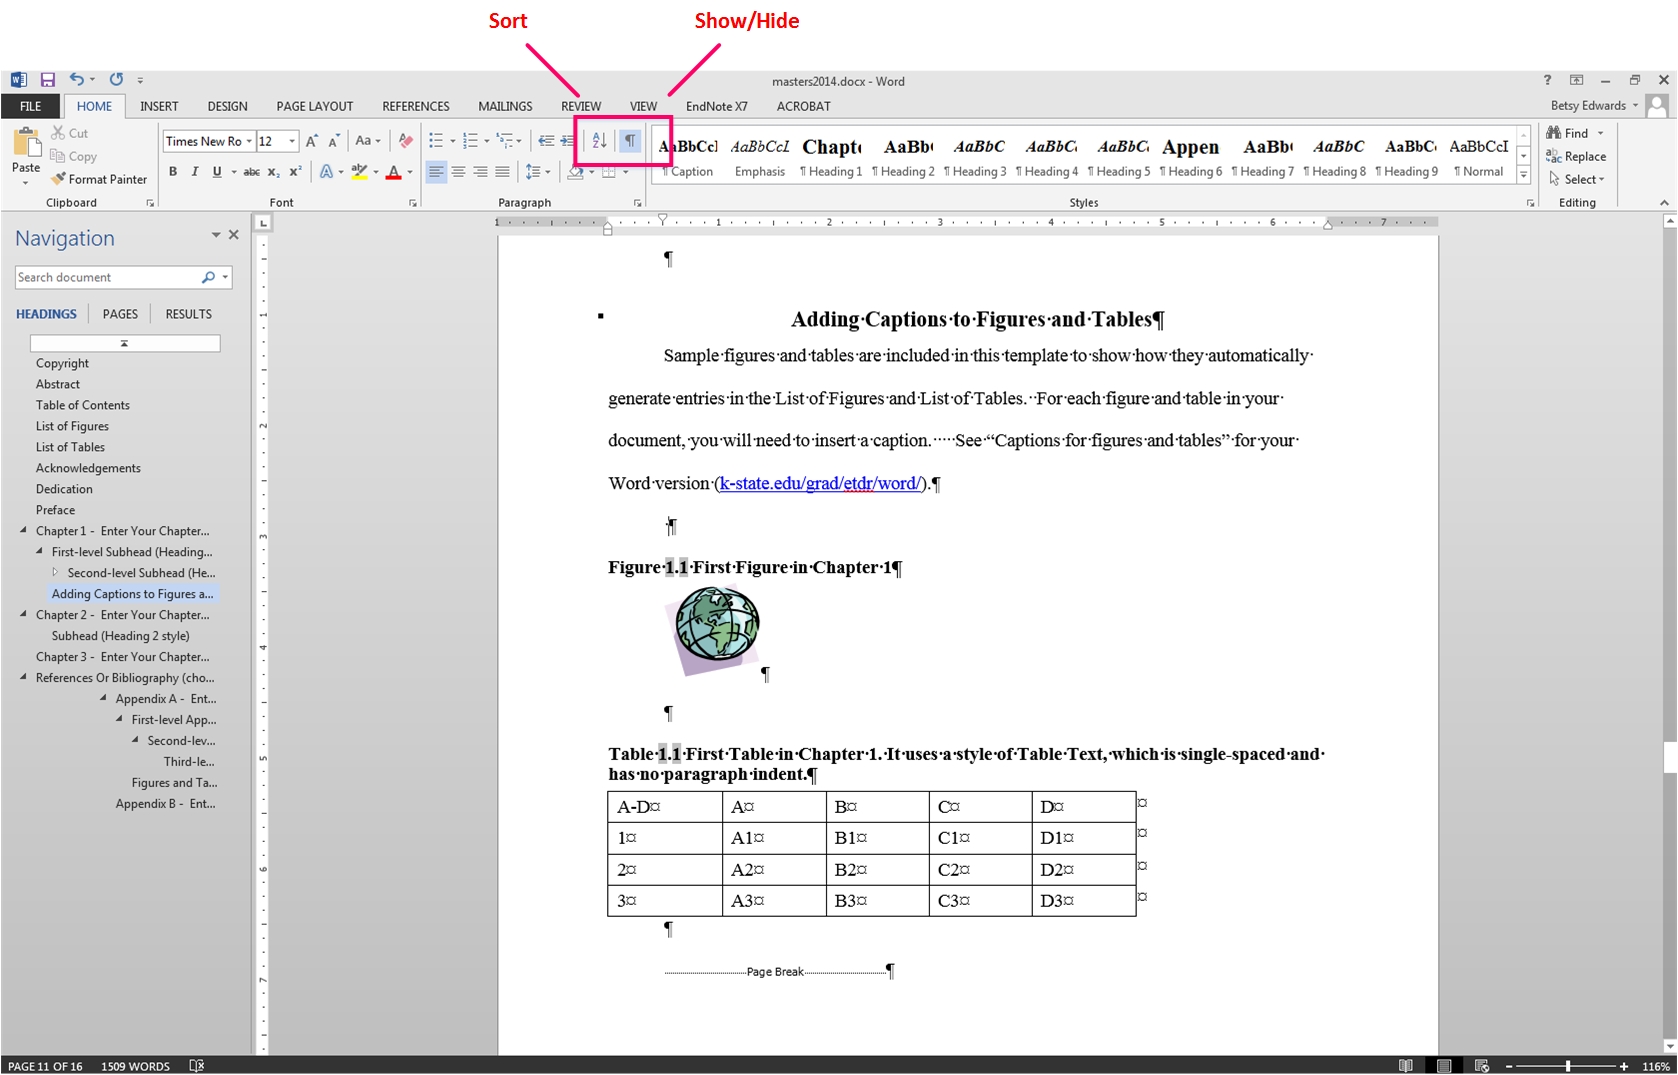
Sort alphabetically or numerically. Writers who love a fast way to sort text and/or data alphabetically or numerically are typically excited to discover the Sort tool. (I think it gets overlooked by the more impressive tools in the Paragraph section.) If you haven’t found it already, this timesaver is on the Home tab of both Windows and Mac
versions.
HOW TO: Home tab > Paragraph section > click Sort button (looks like A-Z)
I still recall how excited I was the first time I selected a multi-page bibliography and, with two clicks, had an alphabetically correct list.
Show/Hide button. This handy little button looks like a black paragraph mark and is on the Home tab of both Word for Windows and Word for Mac. When clicked, it displays a mark for every space, every blank line, tabs, and other special formatting you’ve added. Turn it on to see what’s really happening to your content, and turn it off again when all those extra marks get annoying.
Show/Hide is especially useful for:
HOW TO: View tab > Views section > click Draft
The Draft view is useful because it shows the style used on every element in Word, meaning every item that is followed by a paragraph break. That includes each separate line, paragraph, figure, heading, etc. Oftentimes, fixing a Word problem is simply a matter of changing the style assigned to that one element.
One caveat: Draft view is basically a text view of all your content, so it may not show some figures and complex data. Don’t panic if you’re in Draft view and some of your information appears to be missing. Just go back to Print Layout, which is the master view in Word.
When you first open the Draft view, you won't see the "Style Area" that displays the style associated with each element. You must change a default Word setting in your document. Here's the process:
Now when you go to the Draft view, the Style Area will be displayed at the left side of your content. You can grab the vertical line to resize the Style Area or remove it from view.
Mac users can get the Draft view by clicking View and then Draft. But it's much easier to change the Style Area setting on a Mac.
HOW TO (Mac): Word > Preferences > View > in the Window section, change Style Area width to 1" and then click OK.
In closing, use navigation timesavers to jump to content instead of scrolling; use Word templates (and / or create your own); use automated features, such as Table of Contents, List of Figures, etc.; explore Word's other features, and find those efficient tools, such as the Sort and Show/Hide features.
Betsy Edwards is a web/information specialist in Information Technology Services at Kansas State University. In addition to being a long-time editor and writer for IT communications, she has been providing consulting support since 2007 for the Electronic Theses, Dissertations, and Reports (ETDR) service for K-State graduate students and faculty/staff. Her email is betsy@k-state.edu.
Microsoft Word has a number of features which help users save time. Although this document covers Microsoft Word 2013 (Windows), many of the tools and timesavers are applicable to other Word versions, including Mac Word.
I. Use navigation timesavers. Save time with fast jumps instead of scrolling.
Navigation Pane (a.k.a. Document Map) = clickable roadmap
This is the top timesaver in Word that I share with writers. The longer your document gets, the more time it saves. In Word 2013 it’s called the Navigation Pane. Previous versions may call it that or “Document Map”. I call it a “clickable roadmap” because your trip is the entire document and the points of interest are your headings.
HOW TO: On the View tab, checkmark the Navigation Pane box. (It will display to the left.)
In the Navigation Pane:
- The “Headings” tab is the most useful. It displays text with heading styles 1-9, Page Heading, etc. It even shows blank lines with accidental heading styles. The headings provide a clickable outline and are indented by priority level.
- The “Pages” tab displays thumbnail images of each page. It’s fast for finding blank pages, checking page numbering, and reviewing format. You’ll be surprised what you can see from a bird’s-eye view of your document.
- The “Results” tab is a fast way to find all instances where a word or phrase is used, with a clickable link to each instance.
Zoom slider: Much more than larger or smaller text
Use the Zoom slider (bottom right corner of the Word window) to jump directly to a specific page of a large document. This works best if the page you want has an image or table. Sliding down to a 10%-20% view can display 40+ pages at a time.
HOW TO:
1. Slide the Zoom marker down to 20% or so.
2. Visually skim to find the page you want.
3. Click to put your cursor on the desired page, and zoom back up to 100%.
Split Window: See two parts of your document at the same time
This feature is especially useful when you need to view two parts of your document and jump back and forth between them as you develop content. For example, when you need to view a data table and write about it elsewhere.
HOW TO: View tab > click Split (When clicked, the toggle button will change to Remove Split.)
II. Use a Word template. Save time with pre-structuring.
A Word template is a collection of tools and settings that create an organized document. It allows writers to focus on writing instead of formatting. Microsoft Word provides a variety of templates to meet various publishing needs, and you can also create your own template or modify others.
K-State’s ETDR templates. Since 2004, K-State has provided basic “ETDR templates” (Electronic Theses, Dissertations, and Reports) to help graduate students organize their writing in the format required by the Graduate School. The two templates (a master’s thesis/report, and a doctoral dissertation) are just basic Word documents with many features and settings added.
Readers are welcome to delete the K-State references and use the templates as needed. These templates are released for no-cost public use.
Over the years, I’ve come to realize that “ETDR template” sounds way too technical to most students. That in itself becomes an obvious reason for putting off writing in the template, as in “I don’t have time for that right now; I’ll use it later.” The solution? I now tell students, “The ETDR template is simply a Word document with many cool, timesaving tools.”
Although graduate students are the primary users, faculty/staff and undergraduate students are starting to see the benefits of a writing template that can be easily modified to meet their needs. The template includes the following elements:
- A title page, abstract page, and copyright page
- An automated Table of Contents, List of Figures, and List of Tables
- Sophisticated page numbering that matches book format
- Text styles for headings, subheadings, citations, lists, tables, and more
- Download an ETDR template from http://k-state.edu/grad/etdr/template and use it NOW.
- Delete unwanted sections. (If needed later, copy/paste from another template.)
- Start writing in the template. Don’t worry about formatting.
- Meet with ETDR staff to learn how to add formats to your document by using styles.
Using the ETDR template: Two Views
I sometimes tell students about two doctoral students I helped several years ago. Both were in the same field and had completed their research; both started writing their dissertations at the same time.
One began writing in the doctoral template at the beginning and learning to use styles. Near the end, she elatedly reported, “It saved at least 50 percent of my time!” The other did her writing across several files, copy/pasting her data into the template near the end and learning how to apply styles. The latter was dismayed to realize, as she told me later, “The template would have saved at least 50 percent of my time if I’d used it from the beginning!”
A consolation note: No matter when you learn to use the ETDR template and Word styles, you will continue to save time the rest of your writing life.
Styles are the “power tools” in Word. Microsoft Word and K-State’s ETDR templates make use of a feature in Word called “styles”. A “style” is a named set of formatting characteristics, similar to vehicle styles (Ford’s “Mustang” or “Focus”) and clothing styles. In this case, a style is a combination of almost anything you can do to text, including font size, color, spacing, indentation, and so on.
Using styles saves a lot of time, especially in a long document. With a few easy clicks, you can:
- Easily change and modify selected text.
- Easily change a style and propagate the change globally to all instances where that style is used in your document.
For more information about styles, visit K-State’s ETDR website at http://k-state.edu/grad/etdr and do a search for “Styles”.
III. Use an automated Table of Contents. Save time with automation.
Instead of laboriously creating a Table of Contents (TOC), why not insert an automated one that pulls in all the headings and subheadings from your document? And when I say “laborious” I mean I’ve seen students who’ve had up to a 12-page Table of Contents that was manually typed and painstakingly created, with dot lines and page-number checking, over many hours of time.
On the bright side, an automated Table of Contents can be easily inserted, updated with a few clicks, to show the most current headings and related page numbers in a document. Any Table of Contents can also be manually tweaked to add special styles before converting to PDF for publication purposes.
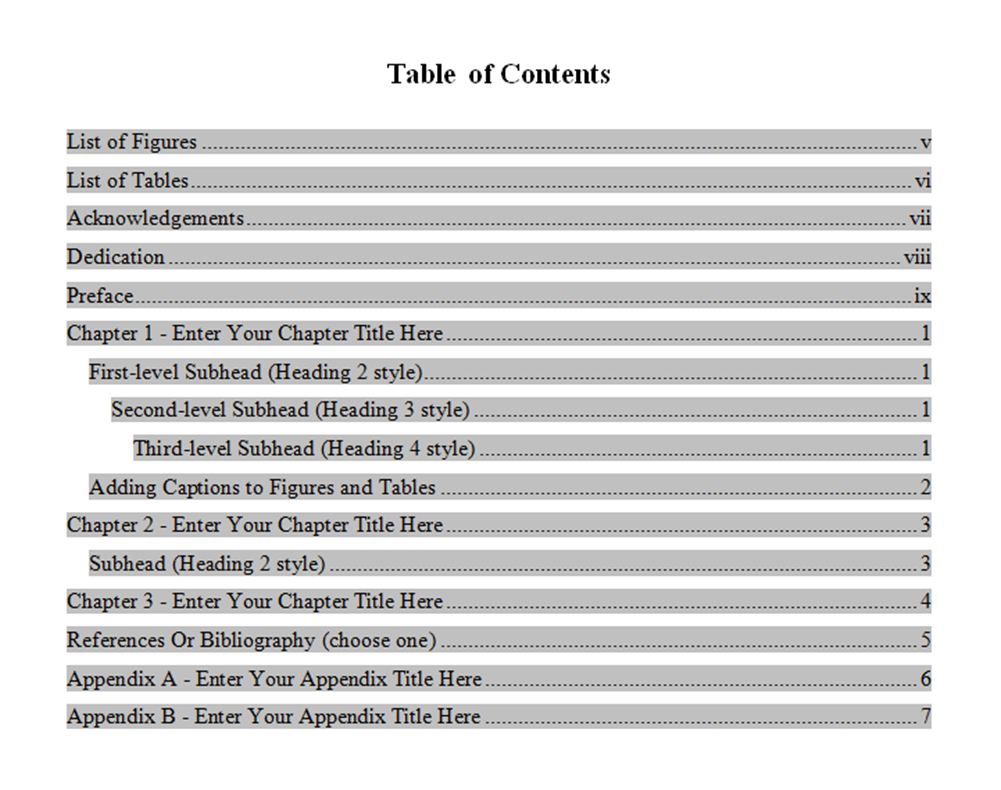
Below is an example of a Table of Contents in Word.
HOW TO: This shows how to use an automated Table of Contents:
- Place the cursor where needed and insert a Table of Contents: References tab > Table of Contents section > select Table of Contents choice.
- Do all your work in your document’s content, applying headings and subheadings as needed.
- Update the Table of Contents periodically to see the most current headings and page numbering:
Or, copy/paste a Table of Contents from an ETDR template.a. Put your cursor inside the TOC field, right-click, and select Update Field.
b. If a window pops up, select Update entire table and click OK.
The TOC in the ETDR templates is easy to copy/paste into any Word document. It has a few modifications beyond Word’s basic TOC.
- It doesn’t include the Abstract, Copyright, or Table of Contents headings. It starts with the List of Figures or List of Tables, if those are in the document.
- It is a full 6.5 inches wide, because it doesn’t have the default box outline that is around Word’s basic Table of Contents.
- It includes Headings 1 through 6. (Word’s default is 1 through 3.)
Relatedly, the List of Figures and List of Tables. In the same fashion, K-State’s ETDR templates also have automated fields to easily generate a List of Figures and a List of Tables when captions are properly applied to those elements. Feel free to copy/paste those sections into your Word document. Updating is done the same way:
a. Put your cursor inside the field, right-click, and select Update Field.
b. If a window pops up, select Update entire table and click OK.
IV. Use efficient tools for troubleshooting Word. Save time while problem-solving.
versions.
HOW TO: Home tab > Paragraph section > click Sort button (looks like A-Z)
I still recall how excited I was the first time I selected a multi-page bibliography and, with two clicks, had an alphabetically correct list.
Show/Hide button. This handy little button looks like a black paragraph mark and is on the Home tab of both Word for Windows and Word for Mac. When clicked, it displays a mark for every space, every blank line, tabs, and other special formatting you’ve added. Turn it on to see what’s really happening to your content, and turn it off again when all those extra marks get annoying.
Show/Hide is especially useful for:
- Finding and removing extra spaces and lines
- Checking for missing (or extra) paragraph breaks.
- Discovering what hidden things are affecting your content.
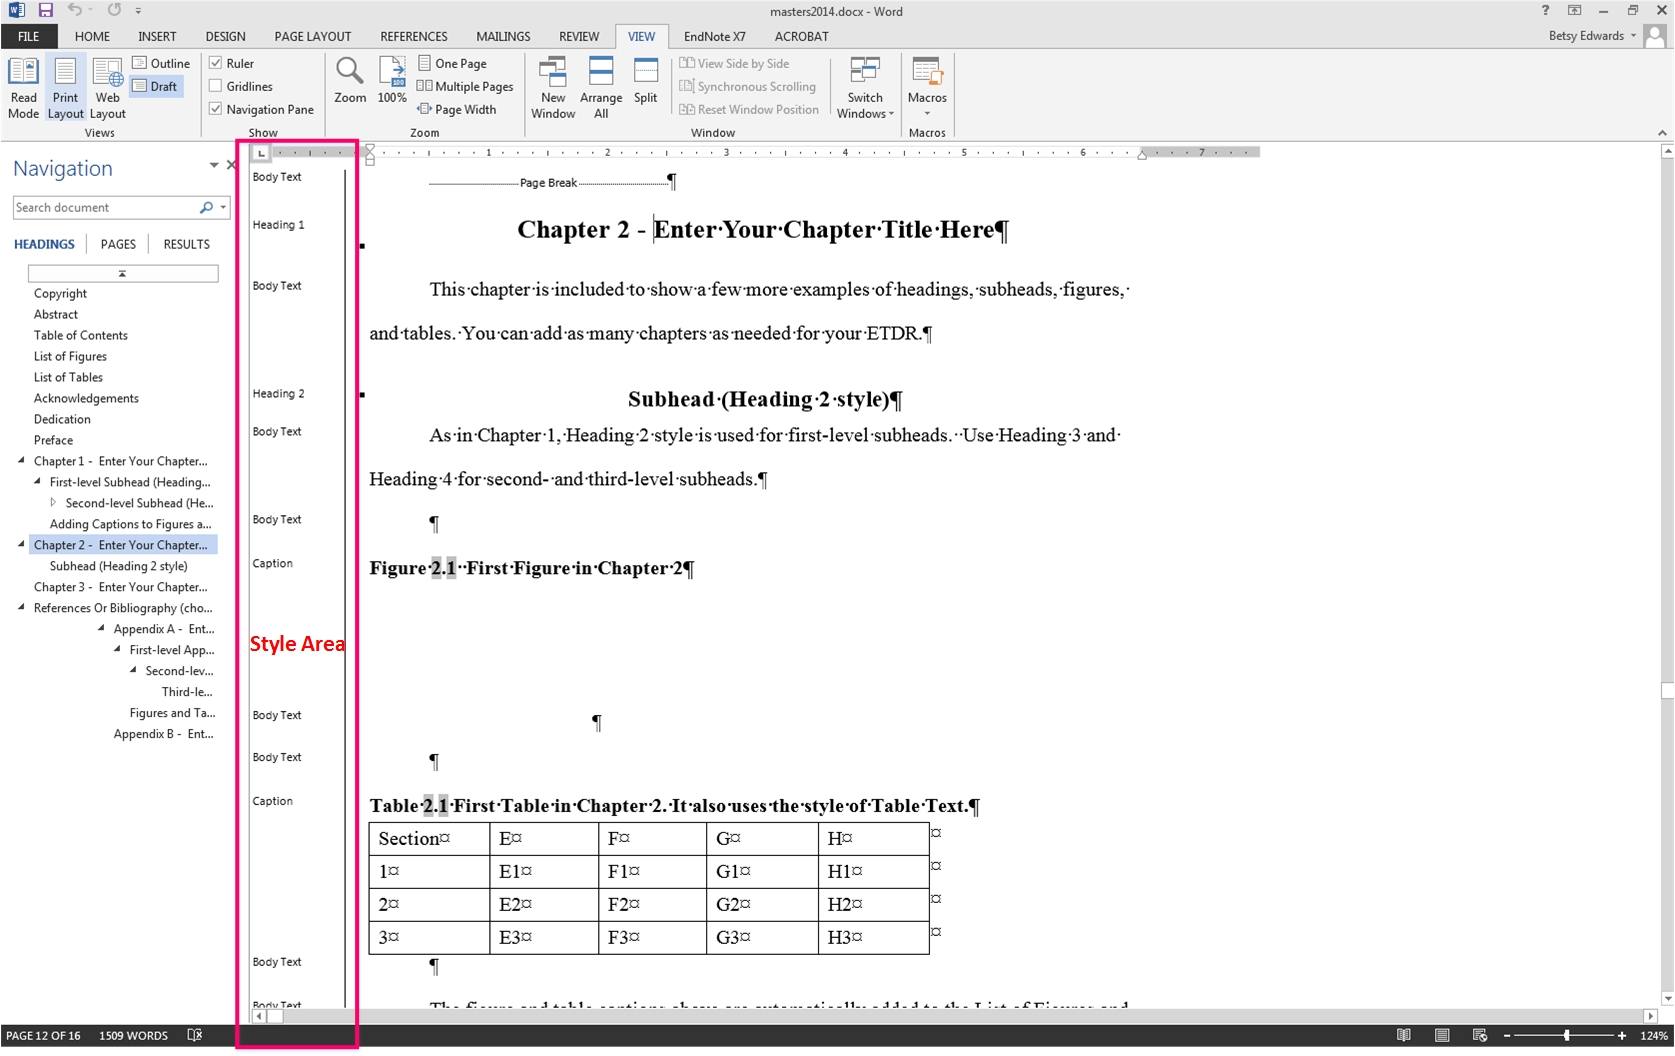
HOW TO: View tab > Views section > click Draft
The Draft view is useful because it shows the style used on every element in Word, meaning every item that is followed by a paragraph break. That includes each separate line, paragraph, figure, heading, etc. Oftentimes, fixing a Word problem is simply a matter of changing the style assigned to that one element.
One caveat: Draft view is basically a text view of all your content, so it may not show some figures and complex data. Don’t panic if you’re in Draft view and some of your information appears to be missing. Just go back to Print Layout, which is the master view in Word.
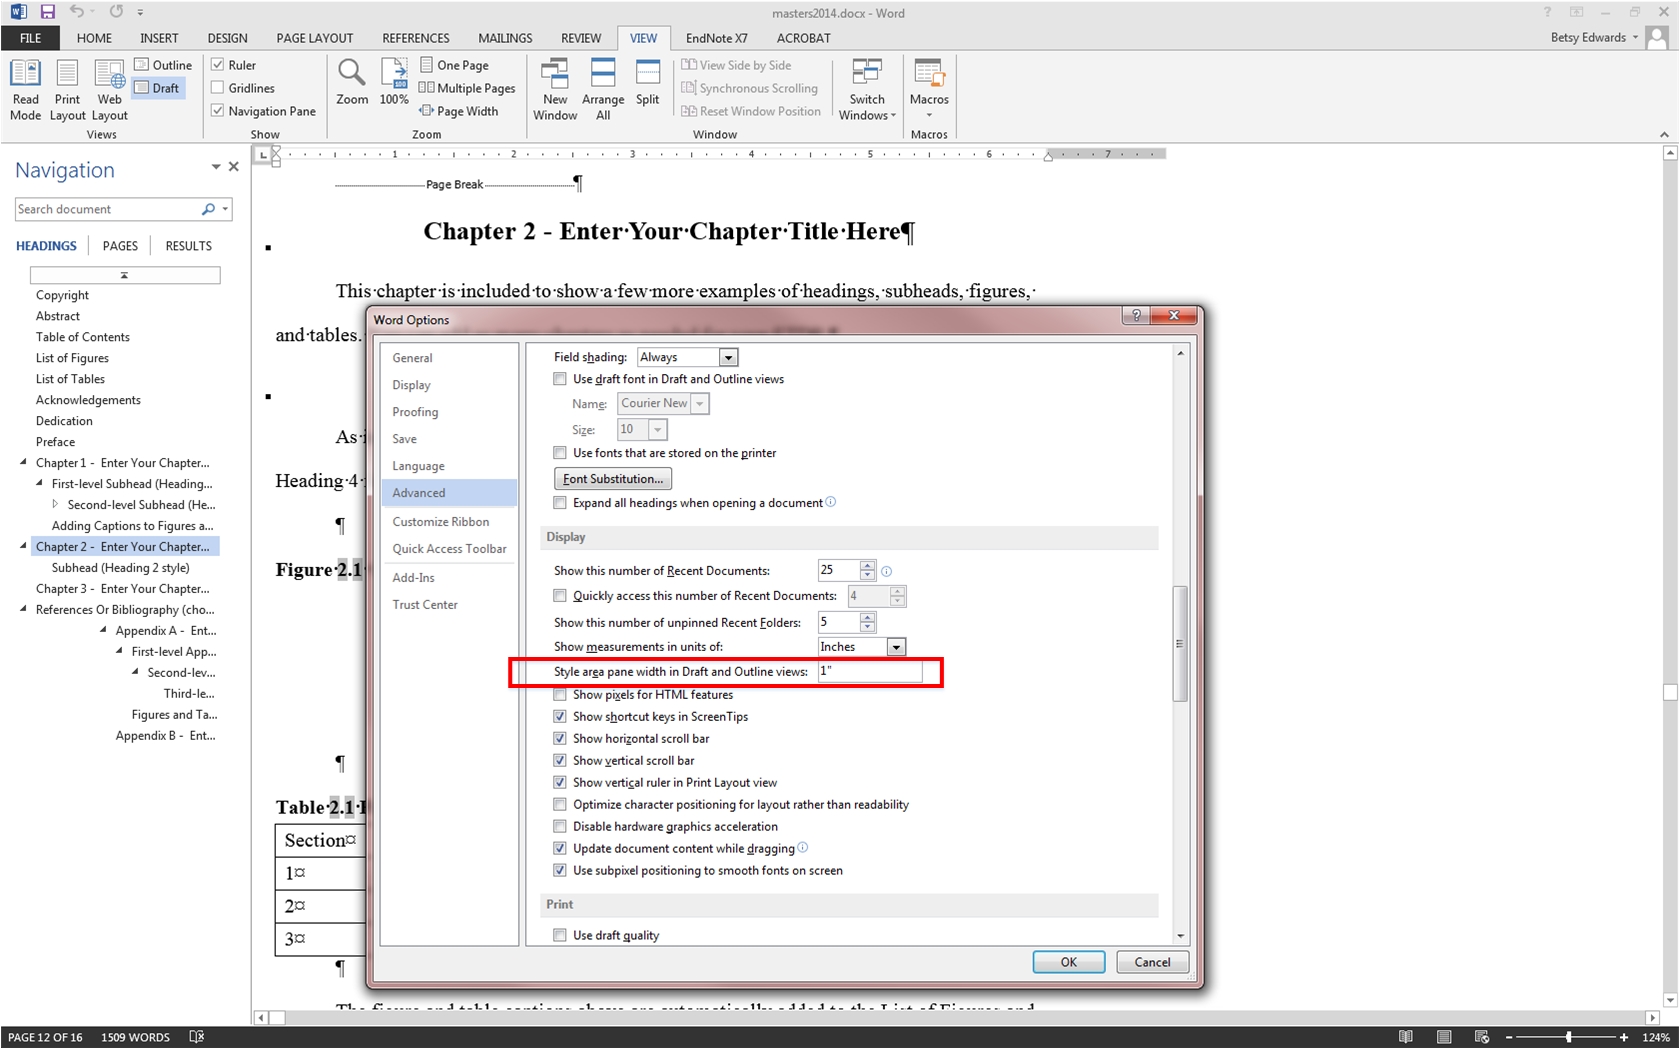
When you first open the Draft view, you won't see the "Style Area" that displays the style associated with each element. You must change a default Word setting in your document. Here's the process:
- File > in the left column, select Options.
- In the left column of the Word Options window, select Advanced.
- In the main content, scroll down and find the Display section.
- Find "Style area pane width in Draft and Outline views".
- Change 0" to 1" and click OK.
Now when you go to the Draft view, the Style Area will be displayed at the left side of your content. You can grab the vertical line to resize the Style Area or remove it from view.
Mac users can get the Draft view by clicking View and then Draft. But it's much easier to change the Style Area setting on a Mac.
HOW TO (Mac): Word > Preferences > View > in the Window section, change Style Area width to 1" and then click OK.
Summary
In closing, use navigation timesavers to jump to content instead of scrolling; use Word templates (and / or create your own); use automated features, such as Table of Contents, List of Figures, etc.; explore Word's other features, and find those efficient tools, such as the Sort and Show/Hide features.
About the Author
Betsy Edwards is a web/information specialist in Information Technology Services at Kansas State University. In addition to being a long-time editor and writer for IT communications, she has been providing consulting support since 2007 for the Electronic Theses, Dissertations, and Reports (ETDR) service for K-State graduate students and faculty/staff. Her email is betsy@k-state.edu.
| Previous page on path | Cover, page 9 of 21 | Next page on path |
Discussion of "Top Timesavers in Microsoft Word 2013"
Add your voice to this discussion.
Checking your signed in status ...