Adding Media and Annotations
This section describes functionality in Scalar's page editor, which is accessed by clicking the ![]() icon (if creating new content) or the
icon (if creating new content) or the ![]() icon (if editing existing content) in your Scalar header bar.
icon (if editing existing content) in your Scalar header bar.
Adding media to your page is done through links in the page editor. Media can be added in one of two ways: as a media link and as inline media.
Adding Media Links
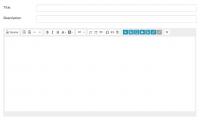
You can add media to your page content by selecting the text you'd like to link and clicking on the first blue media button seen at the top of the text editor. This will insert a media object on the page and create a hyperlink to it with the text you've selected. Clicking on the hyperlink will scroll readers to the media object on the page and highlight it. In the case of time-based media, clicking on its corresponding hyperlink will also start the play-head. Finally, adding media in this way will allow Scalar to cite the full paragraph in which the media object is referenced in the media "Citations" view.
Adding Inline Media
If, however, you want to embed your media in the page at a specific location in the more traditional style, you can use the second blue media button . This will insert an inline reference to a Scalar media file that will be embedded in the page at the selected location.
Formatting Media
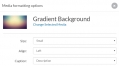
Once you've selected the media you'd like to insert, whether as a media link or as inline media, you'll be prompted to choose options for formatting the media. Using the media formatting options select the following display preferences:- Size. Choices include “Small” (206px wide), “Medium” (412px wide), “Large” (620px wide), “Full” (maximum width of the page), and “Native” (the original size of the media up to the maximum width of the page).
- Alignment. Choices include "Left" (aligned left), "Center" (aligned center) [for inline media only], and "Right" (aligned right).
- Caption. Choices include "Description" (the description for the media object will be displayed), "Title" (the title of the media object will be displayed), "Title and description" (the title and description for the media object will be displayed), and "None" (neither title nor description will be displayed).
Reformatting and Re-selecting Media
To change the size, alignment, caption, and annotation display options for media already added to a page, follow the steps below:For linked media: Click on the hyperlink for the linked media in the text editor and select the gear icon that pops up over the thumbnail of the media. Then change the setting in the media formatting options.
For inline media: Click on the grey box for the media object and then select the gear icon that pops up over the thumbnail of the media. Then change the setting in the media formatting options.
To change the media object you'd like to display, follow the steps below:
For linked media: Click on the hyperlink for the linked media in the text editor and select the gear icon that pops up over the thumbnail of the media. Then click on "Change Selected Media."
For inline media: Click on the grey box for the media object and then select the gear icon that pops up over the thumbnail of the media. Then click on "Change Selected Media."
Displaying Media Annotations
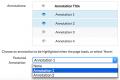
If the media you're adding has annotations, the media formatting options described above will also include options for displaying them. Under “Annotations” click to select which annotations will appear when the media object loads on the page. Clicking the eye icon next to “Annotation Title,” at the top of the menu, will alternately select and de-select all annotations in the list. Once you’ve selected to display at least one annotation you’ll also be given the option, under “Featured annotation,” to choose which annotation will be highlighted in blue below the media object on page load.Let's use an example. You have an image for which you've created four separate annotations--that is, you've previously annotated that image by drawing out four separate areas to which you'd like to call your readers' attention. You'd like to discuss two of those annotations in one paragraph (for example, two areas of a historical map) and the other two in a following paragraph (two other areas of the same map). Simply add the media object to the first paragraph by selecting the relevant text and clicking the first media button; after choosing the size, alignment and caption for the media, select the two annotations you'd like to discuss and then select whether you'd also like either one of those annotations to be featured--to be highlighted in blue below the media object. Then do the same on the next paragraph, this time choosing the other two annotations.
By selecting no annotations, one can also use the annotation display options to display a "clean" version of a piece of media that has been annotated.