6B: The Editing Interface and the DNA of Sound
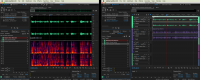
The image below compares the two basic workspaces (also called the “interfaces”) in Audition. Unlike Photoshop and Illustrator, the basic toolbar is located horizontally across the top of the workspace, not vertically down the left side. The basic toolbar in Audition is also much simpler than Photoshop or Illustrator: There are only seven tools, compared to more than a dozen. Furthermore, you really only need two of the basic Audition tools: the Razor tool and the Time Selection Tool to edit basic audio. The Razor tool looks like a razor blade and the Time Selection Tool looks like a capital letter “I,” and it works much like a cursor in a word processor.
But the interfaces involve much more than just the physical tools that artists use to create and edit sound files. The “waveform” workspace on the left and the “multitrack” interface on the right are so similar because both are designed according to the science of sound. They make it easy for you to edit and create all kinds of sound files, such as podcasts, music, and soundtracks.
At first glance, the Audition workspaces and interfaces might seem very technical and complicated to a novice, but they’re actually easy to use if you focus only on the basics of editing. Think of a sound file like a word processing document. A word processing file is made up of words and sentences that you input, cut, copy, paste, and format. In Audition, you do the same: You create a sound file that’s made up of sounds that you input, cut, copy, paste, and format.
Before you begin to input, cut, copy, paste, and format in Audition, first you need to learn how to read the central workspace. The workspace on the left examines a single audio file, titled “vocal narration.wav,” which is a recording of someone’s voice. The workspace on the right includes a vertical stack of multiple sound files, including “narration vocal” and “background music.” You’re probably aware that sound travels in waves, and the top Timelines (in green) in both of the interfaces look like waves. Every bulge you see there is more or less a different word spoken by the narrator. So, if you want to find places to cut or re-arrange those sounds, just like a word-processor, you can use the Time Selection tool like a cursor to select words and then delete them or move them around.
In both interfaces, the top Timeline has two green “channels” of sound that look like waves. The top channel controls the left side of stereo sound, and the bottom controls the right channel — you can most easily tell the left side of a stereo recording from the right when you wear headphones that isolate each channel. Of course, in the real world, sounds do not seem as separated at they do in earphones, but there are actually subtle differences that your left ear and right ear can tell apart in the natural world, depending upon which side of your head is closer to the source of a sound. Thus, the interface in Audition has left and right channels for stereo sound according to the science of how ears typically work, with left and right “depth” of sound reception.
In both interfaces, the green Timelines that look like waves are actually indicating the volume of the sounds (measured in units called decibels). The thicker the bulge, the louder the sound, and the thinner the bulge, the quieter the sound. In the left interface, the bottom Timeline (in red, yellow, orange) is measured according to the frequency of the sound, not the volume. A soprano opera singer who reaches very high notes would produce lots of red and orange color at the top of this graph, but a male bass singer’s low notes would produce more color at the bottom of the graph. The intensity of the color in the bottom graph represents volume: the brighter the graph, the louder the sound. It’s not all that important that you understand the fine points of these sound graphs. You just need a basic sense of how the graphs represent sounds so that you can input, cut, copy, paste, and adjust them — to edit sounds like you edit texts.
The right interface is called the “multitrack” workspace. You can toggle between the left “waveform” workspace and the right “multitrack” workspace by clicking those buttons in the top-left corner of the Audition interface. This example of a multitrack workspace is comprised of two tracks being used to create a podcast, although you can see space in the example for four tracks. The top track in green (labeled Track 1) is a recording of a vocal narration for the podcast. You can use the record function in Audition to capture or input narration directly into your sound file by clicking the red circle in the center at the bottom of the pane (you must configure your microphone inputs for this to work). The bottom track in purple (labeled Track 2) is musical background for the podcast that was downloaded from a Creative Commons source and inputted into this Audition project.
Take a minute to compare in the right multitrack interface the green Track 1 with the purple Track 2. Which seems like it represents human speech? Which seems like it represents rhythmic music?
Now, you’re getting the idea. The purple Track 2 is clearly music because it has a regular rhythm that comes from the drumbeat. The human voice in the green Track 2 is more organic and less rhythmic, so it isn’t as regular or symmetric as the music file. The visualization of the sounds in the form of waves on a graph make it easy for you to manipulate these sounds. And the purpose of the multitrack workspace is to enable you to edit multiple tracks of sound independently. For example, if you look at the thickness of the green vocal track compared to the purple music track, you can tell that the voice is too quiet and will be drowned out by the music. The multitrack workspace allows you to easily adjust the volume of the music until it’s quiet enough to fade into the background so that when you compose your podcast, the voice will be out front and the music will be in the backdrop.
Bands that play and record popular music are often comprised of different musicians playing different instruments. Multitrack recording devices were invented to make recording such bands easy: one track for the lead vocals, with other tracks for background vocals, drums, guitars, bass, horns, etc. — as many tracks and instruments as you want! In Photoshop and Illustrator you can build your visual compositions with multiple layers. In Audition and Premiere Pro, you can build audio compositions with multiple tracks. In a basic podcast, you’re likely to only need two or three tracks, with one track for every source you input: vocal narration, interviews, musical background, and maybe some ambient sounds or sound effects. So, your sound files are likely to only have three or four tracks at the most.
Of course, reading and writing about sound editing in Audition (as you are here) is probably not as effective as listening to an actual sound file and seeing the editing happening in real time, like you can in a tutorial. The point of the description of the Audition interface and the DNA of sound is to provide fundamental concepts for how sound operates and how sound recording and editing are done. Now that you’ve browsed through the basics of the Audition workspace, let’s return to the analogy of comparing a word processor to an audio editor, because their basic operations are similar and simple — and because you can use your experience with a word processor to get going quickly with Audition.
| Word processor | Audio editor | |
| Input | Use the keyboard to input text at the point of the cursor. | Import sound files from other sources or record your own sound files directly into Audition using the record function. (Set up your mics and hit the red “record” circle.) |
| Cut | Use the cursor to select the text you want to delete and hit “Delete” or “Cut.” | Use the Time Selection cursor (shaped like a capital letter “I”) to select the sounds you want to delete and hit “Delete” or “Cut.” |
| Copy | Use the cursor to select the text you want to copy and hit “Copy” or “Command-c.” | Use the Time Selection cursor to copy and hit “Copy” or “Command-C.” |
| Paste | Place the cursor in the text where you want to paste other text that you’ve put into your clipboard and hit “Paste” or “Command-V.” | Place the Time Selection cursor in the sound file where you want to paste other sound that you’ve put into your clipboard and hit “Paste” or “Command-V.” |
| Format | Use the cursor to select the text you want to format (font size, color, style, etc.) and use buttons and menu options to change the look of the text. | Use the Time Selection cursor to select the sound you want to format (volume, reverb, pitch, etc.) and use sound effects and menu options to change the sound of the selection. |
| Correct | Word processors put squiggly warning lines under words that might be misspelled or ungrammatical. | The audio level meter turns to red when the sound is too loud and distorted. |